При использовании мобильного приложения Skype for Business, вверху экрана возникает ошибка:
Не удаётся подключиться к Exchange. Повторите попытку позже.
или
We can’t connect to the server. Check your network connection and server address, the try again.
При этом, пользователю не удается просмотреть информацию о собраниях в мобильном приложении. Так происходит потому, что Skype for Business не может подключиться к EWS (Exchange Web Services) Exchange.
Одно из решений данной проблемы — прописать ссылку до EWS вашего Exchange.
Входим в настройки приложения, кликнув на своё изображение.
В настройках переходим в настройки Exchange:

Вводим вашу внешнюю ссылку на EWS. Она будет примерно такого вида: https://externalmail.bgelov.ru/ews/exchange.asmx.

Проверить, что внешняя ссылка EWS рабочая можно через браузер. Перейдя по ней из вне и введя пароль, вы получите такую страницу:

Возвращаемся назад. Возможно, понадобится перезапустить приложение.
Ошибка пропадает и у нас в мобильном клиенте Skype for Business начинают отображаться встречи из Exchange:


 (9 оценок, среднее: 4,78 из 5)
![]() Загрузка…
Загрузка…
| ms.date | title | ms.reviewer | ms.author | author | manager | audience | ms.topic | ms.service | f1.keywords | ms.localizationpriority | ms.collection | ms.assetid | description |
|---|---|---|---|---|---|---|---|---|---|---|---|---|---|
|
03/17/2018 |
Plan to integrate Skype for Business and Exchange |
serdars |
SerdarSoysal |
serdars |
ITPro |
conceptual |
skype-for-business-server |
NOCSH |
medium |
IT_Skype16 |
ea22beb9-c02e-47cb-836d-97a556969052 |
Summary: Review this topic for information about how to integrate Skype for Business Server with Exchange Server 2016 or Exchange Server 2013. |
Plan to integrate Skype for Business and Exchange
Summary: Review this topic for information about how to integrate Skype for Business Server with Exchange Server 2016 or Exchange Server 2013.
Before you can integrate Skype for Business Server and Exchange Server, you must ensure that both Exchange Server and Skype for Business Server are fully installed and up and running.
For details about installing Exchange Server, see the Exchange Server Planning and Deployment documentation for your version of Exchange.
After the servers are up and running, you must assign server-to-server authentication certificates to both Skype for Business Server and Exchange Server; these certificates allow Skype for Business Server and Exchange Server to exchange information and to communicate with one another. When you install Exchange Server, a self-signed certificate with the name Microsoft Exchange Server Auth Certificate is created for you. This certificate, which can be found in the local computer certificate store, should be used for server-to-server authentication on Exchange Server. For details about assigning certificates in Exchange Server, see Configure Mail Flow and Client Access.
For Skype for Business Server you can use an existing Skype for Business Server certificate as your server-to-server authentication certificate; for example, your default certificate can also be used as the OAuthTokenIssuer certificate. Skype for Business Server allows you to use any Web server certificate as the certificate for server-to-server authentication provided that:
-
The certificate includes the name of your SIP domain in the Subject field.
-
The same certificate is configured as the OAuthTokenIssuer certificate on all of your Front End Servers.
-
The certificate has a length of at least 2048 bits.
For details about server-to-server authentication certificates for Skype for Business Server, see Assign a server-to-server authentication certificate to Skype for Business Server.
After the certificates have been assigned, you must then configure the autodiscover service on Exchange Server. In Exchange Server, the autodiscover service configures user profiles and provides access to Exchange services when users log on to the system. Users present the autodiscover service with their email address and password; in turn, the services provide the user with information such as:
-
Connection information for both internal and external connectivity to Exchange Server.
-
The location of the user’s Mailbox server.
-
URLs for Outlook features such as free/busy information, Unified Messaging, and the offline address book.
-
Outlook Anywhere server settings.
The autodiscover service must be configured before you can integrate Skype for Business Server and Exchange Server. You can verify whether or not the autodiscover service has been configured by running the following command from the Exchange Server Management Shell and checking the value of the AutoDiscoverServiceInternalUri property:
Get-ClientAccessServer | Select-Object Name, AutoDiscoverServiceInternalUri | Format-List
If this value is blank, you must assign a URI to the autodiscover service. Typically this URI will look similar to this: https://autodiscover.litwareinc.com/autodiscover/autodiscover.xml
You can assign the autodiscover URI by running a command similar to this:
Get-ClientAccessServer | Set-ClientAccessServer -AutoDiscoverServiceInternalUri "https://autodiscover.litwareinc.com/autodiscover/autodiscover.xml"
For details about the autodiscover service, see Autodiscover Service.
After the autodiscover service has been configured, you must then modify the Skype for Business Server OAuth configuration settings; this ensures that Skype for Business Server knows where to find the autodiscover service. To modify the OAuth configuration settings in Skype for Business Server, run the following command from within the Skype for Business Server Management Shell. When running this command, be sure that you specify the URI to the autodiscover service running on your Exchange Server, and that you use autodiscover.svc to point to the service location instead of autodiscover.xml (which points to the XML file used by the service):
Set-CsOAuthConfiguration -Identity global -ExchangeAutodiscoverUrl "https://autodiscover.litwareinc.com/autodiscover/autodiscover.svc"
[!NOTE]
The Identity parameter in the preceding command is optional; that’s because Skype for Business Server only allows you to have a single, global collection of OAuth configuration settings. Among other things, that means that you can configure the autodiscover URL by using this slightly-simpler command:[!NOTE]
Set-CsOAuthConfiguration-ExchangeAutodiscoverUrl «https://autodiscover.litwareinc.com/autodiscover/autodiscover.svc»[!NOTE]
If you are unfamiliar with the technology, OAuth is a standard authorization protocol used by a number of major websites. With OAuth, user credentials and passwords are not passed from one computer to another. Instead, authentication and authorization is based on the exchange of security tokens; these tokens grant access to a specific set of resources for a specific amount of time.
In addition to configuring the autodiscover service, you must also create a DNS record for the service that points to your Exchange Server. For example, if your autodiscover service is located at autodiscover.litwareinc.com you will need to create a DNS record for autodiscover.litwareinc.com that resolves to the fully qualified domain name of your Exchange Server (for example, atl-exchange-001.litwareinc.com).
If you are integrating Skype for Business Server with Exchange Online, your next steps are in Configure integration between on-premises Skype for Business Server and Outlook Web App, otherwise see Integrate Skype for Business Server with Exchange Server.
Feature support
[!Important]
Skype for Business Online was retired on July 31, 2021. The Exchange integrations listed below that include the service are no longer supported.
The following table details the features supported under various combinations of online or on premises for Exchange and Skype for Business.
| Exchange 2016/2013/2010 (on premises) + Skype for Business Server (on premises) | Exchange Online + Skype for Business Server (on premises)** | **Exchange 2010 (on premises) + Skype for Business Online | Exchange 2016/2013(on premises) + Skype for Business Online** | **Exchange Online + Skype for Business Online | |
|---|---|---|---|---|---|
| Presence in Outlook | Y | Y | Y | Y | Y |
| Respond via IM, PSTN Call, Skype Call or Video Call from an Outlook email | Y | Y | Y | Y | Y |
| Schedule and join online meetings through Outlook | Y | Y | Y | Y | Y |
| Presence in Outlook Web App | Y | Y | N | N | Y |
| Respond via IM, PSTN Call, Skype Call or Video Call from an OWA email | Y | Y | N | N | Y |
| Schedule and join online meetings through Outlook Web App | Y | Y | N | N | Y |
| IM/Presence in Mobile Clients | Y | Y | Y | Y | Y |
| Join online meetings in Mobile clients | Y | Y | Y | Y | Y |
| Publish status based on Outlook calendar free/busy information | Y | Y | Y | Y | Y |
| Contact List (via Unified Contact Store) | Y (need Exchange 2016/2013) | Y | N | N | Y |
| High-resolution Contact Photo (Requires Lync 2013 or Skype for Business clients at a minimum. Not supported for LWA, mobile apps, Lync 2010, Lync for Mac, and other older clients.) | Y (need Exchange 2016/2013) | Y | N | Y | Y |
| Meeting delegation | Y | Y | Y | Y | Y |
| Missed Conversations history and Call Logs are written to user’s exchange mailbox | Y | Y | Y | Y | Y |
| Archiving Content (IM and Meeting) in Exchange | Y (need Exchange 2016/2013) | Y | N | N | Y |
| Search archived content | Y (need Exchange 2016/2013) | Y | N | N | Y |
| Exchange UM Voice Mail | Y | Y | N | N | N |
| Server Side Conversation History | Y | Y | N | Y | Y |
[!NOTE]
There is a Cloud Voicemail service which is supported for Skype for Business Online, Skype for Business Server 2019, Skype for Business Server 2015, and Lync Server 2013.
See also
Configure integration between on-premises Skype for Business Server and Outlook Web App
Configure OAuth between Skype for Business Online and Exchange on premises
Integrate Skype for Business Server with Exchange Server
How to integrate Exchange Server 2013 with Lync Server 2013, Skype for Business Online, or a Lync Server 2013 hybrid deployment
Configure partner applications in Skype for Business Server and Microsoft Exchange Server
Skype для бизнеса иногда может попросить вас снова ввести свои учетные данные, хотя вы уже делали это несколько раз. Эта проблема становится еще более раздражающей, когда приложение постоянно предлагает вам ввести свои учетные данные.
Более того, приложение также сообщает вам, что, пока вы снова не введете учетные данные, вы можете увидеть устаревшую информацию в Skype для бизнеса. Давайте посмотрим, какие методы устранения неполадок вы можете использовать, чтобы решить эту проблему.
Исправьте ошибку Skype «Exchange требует ваших учетных данных»
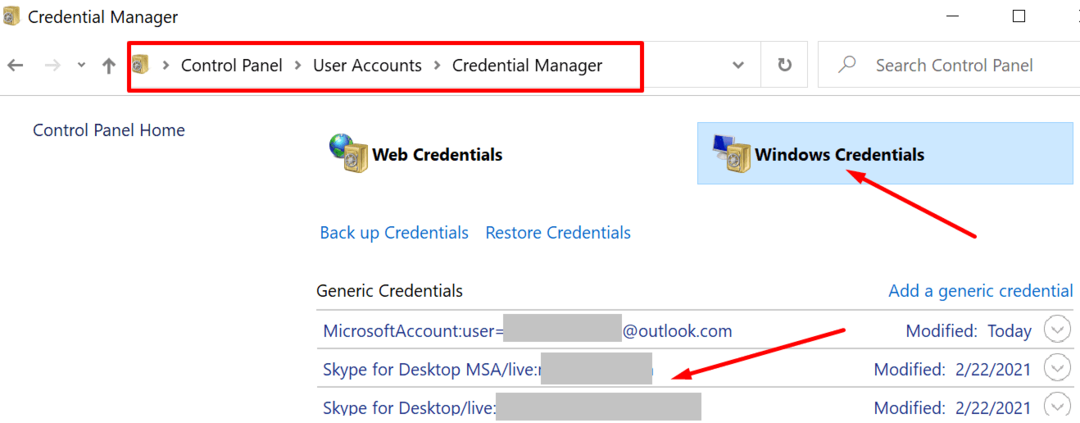
Очистите свои учетные данные
Попробуйте удалить учетные данные, которые вы сохранили на своем компьютере, и проверьте результаты.
- Откройте панель управления, введите ‘учетные данные‘В строке поиска и нажмите Enter.
- Щелкните Диспетчер учетных данных и выберите Учетные данные Windows.
- Начните с удаления учетных данных Skype и Office. Проверьте, исчезла ли проблема. Если проблема не исчезнет, удалите все свои учетные данные Office и Microsoft.

- Снова запустите Skype, войдите в свою учетную запись и убедитесь, что приложение снова предлагает вам ввести свои учетные данные.
Не забывайте проверять обновления. Установите последнюю версию Skype для бизнеса и проверьте, сохраняется ли проблема.
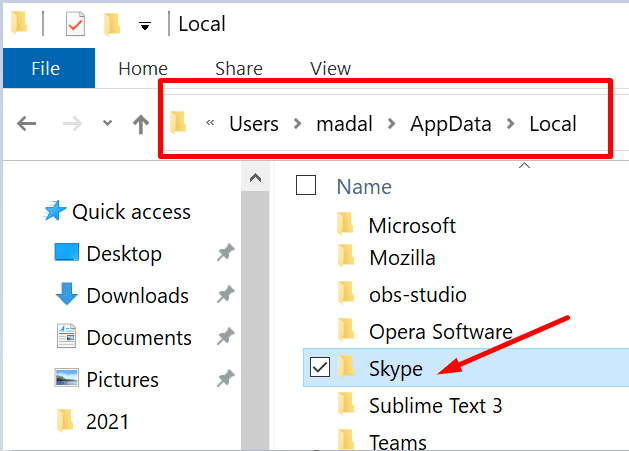
Удалить локальные данные приложения
Ваша локальная папка AppData — это место, где Skype хранит кеш приложения и все временные файлы, созданные во время ваших онлайн-сессий. Попробуйте удалить локальную папку AppData и проверьте, исчезла ли проблема.
- Дважды щелкните на Этот ПК и перейдите к C: Users Имя пользователя AppData Local.
- Затем найдите и удалите папку Skype.
- Перезапустите приложение, войдите в систему и проверьте, просит ли Skype по-прежнему вводить ваши учетные данные.
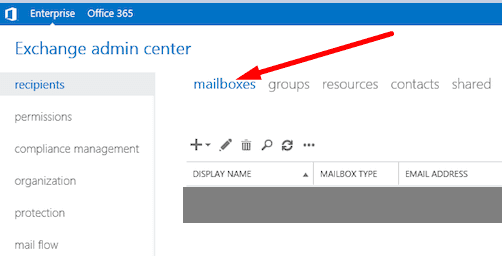
Проверьте свой UPN, основной SMTP и SIP-адреса
Убедитесь, что вы используете один и тот же адрес в качестве адреса SMTP (Outlook), SIP (Skype для бизнеса) и UPN (основного имени пользователя).
- Перейдите в центр администрирования Exchange и выберите Почтовый ящик. Если у вас нет доступа к центру администрирования, обратитесь к администратору.
- Затем выберите проблемный почтовый ящик и адрес электронной почты, который вы хотите отредактировать.
- Ваш адрес Outlook и Skype для бизнеса должен совпадать с вашим UPN-адресом. Убедитесь, что они настроены правильно.
- Перезапустите Skype для бизнеса и Outlook и проверьте, нужны ли ваши учетные данные Exchange.
Кроме того, убедитесь, что ваш персональный информационный менеджер синхронизирует ваши контактные данные Skype и Exchange.
- Для этого запустите Skype для бизнеса и выберите Инструменты.
- Затем перейдите к Параметры и нажмите на Личные.
- Включите параметр, который позволяет вашему компьютеру Синхронизация контактной информации между Skype для бизнеса и Exchange.
- Снова запустите Skype для бизнеса и проверьте, решил ли этот метод проблему.

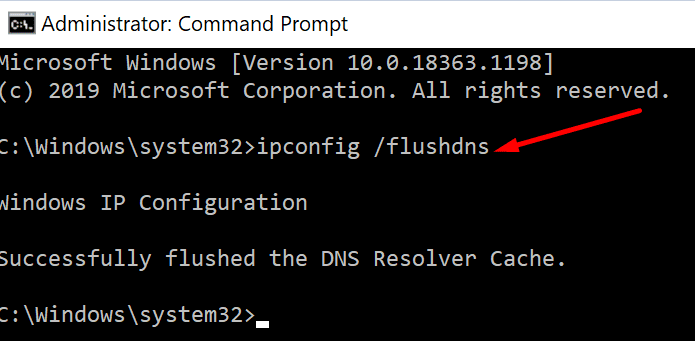
Очистить DNS
- Полностью выйдите из Skype и запустите командную строку с правами администратора.
- Введите ipconfig / flushdns и нажмите Enter, чтобы удалить кеш DNS.
- Затем запустите gpupdate / force также для принудительного обновления групповой политики.
- Снова запустите приложение и проверьте результаты.
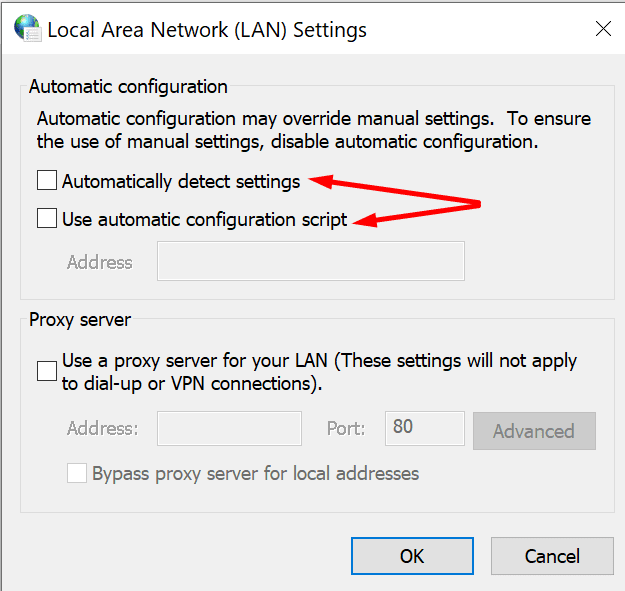
Используйте правильные настройки прокси
- Закройте Skype для бизнеса.
- Тип ‘настройки интернета‘На панели поиска Windows и выберите Подключения таб.
- Затем нажмите на Настройки LAN.
- Давать возможность Автоматически определять настройки если опция отключена.
- Примечание: Если ваша организация использует определенные параметры прокси-сервера или специальный сценарий конфигурации, обратитесь к своему ИТ-администратору.
- Снова запустите приложение и проверьте, по-прежнему ли оно предлагает вам ввести свои учетные данные.
Удалите папку [email protected]
- Закройте Skype для бизнеса и перейдите к % UserProfile% AppData Local Microsoft Office 15.0 Lync.
- Найдите папку, которая начинается с [email protected].
- Удалите его и не делайте ничего в течение одной минуты.
- Затем снова запустите Skype для бизнеса, войдите в систему и проверьте, сохраняется ли проблема.
Кроме того, попробуйте использовать идентификатор электронной почты в качестве имени пользователя вместо вашего домена имени пользователя. Удалите также свой пароль Skype из диспетчера паролей.
Включить аутентификацию ADAL
Ряд пользователей решили эту проблему, включив аутентификацию в Azure Active Directory Authentication Library (ADAL).
- Тип cmd на панели поиска Windows щелкните правой кнопкой мыши командную строку и выберите Запустить от имени администратора.
- Введите следующую команду и нажмите Enter. — reg добавить HKEY_CURRENT_USER Software Policies Microsoft Office 16.0 Lync / f / v AllowAdalForNonLyncIndependentOfLync / t REG_DWORD / d 1
- Снова запустите Skype.
Заключение
Если Skype для бизнеса не удается подключиться к веб-службам Exchange, приложение может постоянно предлагать вам ввести свои учетные данные. Чтобы решить эту проблему, очистите свои учетные данные и разрешите Skype для бизнеса и Exchange синхронизировать контактную информацию.
Сообщите нам, если Exchange по-прежнему нужны ваши учетные данные после выполнения всех шагов, перечисленных в этом руководстве.
Описание
Панель управления предназначена для управления почтовым сервисом Microsoft Exchange и сервисом Skype for Business.
Сервисы предназначены для совместной работы сотрудников в организациях и их филиалах. Microsoft Exchange и Skype for Business тесно интегрируются с большинством продуктов Microsoft, имеют ряд инструментов для постановки и ведения задач.
Функции
С помощью панели управления возможно:
- Создание пользователей организации, почтовых ящиков, групп рассылок, контактов.
- Изменение атрибутов пользователей
- Сброс паролей пользователя
- В планах почтовых ящиков поддерживается настройка:
- протоколы подключения
- квоты на объём создаваемых ящиков
- квоты на размер получаемого/отправляемого письма
- оповещение и запрет на отправку писем при превышении достижимого объёма.
- Настройка Sip Домена для Skype for Business
- Проверка и детализация политик, применяемых на пользователя
- Оценка использования назначенных на организацию Заказчика квот
- Настройка синхронизации атрибутов учетных записей и паролей с помощью AD Sync, между локальным каталогом Active Directory и облачным каталогом Softline
Тарифные планы
Сервис Виртуальный офис позволяет использовать различные тарифы на объединенные коммуникации. Тарифные планы имеют различия по своим функциональным особенностям и ценовым политикам.
По вопросам тестового использования, приобретения или смене тарифного плана, рекомендуем обратиться к Вашему персональному менеджеру.
| Функционал | Тарифы | ||
| Простой | Почтовый | Корпоративный | |
| Цена | 250 ₽/мес | 500 ₽/мес | 850 ₽/мес |
| Размер почтового ящика | 5 Гб | 10 Гб | 15 Гб |
| Протоколы POP3/IMAP/MAPI * | POP3/IMAP | POP3/IMAP/MAPI | POP3/IMAP/MAPI |
| Единая система обмена сообщениями | |||
| Календари и контакты | Личные календари и контакты |
Общие календари и контакты |
Общие календари и контакты |
| Личный архив | |||
| Система OWA ActiveSync | |||
| Отмена кэширования в Outlook | |||
| Доступ к Exchange ActiveSync ** | |||
| Общий почтовый ящик OWA | |||
| Управление записями журнала | |||
| In-place hold enabled | |||
| Хранение для судебного разбирательства | |||
| Аудио-, видео- и веб-конференции. Общение через сеть Skype внутри сервиса.*** |
*POP3 — протокол для приема сообщений электронной почты.
IMAP — более современный протокол, поддерживающий прием и возможность управления электронной почтой прямо на почтовом сервере.
При стандартных настройках Exchange протоколы POP3 и IMAP не поддерживают расширенные функции совместной работы, например ведение календаря, контакты и задачи. К примеру при использовании тарифа «Простой», без использования ActiveSync, не возможно синхронизировать календари, задачи и контакты между почтовым клиентом и сервером Exchange, а так же не будут доступны общие календари, задачи и контакты в подписке.
** Exchange ActiveSync — это протокол синхронизации мобильного устройства (включая локальные почтовые клиенты) с сервером электронной почты Microsoft Exchange поверх протокола HTTP/HTTPS, позволяет почтовым приложениям получать доступ к электронной почте, календарю, контактам и задачам и работать с этой информацией без подключения к Интернету.
*** Skype for Business — в рамках тарифа Корпоративный, пользователи могут воспользоваться дополнительным сервисом Skype для бизнеса, посредством программы-клиента становятся доступны различные виды коммуникаций: мгновенные сообщения, видео- и голосовую связь, общий доступ к рабочему столу, конференции, передачу файлов. В рамках публичного решения отсутствует настройка поддержки федерации для клиентов, что позволяет использовать данный сервис только внутри организации, без возможности прямой коммуникации с внешними пользователями Skype для бизнеса, осуществления внешних звонков на телефонные номера и различные интеграции со сторонними приложениями и оборудованием.
Table of Contents
- Overview
- Exchange Server Settings
- Skype for Business Server Settings
- Outlook Web App Access
- Other Languages
- Reference
Overview
In this article we will demonstrate the steps for integration between Exchange Server 2013 Outlook Web App and
Skype for Business Server 2015 to enable instant messaging and presence in Outlook Web App.
There is four virtual machines, all servers belong to the same Active Directory Domain Services and installed with Windows Server 2012 R2. In the figure below we have the names and functions of virtual machines.

The internal DNS name is home.intranet and a sip domain
home.eti.br
| FQDN | Endereço IP | Função do Servidor |
| Hm01.home.intranet | 172.16.1.245 | Domain Controller and Enterprise CA |
| Hm02.home.intranet | 172.16.1.247 | Skype for Business 2015 Front End |
| Hm03-CAS.home.intranet | 172.16.1.244 | Exchange Server 2013 Client Access Server |
| Hm03-MBX.home.intranet | 172.16.1.243 | Exchange Server 2013 Mailbox Server |
Exchange Server Settings
The Exchange services Outlook Anywhere, ActiveSync, Offline Address Book and Autodiscover are configured with
mail.home.eti.br URL and pointing th HM03-CAS host that is my
Client Access Server role.


The digital certificate used for services was issued by an internal CA installed on the domain controller. Subject Name of the certificate is set to the URL that services are using, in
this case mail.home.eti.br and in the field Subject Alternative Name is configured netbios and Client Access FQDN name.
In the Mailbox Server we have a certificate issued by the same internal CA. The
Subject Name of the certificate has been configured with the FQDN of the Mailbox Server and the
Subject Alternative Name configured with the FQDN and netbios name.
To configure the connection between the servers you must select a digital certificate for encryption of traffic. We will need the
Thumbprint and Subject Name of this certificate in your Mailbox Server. Use the cmdlet to identify and extract the information:
Get-ExchangeCertificate

Write down the Thumbprint of the certificate to identify which certificate will be used for the connection. The
Subject Name is used in the creation of Trusted Application on the
Skype Server, the name of the Trusted Application must be identical to name Subject Name of the certificate.
Then enable the integration of Exchange web service with Skype for Business run the cmdlet
Get-OwaVirtualDirectory | Set-OwaVirtualDirectory -InstantMessagingEnable $True -InstantMessagingType OCS

Configure OWA access policy and enable the IM function for all users
Get-OwaMailboxPolicy | Set-OwaMailboxPolicy -InstantMessagingEnabled $true –InstantMessagingType OCS

To finish the configuration change the web.config file on Mailbox Server. By default the file is located in C:Program
FilesMicrosoftExchange ServerV15ClientAccessOwa

Open the file in a text editor, locate the
<appSettings> tag and add the two lines in the configuration file:
<add key=»IMCertificateThumbprint» value=»Certificate ThumbPrint of Mailbox Server»/>
<add key=»IMServerName» value=»FQDN Pool Skype for Business» />
The final configuration should look like this

.Run the command to apply the changes in OWA.
C:WindowsSystem32InetsrvAppcmd.exe recycle apppool /apppool.name:»MSExchangeOWAAppPool»

Skype for Business Server Settings
A Trusted Application is an application based on Microsoft Unified Communications Managed API
entrusted by Skype Server.
To configure the integration with OWA you must configure a Trusted Application between Exchange and Skype.
To create an application Skype Server first identify the site created. Use the Get-CsSite cmdlet and note the pool SiteId.
Get-CsSite

To create an application pool run the cmdlet
New-CsTrustedApplicationPool -Identity <Certificate Subject Name of Mailbox Server> -Registrar <FQDN Pool Skype Server> -Site <SiteID Pool> -RequiresReplication $False

To create the application that represents OWA in Skype Server run the cmdlet
New-CsTrustedApplication -ApplicationId OutlookWebApp -TrustedApplicationPoolFqdn <Certificate Subject Name of Mailbox Server> -Port <Available TCP
port number>

Execute Enable-CsTopology to
aplly the changes.
Enable-CsTopology

Outlook Web App Access
To check the integration between servers is up and running access Exchange OWA
and check that the presence was activated and the presence of other users is working.

Within the OWA it is also possible to start an instant messaging session.

Other Languages
- Integração
do Exchange Server 2013 OWA e Skype for Busines 2015
Reference
- https://technet.microsoft.com/library/jj688055.aspx
This edition in a series of deployment articles for Skype for Business Server 2015 addresses the integration of an existing Exchange Server 2013 installation with a recently installed Skype for Business Standard Edition server. The article outlines establishing the prerequisite partnership between each platform, allowing the Skype for Business server to leverage the Exchange Server database engine for storage of some types of data
Further configuration of additional features provided by this integration will be covered in later articles, as in Unified Contact Store, Exchange Unified Messaging, and Outlook Web App with Skype for Business Server 2015. For each of these additional integrations the following Partner Application relationship must first be enabled in the environment. An updated listing of only the articles specific to Exchange Server integration with Skype for Business Server 2015 can be found using this link
The sections in this article are outlined in the following configuration steps:
 .
.
Configure Autodiscover
In the event that Exchange Autodiscover is not correctly configured this could prevent the Skype for Business server and clients from being able to locate the Exchange server and thus cripple the ability to complete this integration. The steps in this first section are optional and may not be required in all environments, so long as Autodiscover is correctly deployed.
In event that the existing autodiscover URL will be used then skip to the next section to configure OAuth.
Validate Configuration
- Using the Exchange Server Management Console run the following Get-ClientAccessServer cmdlet to view the current Autodiscover configuration. The Identity parameter cab be either the Exchange server’s hostname or the Fully Qualified Domain Name (FQDN).
Get-ClientAccessServer -Identity EXCH | Select-Object AutoD*

In this example environment the default configuration is still applied whereas the server name is utilized in the internal autodiscover URL. This will be updated to use the well-known autodiscover record format which is generally an Exchange Server deployment best practice.
Most likely when the Exchange Server was originally deployed the Autodiscover option was selected which would have included the proper FQDN in the certificate request. To validate this the following commands can be used to identify and parse the server certificate currently assigned to Exchange Server roles.
- Using the Exchange Server Management Console run the following Get-ExchangeCertificate.
Get-ExchangeCertificate | Select-Object Subject,Services,CertificateDomains | fl
.
 .
.As seen in the example above the desired certificate should be the entry with a FQDN in the Subject which is also assigned to at least the IIS service. This example snows that the Subject Alternative Name (SAN) field of the certificate in use by IIS already includes the desired FQDN of autodiscover.jdskype.net.
Create DNS Records
If the following two DNS records do not already exist in the environment then they need to be created before modifying the Exchange configuration. These are the two well-known DNS records that mostly autodiscover-aware clients will query when attempting to locate an Exchange Server.
- Create a new Alias (CNAME) record in the proper SMTP/SIP namespace forward lookup zone, pointing to the Exchange Server FQDN.

- Create a new Service Location (SRV) record using the following parameters, pointing this record to the CNAME record created in the previous step.

To validate the records were created successfully and are functional run the following two test commands from a command shell.
nslookup -q=srv _autodiscover._tcp.jdskype.net
_autodiscover._tcp.jdskype.net SRV service location:
priority = 0
weight = 0
port = 443
svr hostname = autodiscover.jdskype.net
nslookup autodiscover.jdskype.net
Name: exch.jdskype.net
Address: 192.168.0.101
Aliases: autodiscover.jdskype.net
Update Autodiscover URL
- Using the Exchange Server Management Console run the following set-ClientAccessServer cmdlet to update the configuration to use the new FQDN. The Identity parameter should be the Exchange server FQDN, while the new Autodiscover FQDN replaces the server FQDN in the internal URL.
Set-ClientAccessServer -Identity EXCH -AutoDiscoverServiceInternalUri «https://autodiscover.jdskype.net/autodiscover/autodiscover.xml»
- When the process completes perform a reset of Internet Information Server to immediately apply the change using the following iisreset shell command. (If performing this in a production environment with active connections then it is recommended to use the /noforce switch.)
iisreset
Attempting stop…
Internet services successfully stopped
Attempting start…
Internet services successfully restarted
Configure OAuth
The Partner Application pairing provides the ability for the Skype for Business and Exchange servers to communicate with each other via an authenticated secure connection that does not require any third party system to negotiate or establish the session.
OAuth is the server-to-server authentication mechanism used between the Skype for Business and Exchange servers to establish secure communications. During the initial SfB server deployment in this article an SSL certificate was created specifically for OAuth.
Before defining Exchange Server as a partner application Skype for Business needs to know about the Exchange Autodiscover configuration.
- Using the Exchange Server Management Console run the following Get-ClientAccessServer cmdlet to query the existing internal autodiscover URL. This is either the existing or newly defined value, depending on whether the previous section was skipped or not.
Get-ClientAccessServer -Identity EXCH | Select-Object AutoDiscoverServiceI*
AutoDiscoverServiceInternalUri
——————————
https://autodiscover.jdskype.net/autodiscover/autodiscover.xml
Pay special attention to the fact that the retrieved autodiscover URL points to an .xml file; this will be important in a few steps.
- On the SfB server open the Skype for Business Server Management Shell and enter the following Get-CsOAuthConfiguration cmdlet.
Get-CsOAuthConfiguration

The ExchangeAutodiscoverUrl parameter should be blank as it has not yet been defined.
- Enter the following Set-CsOAuthConfiguration cmdlet to define the Exchange autodiscover location as shown below.
Set-CsOAuthConfiguration -Identity global -ExchangeAutodiscoverUrl https://autodiscover.jdskype.net/autodiscover/autodiscover.svc
In contrast to what was pointed out earlier the path provided above must end with .svc and not .xml. This is a minor detail not specifically called out in the TechNet documentation but can easily be missed, especially if cutting and pasting these strings between steps.
- Run the Get-CsOAuthConfiguration cmdlet again to verify the new parameter value is applied as intended.
Get-CsOAuthConfiguration

Configure Exchange Server
Enabling the partner application relationship requires that some configuration is performed on both side. Starting with the Exchange Server configuration pre-packaged script will be called while passing a few parameters. Before executing the script
- Identify the proper path for the Skype for Business server authentication metadata document. This URL should be identical to the following format, utilizing the SfB Front End server FQDN.
https://fe.jdskype.net/metadata/json/1
- Connect to this URL in a web browser from the Exchange Server to validate connectivity which should result in a prompt to open or save a file simply named ‘1’.

- Open the file using Notepad to view the contents, which should start with a x509 certificate string and end with the OAuth realm.
{«issuer»:»00000004-0000-0ff1-ce00-000000000000@jdskype.net»,»keys»:[{«keyValue»:{«type»:»x509Certificate»,»value»:»MIIF2TCCBMGgA…
…xSTGd1KHw==»},»usage»:»signing»}],»realm»:»jdskype.net«,»serviceName»:»00000004-0000-0ff1-ce00-000000000000″}
- Open the Exchange Server Management Console on the Exchange Server and change to the Scripts directory by using the following command.
cd c:’Program Files’Microsoft’Exchange Server’V15Scripts
- Then execute the Configure-EnterprisePartnerApplication.ps1 script using the following command.
.Configure-EnterprisePartnerApplication.ps1 -AuthMetaDataUrl ‘https://fe.jdskype.net/metadata/json/1′ -ApplicationType Lync»

- To complete the changes restart Internet Information Services using the iisreset command.
iisreset

Configure Skype for Business Server
To complete the pairing a new partner application will also need to be defined on the Skype for Business side.
- Identify the proper path for the Exchange server authentication metadata document. This URL should be identical to the following format, utilizing the SfB Front End server FQDN.
https://autodiscover.jdskype.net/autodiscover/metadata/json/1
- Connect to this URL in a web browser from the Skype for Business Server to validate connectivity, which should look similar to the results the previous section.

- Using the Skype for Server Business Management Shell enter the following New-CsPartnerApplication cmdlet to define the other half of the association.
New-CsPartnerApplication -Identity Exchange -ApplicationTrustLevel Full -MetadataUrl «https://autodiscover.jdskype.net/autodiscover/metadata/json/1″

Verify Connectivity
To validate that the partner application relationship has been successfully established a simple cmdlet can be run from the SfB Server.
- Enter the following Test-CsExStorageConnectivity cmdlet, providing the SIP address of a user account which has already been enabled for Skype for Business. (The -Verbose parameter is optional and is used here to display additional information about the test process.)
Test-CsExStorageConnectivity -SipUri «sip:jeff@jdskype.net» -Verbose


If the test cmdlet fails to return a successful result of “Test Passed” then here are a couple of the most common issues.
- In the event that the Skype for Business OAuth configuration was previously defined with an incorrect ExchangeAutodiscoverUrl parameter, as could happen by accidentally using .xml instead .svc for example, then the following error may occur. In fact if this parameter is null or invalid in any way then this error can occur.
Test-CsExStorageConnectivity : ExCreateItem exchange operation failed, code=50043,
To resolve the above error define the proper ExchangeAutodiscoverUrl in Skype for Business server using the Set-CsOAuthConfiguration cmdlet as outlined earlier in this article.
- If the AD user account which is used to execute the test cmdlet does not have the correct permissions then the process will fail with the following error being reported.
Test-CsExStorageConnectivity : ExCreateItem exchange operation failed, code=5,
To resolve this issue follow the directions outlined in this TechNet article to add the account to the RTCUniversalUserAdmins universal security group.
Now that Exchange Server has been successfully integrated with Skype for Business Server then additional features can now be deployed. An updated list of articles covering other Exchange Server integration options can be found here.
 About Jeff Schertz
Site Administrator
Outlook легко интегрируется со Skype. Это очень хорошо работает, если эти инструменты в основном используются для общения в вашей организации или бизнесе. Однако мы видим сообщения от пользователей о том, что в нижнем левом углу настольного приложения остается предупреждение с надписью «Ошибка интеграции с Outlook». Самое интересное в том, что для некоторых проблем вообще нет, и кажется, что все синхронизировано. Возможно, проблема действительно возникла, но исчезла сама собой.
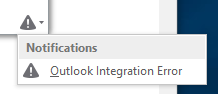
Если проблема для вас реальна, возможно, почтовые ящики, размещенные на сервере Exchange, с обновлением клиента Skype для бизнеса за апрель 2017 г. Это конкретное обновление не поддерживает «Контакты Skype для бизнеса»В Outlook. Основная причина этой проблемы заключается в том, что клиент пытается создать «Контакты Skype для бизнеса»В почтовом ящике обмена пользователями и не работает. Есть два решения.
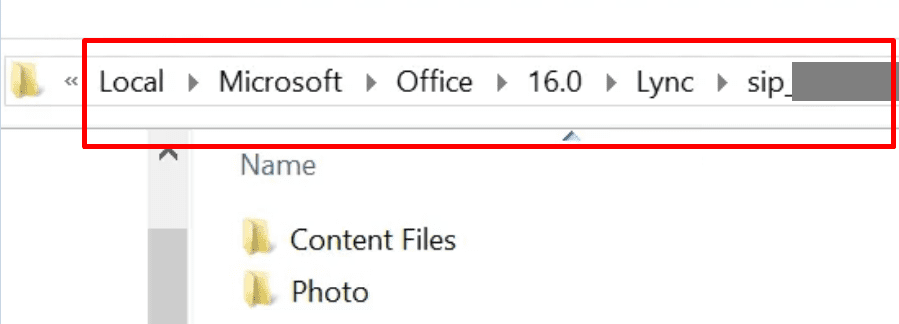
Очистить кеш Skype для бизнеса
Иногда кеш вызывает проблему, и лучше всего его очистить, чтобы все было бесплатно и обновлено. Следуйте инструкциям ниже:
- Нажмите Win + R, а затем введите % localappdata% Microsoft Office 16.0 Lync папка. Нажмите Ввод.
- Удалите в нем папку профиля sip.
- Зайдите в папку Tracing, удалите все файлы, но не папки.
Восстановление Microsoft Office и приложений
Office поставляется со встроенным средством устранения неполадок, которое может восстановить Office. Это гарантирует, что если есть файлы, которые отсутствуют или повреждены, они будут заменены рабочей копией.
Переход на более высокий сервер Exchange
Если это на самом деле проблема с сервером обмена, вы можете перенести почтовые ящики на сервер Exchange более высокого уровня.
Отключить создание «Skype для деловых контактов »
Технет предлагает вам попробовать добавить указанную ниже политику для тестирования и посмотреть, работает ли она. Назначьте его одному пользователю и посмотрите, решит ли он проблему. После применения политики пользователю необходимо подождать несколько минут, выйти из клиента и Outlook и повторить попытку.
New-CsClientPolicy -Identity ContactsDeprecation -EnableExchangeContactSync $ false $ x = New-CsClientPolicyEntry -Name «EnableExchangeContactsFolder» -Значение «$ false» Set-CsClientPolicy -Identity ContactsDeprecation -PolicyEntClientPolicy -Identity ContactsDeprecation -PolicyEntClientPolicy-Grant-x[email protected] -PolicyName ContactsDeprecation Invoke-CsManagementStoreReplication
Проверьте, в порядке ли EWS и MAPI Status
Вам нужно открыть информацию о конфигурации и проверить, есть ли у MAPI и EWS статус OK. В противном случае либо конфигурация для них обоих изменилась, либо конфигурация, сделанная на вашем клиенте, неверна. Вам нужно будет спросить у администратора правильную конфигурацию.
Переустановите клиент Skype для бизнеса (SFB):
Если восстановление Office не помогло вам в сети, вы можете попробовать переустановить клиент SFB и клиент Outlook.
Надеюсь это поможет.
.