В настоящее время язык программирования Python является ведущим из-за его удобных функций. Python также имеет много интересных модулей и библиотек, с помощью которых пользователи могут многое сделать, используя их. Одна из самых интересных особенностей языка Python – это его аудиомодули.
В этой статье мы обсудим 10 различных типов аудиомодулей и библиотек на Python для воспроизведения и записи звука, их уникальные особенности и преимущества.
- PYO
- PyAudio
- Dejavu
- Mingus
- hYPerSonic
- Pydub
- simpleaudio
- winsound
- python – sounddevice
- playsound
Давайте разберемся с вышеуказанными аудиомодулями по очереди.
1. Аудиомодуль PYO
PYO – это модуль Python, написанный на языке программирования C для создания сценария цифровой обработки сигналов. Этот модуль Python содержит классы для обработки самых разных типов аудиосигналов. Благодаря этому пользователи могут импортировать цепочки обработки сигналов непосредственно в сценарии или проекты Python и могут манипулировать звуковыми сигналами в реальном времени с помощью интерпретатора.
Инструмент модулей PYO в Python имеет примитивы, такие как математические операции, базовую обработку сигналов: задержки, генераторы синтеза, фильтры и многое другое. Но он также объединяет алгоритмы для создания звуковой грануляции и многих других художественных звуковых операций.
Пример:
# to play a sound file:
from pyo import *
sound = Server( ) .boot( )
sound.start ( )
sound_file = SFPlayer( " path /to /users /sound.aif ", speed = 1, loop = True ).out( )
# for Granulating an audio buffer:
sound = Server( ) .boot( )
sound_nd = SndTable( " path /to /users /sound.aif " )
ev = HannTable( )
ps = Phasor( freq = sound_nd.getRate( )*.25, ml = sound_nd.getSize( ) )
dr = Noise( mul = .001, add = .1 )
granulate = Granulator( sound_nd, ev, [ 1, 1.001 ] , ps, dr, 32, ml = .1 ).out( )
# to generate melodies:
sound = Server( ) .boot( )
sound.start( )
wv = SquareTable( )
ev = CosTable( [( 0, 0 ) ,( 100 , 1 ) ,( 500 , 0.3 ) ,( 8391 , 0 ) ] )
mt = Metro( 0.135 , 12 ).play( )
ap = TrigEnv( mt , table = ev , dr = 1 , ml = .1 )
pt = TrigXnoiseMidi( mt , dist = ' loopseg ' , x1 = 20 , scale = 1 , mrange =( 47, 74 ) )
out = Osc( table = wav , freq = pt , ml = ap ).out( )
2. Кроссплатформенный аудиовход – вывод с pyAudio
Pyaudio – это библиотека Python, которая представляет собой кроссплатформенный аудиовход – вывод с открытым исходным кодом. Он имеет широкий спектр функций, связанных со звуком и в основном ориентированных на сегментацию, извлечение функций, классификацию и визуализацию.
Используя библиотеку pyaudio, пользователи могут классифицировать неизвестные звуки, выполнять контролируемую и неконтролируемую сегментацию, извлекать звуковые функции и представления, обнаруживать звуковые события и отфильтровывать периоды тишины из длинных записей, применять уменьшение размерности для визуализации аудиоданных и сходства контента и многое другое.
Эта библиотека предоставляет привязки для PortAudio. Пользователи могут использовать эту библиотеку для воспроизведения и записи звука на разных платформах, таких как Windows, Mac и Linux. Для воспроизведения звука с помощью библиотеки pyaudio пользователь должен писать в .stream.
Пример:
import pyaudio
import wave

filename = ' example.wav '

# Set chunk size of 1024 samples per data frame
chunksize = 1024

# Now open the sound file, name as wavefile
wavefile = wave.open( filename, ' rb ' )

# Create an interface to PortAudio
portaudio = pyaudio.PyAudio( )

# Open a .Stream object to write the WAV file to play the audio using pyaudio
# in this code, 'output = True' means that the audio will be played rather than recorded
streamobject = portaudio.open(format = portaudio.get_format_from_width( wavefile.getsampwidth( ) ),
                channels = wavefile.getnchannels( ),
                rate = wavefile.getframerate( ),
                output = True( )

# Read data in chunksize
Data_audio = wavefile.readframes( chunksize )

# Play the audio by writing the audio data to the streamobject
while data != '':
    streamobject.write( data_audio )
    data_audio = wavefile.readframes( chunksize )

# Close and terminate the streamobject
streamobject.close( )
portaudio.terminate( )
Здесь пользователи могут заметить, что воспроизведение звука с использованием библиотеки pyaudio может быть немного сложнее по сравнению с другими библиотеками воспроизведения звука. Вот почему эта библиотека может быть не лучшим выбором пользователей для воспроизведения звука в своих проектах или приложениях.
Хотя библиотека pyaudio обеспечивает более низкоуровневое управление, что позволяет пользователям устанавливать параметры для своих устройств ввода и вывода. Эта библиотека также позволяет пользователям проверять загрузку своего процессора и активность ввода-вывода.
Библиотека Pyaudio также позволяет пользователям воспроизводить и записывать звук в режиме обратного вызова, где указанная функция обратного вызова вызывается, когда новые данные необходимы для воспроизведения и доступны для записи. Это особенности библиотеки pyaudio, которые отличают ее от других аудиобиблиотек и модулей. Эта библиотека специально используется, если пользователь хочет воспроизвести звук помимо простого воспроизведения.
3. Dejavu
Dejavu – это аудиомодуль на Python с открытым исходным кодом. Он может запоминать записанный звук, прослушивая его один раз, и этот звук сохраняется в базе данных. После этого, когда проигрывается песня, микрофонный вход или дисковый файл, Dejavu пытается сопоставить звук с сохраненными в базе данными, и вернуть песню или запись, которая была воспроизведена ранее.
Модуль Dejavu превосходит распознавание отдельных сигналов с реалистичным количеством шума. Есть две формы, в которых пользователь может использовать Дежавю для распознавания звука:
- Пользователь может распознавать аудио, читая и обрабатывая аудиофайлы на диске.
- Пользователь может использовать микрофон компьютера.
Например:
#User should create a MySQL database where Dejavu can store fingerprints of the audio.

#on user local setup:

$ mysql -u root -p

Enter password: *************

mysql> HERE, USER SHOULD CREATE A DATABASE dejavu;
Готово.
from dejavu import Dejavu
config = {
    " database ": {
         " host ": " 125.0.1.1 ",
         " user ": " root ",
         " password ": < password imported in Local setup >,
         " database ": < name of the database user has created in local setup >,
     }
}
dejv = Dejavu( config )
4. Mingus
Mingus – это пакет на Python. Его используют многие программисты, исследователи музыкантов и композиторы для создания и изучения музыки и песен. Этот пакет является кроссплатформенным и представляет собой очень продвинутую теорию музыки, представляющую пакет для Python вместе с файлами цифрового интерфейса музыкальных инструментов и поддержкой воспроизведения.
Пакет Mingus можно использовать для образовательных инструментов, для создания редакторов для песен, а также во многих других приложениях и программах, в которые пользователи хотят импортировать функцию обработки и воспроизведения музыки.
Этот пакет представляет собой теорию музыки и включает в себя такие темы, как гаммы, прогрессии, аккорды и интервалы. Mingus тестирует эти компоненты и использует для создания и распознавания музыкальных элементов с помощью удобных сокращений.
Например:
import mingus.core.notes as notes_m
# for valid notes
notes_m.is_valid_note("C")
notes_m.is_valid_note("D#")
notes_m.is_valid_note("Eb")
notes_m.is_valid_note("Fbb")
notes_m.is_valid_note("G##")
Выход:
True
True
True
True
True
# для недействительных заметок:
notes_m.is_valid_note("c")
notes_m.is_valid_note("D #")
notes_m.is_valid_note("E-b")
Выход:
False
False
False
5. hYPerSonic
hYPerSonic – это фреймворк на языках Python и C. Используется для разработки и эксплуатации конвейеров обработки звука, предназначенных для управления в реальном времени. Эта структура является низкоуровневой, в которой подсчитывается каждый байт, и это также включает объекты для звуковой карты, фильтрует операции с памятью, file – io и осцилляторы. Эта структура работает в операционных системах Linux и OSX.
6. Pydub
Pydub – это библиотека Python, используемая для управления аудио и добавления к нему эффектов. Эта библиотека представляет собой очень простой и легкий, но высокоуровневый интерфейс, основанный на FFmpeg и склонный к jquery. Эта библиотека используется для добавления тегов id3 в аудио, нарезки его и объединения аудиодорожек. Библиотека Pydub поддерживает версии Python 2.6, 2.7, 3.2 и 3.3.
Однако пользователи могут открывать и сохранять файл WAV с помощью библиотеки pydub без каких-либо зависимостей. Но пользователям необходимо установить пакет для воспроизведения звука, если они хотят воспроизводить звук.
Следующий код можно использовать для воспроизведения файла WAV с помощью pydub:
from pydub import AudioSegment
from pydub.playback import play

sound_audio = AudioSegment.from_wav( ' example.wav ' )
play( sound_audio )
Если пользователь хочет воспроизводить другие форматы аудиофайлов, такие как файлы MP3, им следует установить libav или FFmpeg.
После установки FFmpeg пользователю необходимо внести небольшое изменение в код для воспроизведения файла MP3.
Пример:
from pydub import AudioSegment
from pydub.playback import play

sound_audio = AudioSegment.from_mp3( 'example.mp3 ' )
play( sound_audio )
Используя оператор AudioSegment.from_file(имя_файла, тип_файла), пользователи могут воспроизводить любой формат аудиофайла, поддерживаемый ffmpeg.
Например:
# Users can play a WMA file:
sound = AudioSegment.from_file( 'example.wma ', ' wma ' )
Библиотека Pydub также позволяет пользователям сохранять аудио в различных форматах файлов. Пользователи также могут рассчитать длину аудиофайлов, использовать кроссфейды в аудио с помощью этой библиотеки.
7. Simpleaudio
Simpleaudio – это кроссплатформенная библиотека. Также используется для воспроизведения файлов WAV без каких-либо зависимостей. Библиотека simpleaudio ожидает, пока файл закончит воспроизведение звука в формате WAV, перед завершением скрипта.
Например:
import simpleaudio as simple_audio

filename = ' example.wav '
wave_object = simple_audio.WaveObject.from_wave_file( filename )
play_object = wave_object.play( )
play_object.wait_done( )
# Wait until audio has finished playing
В файле формата WAV сохраняется категоризация битов, которая представляет необработанные аудиоданные, а также хранятся заголовки вместе с метаданными в формате файла обмена ресурсами.
Окончательная запись состоит в том, чтобы сохранять каждый аудиосэмпл, который представляет собой конкретную точку данных, относящуюся к давлению воздуха, как при 44200 выборок в секунду, 16-битное значение для записей компакт-дисков.
Для уменьшения размера файла этого достаточно для хранения нескольких записей, таких как человеческая речь, с более низкой частотой дискретизации, например 8000 выборок в секунду. Однако более высокие звуковые частоты не могут быть представлены достаточно точно.
Некоторые из библиотек и модулей, обсуждаемых в этой статье, воспроизводят и записывают байтовые объекты, а некоторые из них используют массивы NumPy для записи необработанных аудиоданных. Оба напоминают категоризацию точек данных, которые можно воспроизводить с определенной частотой дискретизации для воспроизведения звука.
В массиве NumPy каждый элемент может содержать 16-битное значение, эквивалентное отдельной выборке, а для объекта bytes каждая выборка сохраняется как набор из двух 8-битных значений. Важное различие между этими двумя типами данных заключается в том, что массивы NumPy изменяемы, а объекты байтов неизменны, что делает последние более подходящими для генерации аудио и обработки более сложных сигналов.
Пользователи могут воспроизводить массивы NumPy и байтовые объекты в библиотеке simpleaudio с помощью оператора simpleaudio.play_buffer(). Но перед этим пользователи должны убедиться, что они уже установили библиотеки NumPy и simpleaudio.
Пример: сгенерировать массив Numpy, соответствующий тону 410 Гц.
import numpy as numpy
import simpleaudio as simple_audio

frequency = 410  # user's played note will be 410 Hz
fsample = 44200  # 44200 samples per second will be played
second = 5  # Note duration of 5 seconds

# Generate array with second*sample_rate steps, ranging between 0 and seconds
tp = numpy.linspace( 0 , second , second * fsample, False )

# to generate a 410 Hz sine wave
note = numpy.sin( frequency * tp * 2 * numpy.pi )

# user should Ensure that highest value is in 16-bit range
audio = note *(2**15 - 1) / numpy.max( numpy.abs( note ) )
# now, Convert to 16-bit data
ado = audio.astype( numpy.int16 )

# to Start the playback
play_object = simple_audio.play_buffer( ado , 1 , 2 , fsample )

# user now Waits for playback to finish before exiting
play_object.wait_done( )
8. winsound
winsound – это модуль в Python, который используется для доступа к основному механизму воспроизведения звука операционной системы Windows.
В модуле winsound файл WAV можно воспроизвести с помощью всего нескольких строк кода.
Например:
import winsound

filename = ' example.wav '
winsound.PlaySound( filename, winsound.SND_FILENAME )
Модуль winsound не поддерживает никаких форматов файлов, кроме файлов WAV. Это позволяет пользователям подавать звуковой сигнал своим динамикам, используя выражение winsound.Beep(частота, продолжительность).
Например:
# User can beep a 1010 Hz tone for 110 milliseconds:
import winsound

winsound.Beep( 1010, 110 )  # Beep at 1010 Hz for 110 milliseconds
9. python-sounddevice
python – sounddevice – это модуль python для кроссплатформенного воспроизведения звука. Этот модуль предоставляет привязки для библиотеки PortAudio и имеет некоторые подходящие функции для воспроизведения и записи массивов NumPy, содержащих аудиосигналы.
Если пользователь хочет воспроизвести файл WAV, он должен установить NumPy и звуковой файл, чтобы открыть формат аудиофайла в файлах WAV в виде массивов NumPy.
Например:
import sounddevice as sound_device
import soundfile as sound_file

filename = ' example.wav '
# now, Extract the data and sampling rate from file
data_set, fsample = sound_file.read( filename , dtype = ' float32 ' )
sound_device.play( data_set, fsample )
# Wait until file is done playing
status = sound_device.wait( )
Оператор sound_file.read() используется для извлечения необработанных аудиоданных, а также частоты дискретизации файла, которые хранятся в заголовке формата файла обмена ресурсами. Оператор sound_device.wait() используется для того, чтобы убедиться, что сценарий завершается только после завершения воспроизведения звука.
10. playsound
playsound – это модуль Python, с помощью которого пользователи могут воспроизводить звук в одной строке кода. Это кроссплатформенный модуль, который представляет собой единую функцию без каких-либо зависимостей для воспроизведения звуков и аудио.
Например:
from playsound import playsound

playsound( ' example.wav ' )
Модуль playsound используется для файлов, отформатированных в файл WAV и файл MP3, а также может работать с другими форматами файлов.
Заключение:
В этой статье мы обсудили различные типы библиотеки Python и модулей, которые используются для воспроизведения и записи различных типов аудиофайлов и звуков. Здесь мы объяснили различные функции и важность каждой библиотеки и модулей для воспроизведения звуков в проекте разработки и модификации приложений и программного обеспечения.


Изучаю Python вместе с вами, читаю, собираю и записываю информацию опытных программистов.
Python’s «batteries included» nature makes it easy to interact with just about anything… except speakers and a microphone! As of this moment, there still are not standard libraries which which allow cross-platform interfacing with audio devices. There are some pretty convenient third-party modules, but I hope in the future a standard solution will be distributed with python. I appreciate the differences of Linux architectures such as ALSA and OSS, but toss in Windows and MacOS in the mix and it gets to be a huge mess. For Linux, would I even need anything fancy? I can run «cat file.wav > /dev/dsp» from a command prompt to play audio. There are some standard libraries for operating system specific sound (i.e., winsound), but I want something more versatile. The official audio wiki page on the subject lists a small collection of third-party platform-independent libraries. After excluding those which don’t support microphone access (the ultimate goal of all my poking around in this subject), I dove a little deeper into sounddevice and PyAudio. Both of these I installed with pip (i.e., pip install pyaudio)
I really like the structure and documentation of sounddevice, but I decided to keep developing with PyAudio for now. Sounddevice seemed to take more system resources than PyAudio (in my limited test conditions: Windows 10 with very fast and modern hardware, Python 3), and would audibly «glitch» music as it was being played every time it attached or detached from the microphone stream. I tried streaming, but after about an hour I couldn’t get clean live access to the microphone without glitching audio playback. Furthermore, every few times I ran this script it crashed my python kernel! I very rarely see this happening. iPython complained: «It seems the kernel died unexpectedly. Use ‘Restart kernel’ to continue using this console» and I eventually moved back to PyAudio. For a less «realtime» application, sounddevice might be a great solution. Here’s the minimal case sounddevice script I tested with (that crashed sometimes). If you have a better one to do live high-speed audio capture, let me know!
import sounddevice #pip install sounddevice

for i in range(30): #30 updates in 1 second
    rec = sounddevice.rec(44100/30)
    sounddevice.wait()
    print(rec.shape)
Here’s a simple demo to show how I get realtime microphone audio into numpy arrays using PyAudio. This isn’t really that special. It’s a good starting point though. Note that rather than have the user define a microphone source in the python script (I had a fancy menu system handling this for a while), I allow PyAudio to just look at the operating system’s default input device. This seems like a realistic expectation, and saves time as long as you don’t expect your user to be recording from two different devices at the same time. This script gets some audio from the microphone and shows the values in the console (ten times).
import pyaudio
import numpy as np

CHUNK = 4096 # number of data points to read at a time
RATE = 44100 # time resolution of the recording device (Hz)

p=pyaudio.PyAudio() # start the PyAudio class
stream=p.open(format=pyaudio.paInt16,channels=1,rate=RATE,input=True,
              frames_per_buffer=CHUNK) #uses default input device

# create a numpy array holding a single read of audio data
for i in range(10): #to it a few times just to see
    data = np.fromstring(stream.read(CHUNK),dtype=np.int16)
    print(data)

# close the stream gracefully
stream.stop_stream()
stream.close()
p.terminate()
I tried to push the limit a little bit and see how much useful data I could get from this console window. It turns out that it’s pretty responsive! Here’s a slight modification of the code, made to turn the console window into an impromptu VU meter.
import pyaudio
import numpy as np

CHUNK = 2**11
RATE = 44100

p=pyaudio.PyAudio()
stream=p.open(format=pyaudio.paInt16,channels=1,rate=RATE,input=True,
              frames_per_buffer=CHUNK)

for i in range(int(10*44100/1024)): #go for a few seconds
    data = np.fromstring(stream.read(CHUNK),dtype=np.int16)
    peak=np.average(np.abs(data))*2
    bars="#"*int(50*peak/2**16)
    print("%04d %05d %s"%(i,peak,bars))

stream.stop_stream()
stream.close()
p.terminate()
Result
The results are pretty good! The advantage here is that no libraries are required except PyAudio. For people interested in doing simple math (peak detection, frequency detection, etc.) this is a perfect starting point. Here’s a quick cellphone video:
I’ve made realtime audio visualization (realtime FFT) scripts with Python before, but 80% of that code was creating a GUI. I want to see data in real time while I’m developing this code, but I really don’t want to mess with GUI programming. I then had a crazy idea. Everyone has a web browser, which is a pretty good GUI… with a Python script to analyze audio and save graphs (a lot of them, quickly) and some JavaScript running in a browser to keep refreshing those graphs, I could get an idea of what the audio stream is doing in something kind of like real time. It was intended to be a hack, but I never expected it to work so well! Check this out…
Here’s the python script to listen to the microphone and generate graphs:
import pyaudio
import numpy as np
import pylab
import time

RATE = 44100
CHUNK = int(RATE/20) # RATE / number of updates per second

def soundplot(stream):
    t1=time.time()
    data = np.fromstring(stream.read(CHUNK),dtype=np.int16)
    pylab.plot(data)
    pylab.title(i)
    pylab.grid()
    pylab.axis([0,len(data),-2**16/2,2**16/2])
    pylab.savefig("03.png",dpi=50)
    pylab.close('all')
    print("took %.02f ms"%((time.time()-t1)*1000))

if __name__=="__main__":
    p=pyaudio.PyAudio()
    stream=p.open(format=pyaudio.paInt16,channels=1,rate=RATE,input=True,
                  frames_per_buffer=CHUNK)
    for i in range(int(20*RATE/CHUNK)): #do this for 10 seconds
        soundplot(stream)
    stream.stop_stream()
    stream.close()
    p.terminate()
Here’s the HTML file with JavaScript to keep reloading the image…
<html>
<script language="javascript">
function RefreshImage(){
document.pic0.src="03.png?a=" + String(Math.random()*99999999);
setTimeout('RefreshImage()',50);
}
</script>
<body onload="RefreshImage()">
<img name="pic0" src="03.png">
</body>
</html>
Operation
I couldn’t believe my eyes. It’s not elegant, but it’s kind of functional!
Why stop there? I went ahead and wrote a microphone listening and processing class which makes this stuff easier. My ultimate goal hasn’t been revealed yet, but I’m sure it’ll be clear in a few weeks. Let’s just say there’s a lot of use in me visualizing streams of continuous data. Anyway, this class is the truly terrible attempt at a word pun by merging the words «SWH», «ear», and «Hear», into the official title «SWHear» which seems to be unique on Google. This class is minimal case, but can be easily modified to implement threaded recording (which won’t cause the rest of the functions to hang) as well as mathematical manipulation of data, such as FFT. With the same HTML file as used above, here’s the new python script and some video of the output:
import pyaudio
import time
import pylab
import numpy as np

class SWHear(object):
    """
    The SWHear class is made to provide access to continuously recorded
    (and mathematically processed) microphone data.
    """

    def __init__(self,device=None,startStreaming=True):
        """fire up the SWHear class."""
        print(" -- initializing SWHear")

        self.chunk = 4096 # number of data points to read at a time
        self.rate = 44100 # time resolution of the recording device (Hz)

        # for tape recording (continuous "tape" of recent audio)
        self.tapeLength=2 #seconds
        self.tape=np.empty(self.rate*self.tapeLength)*np.nan

        self.p=pyaudio.PyAudio() # start the PyAudio class
        if startStreaming:
            self.stream_start()

    ### LOWEST LEVEL AUDIO ACCESS
    # pure access to microphone and stream operations
    # keep math, plotting, FFT, etc out of here.

    def stream_read(self):
        """return values for a single chunk"""
        data = np.fromstring(self.stream.read(self.chunk),dtype=np.int16)
        #print(data)
        return data

    def stream_start(self):
        """connect to the audio device and start a stream"""
        print(" -- stream started")
        self.stream=self.p.open(format=pyaudio.paInt16,channels=1,
                                rate=self.rate,input=True,
                                frames_per_buffer=self.chunk)

    def stream_stop(self):
        """close the stream but keep the PyAudio instance alive."""
        if 'stream' in locals():
            self.stream.stop_stream()
            self.stream.close()
        print(" -- stream CLOSED")

    def close(self):
        """gently detach from things."""
        self.stream_stop()
        self.p.terminate()

    ### TAPE METHODS
    # tape is like a circular magnetic ribbon of tape that's continously
    # recorded and recorded over in a loop. self.tape contains this data.
    # the newest data is always at the end. Don't modify data on the type,
    # but rather do math on it (like FFT) as you read from it.

    def tape_add(self):
        """add a single chunk to the tape."""
        self.tape[:-self.chunk]=self.tape[self.chunk:]
        self.tape[-self.chunk:]=self.stream_read()

    def tape_flush(self):
        """completely fill tape with new data."""
        readsInTape=int(self.rate*self.tapeLength/self.chunk)
        print(" -- flushing %d s tape with %dx%.2f ms reads"%
                  (self.tapeLength,readsInTape,self.chunk/self.rate))
        for i in range(readsInTape):
            self.tape_add()

    def tape_forever(self,plotSec=.25):
        t1=0
        try:
            while True:
                self.tape_add()
                if (time.time()-t1)>plotSec:
                    t1=time.time()
                    self.tape_plot()
        except:
            print(" ~~ exception (keyboard?)")
            return

    def tape_plot(self,saveAs="03.png"):
        """plot what's in the tape."""
        pylab.plot(np.arange(len(self.tape))/self.rate,self.tape)
        pylab.axis([0,self.tapeLength,-2**16/2,2**16/2])
        if saveAs:
            t1=time.time()
            pylab.savefig(saveAs,dpi=50)
            print("plotting saving took %.02f ms"%((time.time()-t1)*1000))
        else:
            pylab.show()
            print() #good for IPython
        pylab.close('all')

if __name__=="__main__":
    ear=SWHear()
    ear.tape_forever()
    ear.close()
    print("DONE")
I don’t really intend anyone to actually do this, but it’s a cool alternative to recording a small portion of audio, plotting it in a pop-up matplotlib window, and waiting for the user to close it to record a new fraction. I had a lot more text in here demonstrating real-time FFT, but I’d rather consolidate everything FFT related into a single post. For now, I’m happy pursuing microphone-related python projects with PyAudio.
Display a single frequency
Use Numpy’s FFT() and FFTFREQ() to turn the linear data into frequency. Set that target and grab the FFT value corresponding to that frequency. I haven’t tested this to be sure it’s working, but it should at least be close…
import pyaudio
import numpy as np
np.set_printoptions(suppress=True) # don't use scientific notation

CHUNK = 4096 # number of data points to read at a time
RATE = 44100 # time resolution of the recording device (Hz)
TARGET = 2100 # show only this one frequency

p=pyaudio.PyAudio() # start the PyAudio class
stream=p.open(format=pyaudio.paInt16,channels=1,rate=RATE,input=True,
              frames_per_buffer=CHUNK) #uses default input device

# create a numpy array holding a single read of audio data
for i in range(10): #to it a few times just to see
    data = np.fromstring(stream.read(CHUNK),dtype=np.int16)
    fft = abs(np.fft.fft(data).real)
    fft = fft[:int(len(fft)/2)] # keep only first half
    freq = np.fft.fftfreq(CHUNK,1.0/RATE)
    freq = freq[:int(len(freq)/2)] # keep only first half
    assert freq[-1]>TARGET, "ERROR: increase chunk size"
    val = fft[np.where(freq>TARGET)[0][0]]
    print(val)

# close the stream gracefully
stream.stop_stream()
stream.close()
p.terminate()
Display Peak Frequency
If your goal is to determine which frequency is producing the loudest tone, use this function. I also added a few lines to graph the output in case you want to observe how it operates. I recommend testing this script with a tone generator, or a YouTube video containing tones of a range of frequencies like this one.
import pyaudio
import numpy as np
import matplotlib.pyplot as plt

np.set_printoptions(suppress=True) # don't use scientific notation

CHUNK = 4096 # number of data points to read at a time
RATE = 44100 # time resolution of the recording device (Hz)

p=pyaudio.PyAudio() # start the PyAudio class
stream=p.open(format=pyaudio.paInt16,channels=1,rate=RATE,input=True,
              frames_per_buffer=CHUNK) #uses default input device

# create a numpy array holding a single read of audio data
for i in range(10): #to it a few times just to see
    data = np.fromstring(stream.read(CHUNK),dtype=np.int16)
    data = data * np.hanning(len(data)) # smooth the FFT by windowing data
    fft = abs(np.fft.fft(data).real)
    fft = fft[:int(len(fft)/2)] # keep only first half
    freq = np.fft.fftfreq(CHUNK,1.0/RATE)
    freq = freq[:int(len(freq)/2)] # keep only first half
    freqPeak = freq[np.where(fft==np.max(fft))[0][0]]+1
    print("peak frequency: %d Hz"%freqPeak)

    # uncomment this if you want to see what the freq vs FFT looks like
    #plt.plot(freq,fft)
    #plt.axis([0,4000,None,None])
    #plt.show()
    #plt.close()

# close the stream gracefully
stream.stop_stream()
stream.close()
p.terminate()
Display Left and Right Levels
import pyaudio
import numpy as np

maxValue = 2**16
p=pyaudio.PyAudio()
stream=p.open(format=pyaudio.paInt16,channels=2,rate=44100,
              input=True, frames_per_buffer=1024)
while True:
    data = np.fromstring(stream.read(1024),dtype=np.int16)
    dataL = data[0::2]
    dataR = data[1::2]
    peakL = np.abs(np.max(dataL)-np.min(dataL))/maxValue
    peakR = np.abs(np.max(dataR)-np.min(dataR))/maxValue
    print("L:%00.02f R:%00.02f"%(peakL*100, peakR*100))
Output
L:47.26 R:45.17
L:47.55 R:45.63
L:49.44 R:45.98
L:45.27 R:49.80
L:44.39 R:45.75
L:47.50 R:46.96
L:41.49 R:42.64
L:42.95 R:41.39
L:49.56 R:49.62
L:48.29 R:48.80
L:45.03 R:47.62
L:47.99 R:49.35
L:41.58 R:49.21
Or with a tweak…
import pyaudio
import numpy as np

maxValue = 2**16
bars = 35
p=pyaudio.PyAudio()
stream=p.open(format=pyaudio.paInt16,channels=2,rate=44100,
              input=True, frames_per_buffer=1024)
while True:
    data = np.fromstring(stream.read(1024),dtype=np.int16)
    dataL = data[0::2]
    dataR = data[1::2]
    peakL = np.abs(np.max(dataL)-np.min(dataL))/maxValue
    peakR = np.abs(np.max(dataR)-np.min(dataR))/maxValue
    lString = "#"*int(peakL*bars)+"-"*int(bars-peakL*bars)
    rString = "#"*int(peakR*bars)+"-"*int(bars-peakR*bars)
    print("L=[%s]tR=[%s]"%(lString, rString))
Graphical Output

---
title: Realtime Audio Visualization in Python
date: 2016-07-19 04:44:48
tags: python, old
---
# Realtime Audio Visualization in Python
__Python's "batteries included" nature makes it easy to interact with just about anything... except speakers and a microphone!__ As of this moment, there still are not standard libraries which which allow cross-platform interfacing with audio devices. There are some pretty convenient third-party modules, but I hope in the future a standard solution will be distributed with python. I appreciate the differences of Linux architectures such as [ALSA](http://www.alsa-project.org/) and [OSS](https://en.wikipedia.org/wiki/Open_Sound_System), but toss in Windows and MacOS in the mix and it gets to be a huge mess. For Linux, would I even need anything fancy? I can run "`` cat file.wav > /dev/dsp ``" from a command prompt to play audio. There are some standard libraries for operating system specific sound (i.e., [winsound](https://docs.python.org/2/library/winsound.html)), but I want something more versatile. The [official audio wiki page on the subject](https://wiki.python.org/moin/Audio/) lists a small collection of third-party platform-independent libraries. After excluding those which don't support microphone access (the ultimate goal of all my poking around in this subject), I dove a little deeper into [sounddevice](http://python-sounddevice.readthedocs.io/en/0.3.3/) and [PyAudio](http://people.csail.mit.edu/hubert/pyaudio/). Both of these I installed with pip (i.e., `` pip install pyaudio ``)
__I really like the structure and documentation of sounddevice, but I decided to keep developing with PyAudio for now.__ Sounddevice seemed to take more system resources than PyAudio (in my limited test conditions: Windows 10 with very fast and modern hardware, Python 3), and would audibly "glitch" music as it was being played every time it attached or detached from the microphone stream. I tried streaming, but after about an hour I couldn't get clean live access to the microphone without glitching audio playback. Furthermore, every few times I ran this script it crashed my python kernel! I very rarely see this happening. iPython complained: "_It seems the kernel died unexpectedly. Use 'Restart kernel' to continue using this console_" and I eventually moved back to PyAudio. For a less "realtime" application, sounddevice might be a great solution. Here's the minimal case sounddevice script I tested with (that crashed sometimes). If you have a better one to do live high-speed audio capture, let me know!
```python
import sounddevice #pip install sounddevice
for i in range(30): #30 updates in 1 second
rec = sounddevice.rec(44100/30)
sounddevice.wait()
print(rec.shape)
```
__Here's a simple demo to show how I get realtime microphone audio into numpy arrays using PyAudio.__ This isn't really that special. It's a good starting point though. Note that rather than have the user define a microphone source in the python script (I had a fancy menu system handling this for a while), I allow PyAudio to just look at the operating system's default input device. This seems like a realistic expectation, and saves time as long as you don't expect your user to be recording from two different devices at the same time. This script gets some audio from the microphone and shows the values in the console (ten times).
```python
import pyaudio
import numpy as np
CHUNK = 4096 # number of data points to read at a time
RATE = 44100 # time resolution of the recording device (Hz)
p=pyaudio.PyAudio() # start the PyAudio class
stream=p.open(format=pyaudio.paInt16,channels=1,rate=RATE,input=True,
frames_per_buffer=CHUNK) #uses default input device
# create a numpy array holding a single read of audio data
for i in range(10): #to it a few times just to see
data = np.fromstring(stream.read(CHUNK),dtype=np.int16)
print(data)
# close the stream gracefully
stream.stop_stream()
stream.close()
p.terminate()
```
<div class="text-center img-border">
[](01.png)
</div>
I tried to push the limit a little bit and see how much useful data I could get from this console window. It turns out that it's pretty responsive! Here's a slight modification of the code, made to turn the console window into an impromptu [VU meter](https://en.wikipedia.org/wiki/VU_meter).
```python
import pyaudio
import numpy as np
CHUNK = 2**11
RATE = 44100
p=pyaudio.PyAudio()
stream=p.open(format=pyaudio.paInt16,channels=1,rate=RATE,input=True,
frames_per_buffer=CHUNK)
for i in range(int(10*44100/1024)): #go for a few seconds
data = np.fromstring(stream.read(CHUNK),dtype=np.int16)
peak=np.average(np.abs(data))*2
bars="#"*int(50*peak/2**16)
print("%04d %05d %s"%(i,peak,bars))
stream.stop_stream()
stream.close()
p.terminate()
```
### Result
The results are pretty good! The advantage here is that _no_ libraries are required except PyAudio. For people interested in doing simple math (peak detection, frequency detection, etc.) this is a perfect starting point. Here's a quick cellphone video:

I've made [realtime audio visualization (realtime FFT) scripts with Python before](https://www.swharden.com/wp/2013-05-09-realtime-fft-audio-visualization-with-python/), but 80% of that code was creating a GUI. I want to see data in real time while I'm developing this code, but I _really_ don't want to mess with GUI programming. I then had a crazy idea. Everyone has a web browser, which is a pretty good GUI... with a Python script to analyze audio and save graphs (a lot of them, quickly) and some JavaScript running in a browser to keep refreshing those graphs, I could get an idea of what the audio stream is doing in something kind of like real time. It was intended to be a hack, but I never expected it to work so well! Check this out...
__Here's the python script to listen to the microphone and generate graphs:__
```python
import pyaudio
import numpy as np
import pylab
import time
RATE = 44100
CHUNK = int(RATE/20) # RATE / number of updates per second
def soundplot(stream):
t1=time.time()
data = np.fromstring(stream.read(CHUNK),dtype=np.int16)
pylab.plot(data)
pylab.title(i)
pylab.grid()
pylab.axis([0,len(data),-2**16/2,2**16/2])
pylab.savefig("03.png",dpi=50)
pylab.close('all')
print("took %.02f ms"%((time.time()-t1)*1000))
if __name__=="__main__":
p=pyaudio.PyAudio()
stream=p.open(format=pyaudio.paInt16,channels=1,rate=RATE,input=True,
frames_per_buffer=CHUNK)
for i in range(int(20*RATE/CHUNK)): #do this for 10 seconds
soundplot(stream)
stream.stop_stream()
stream.close()
p.terminate()
```
__Here's the HTML file with JavaScript to keep reloading the image...__
```html
<html>
<script language="javascript">
function RefreshImage(){
document.pic0.src="03.png?a=" + String(Math.random()*99999999);
setTimeout('RefreshImage()',50);
}
</script>
<body onload="RefreshImage()">
<img name="pic0" src="03.png">
</body>
</html>
```
### Operation
I couldn't believe my eyes. It's not elegant, but it's kind of functional!

__Why stop there?__ I went ahead and wrote a microphone listening and processing class which makes this stuff easier. My ultimate goal hasn't been revealed yet, but I'm sure it'll be clear in a few weeks. Let's just say there's a lot of use in me visualizing streams of continuous data. Anyway, this class is the truly _terrible_ attempt at a word pun by merging the words "SWH", "ear", and "Hear", into the official title "SWHear" which seems to be [unique on Google](https://www.google.com/search?q=%2Bpython+%2Bswhear). This class is minimal case, but can be easily modified to implement threaded recording (which won't cause the rest of the functions to hang) as well as mathematical manipulation of data, such as FFT. With the same HTML file as used above, here's the new python script and some video of the output:
```python
import pyaudio
import time
import pylab
import numpy as np
class SWHear(object):
"""
The SWHear class is made to provide access to continuously recorded
(and mathematically processed) microphone data.
"""
def __init__(self,device=None,startStreaming=True):
"""fire up the SWHear class."""
print(" -- initializing SWHear")
self.chunk = 4096 # number of data points to read at a time
self.rate = 44100 # time resolution of the recording device (Hz)
# for tape recording (continuous "tape" of recent audio)
self.tapeLength=2 #seconds
self.tape=np.empty(self.rate*self.tapeLength)*np.nan
self.p=pyaudio.PyAudio() # start the PyAudio class
if startStreaming:
self.stream_start()
### LOWEST LEVEL AUDIO ACCESS
# pure access to microphone and stream operations
# keep math, plotting, FFT, etc out of here.
def stream_read(self):
"""return values for a single chunk"""
data = np.fromstring(self.stream.read(self.chunk),dtype=np.int16)
#print(data)
return data
def stream_start(self):
"""connect to the audio device and start a stream"""
print(" -- stream started")
self.stream=self.p.open(format=pyaudio.paInt16,channels=1,
rate=self.rate,input=True,
frames_per_buffer=self.chunk)
def stream_stop(self):
"""close the stream but keep the PyAudio instance alive."""
if 'stream' in locals():
self.stream.stop_stream()
self.stream.close()
print(" -- stream CLOSED")
def close(self):
"""gently detach from things."""
self.stream_stop()
self.p.terminate()
### TAPE METHODS
# tape is like a circular magnetic ribbon of tape that's continously
# recorded and recorded over in a loop. self.tape contains this data.
# the newest data is always at the end. Don't modify data on the type,
# but rather do math on it (like FFT) as you read from it.
def tape_add(self):
"""add a single chunk to the tape."""
self.tape[:-self.chunk]=self.tape[self.chunk:]
self.tape[-self.chunk:]=self.stream_read()
def tape_flush(self):
"""completely fill tape with new data."""
readsInTape=int(self.rate*self.tapeLength/self.chunk)
print(" -- flushing %d s tape with %dx%.2f ms reads"%
(self.tapeLength,readsInTape,self.chunk/self.rate))
for i in range(readsInTape):
self.tape_add()
def tape_forever(self,plotSec=.25):
t1=0
try:
while True:
self.tape_add()
if (time.time()-t1)>plotSec:
t1=time.time()
self.tape_plot()
except:
print(" ~~ exception (keyboard?)")
return
def tape_plot(self,saveAs="03.png"):
"""plot what's in the tape."""
pylab.plot(np.arange(len(self.tape))/self.rate,self.tape)
pylab.axis([0,self.tapeLength,-2**16/2,2**16/2])
if saveAs:
t1=time.time()
pylab.savefig(saveAs,dpi=50)
print("plotting saving took %.02f ms"%((time.time()-t1)*1000))
else:
pylab.show()
print() #good for IPython
pylab.close('all')
if __name__=="__main__":
ear=SWHear()
ear.tape_forever()
ear.close()
print("DONE")
```

__I don't really intend anyone to actually do this,__ but it's a cool alternative to recording a small portion of audio, plotting it in a pop-up matplotlib window, and waiting for the user to close it to record a new fraction. I had a lot more text in here demonstrating real-time FFT, but I'd rather consolidate everything FFT related into a single post. For now, I'm happy pursuing microphone-related python projects with PyAudio.
### Display a single frequency
Use [Numpy's FFT() and FFTFREQ()](https://docs.scipy.org/doc/numpy/reference/routines.fft.html) to turn the linear data into frequency. Set that target and grab the FFT value corresponding to that frequency. I haven't tested this to be sure it's working, but it should at least be close...
```python
import pyaudio
import numpy as np
np.set_printoptions(suppress=True) # don't use scientific notation
CHUNK = 4096 # number of data points to read at a time
RATE = 44100 # time resolution of the recording device (Hz)
TARGET = 2100 # show only this one frequency
p=pyaudio.PyAudio() # start the PyAudio class
stream=p.open(format=pyaudio.paInt16,channels=1,rate=RATE,input=True,
frames_per_buffer=CHUNK) #uses default input device
# create a numpy array holding a single read of audio data
for i in range(10): #to it a few times just to see
data = np.fromstring(stream.read(CHUNK),dtype=np.int16)
fft = abs(np.fft.fft(data).real)
fft = fft[:int(len(fft)/2)] # keep only first half
freq = np.fft.fftfreq(CHUNK,1.0/RATE)
freq = freq[:int(len(freq)/2)] # keep only first half
assert freq[-1]>TARGET, "ERROR: increase chunk size"
val = fft[np.where(freq>TARGET)[0][0]]
print(val)
# close the stream gracefully
stream.stop_stream()
stream.close()
p.terminate()
```
### Display Peak Frequency
If your goal is to determine which frequency is producing the loudest tone, use this function. I also added a few lines to graph the output in case you want to observe how it operates. I recommend testing this script with a tone generator, or a YouTube video containing tones of a range of frequencies [like this one](https://www.youtube.com/watch?v=WfbMNJj2C4I).
```python
import pyaudio
import numpy as np
import matplotlib.pyplot as plt
np.set_printoptions(suppress=True) # don't use scientific notation
CHUNK = 4096 # number of data points to read at a time
RATE = 44100 # time resolution of the recording device (Hz)
p=pyaudio.PyAudio() # start the PyAudio class
stream=p.open(format=pyaudio.paInt16,channels=1,rate=RATE,input=True,
frames_per_buffer=CHUNK) #uses default input device
# create a numpy array holding a single read of audio data
for i in range(10): #to it a few times just to see
data = np.fromstring(stream.read(CHUNK),dtype=np.int16)
data = data * np.hanning(len(data)) # smooth the FFT by windowing data
fft = abs(np.fft.fft(data).real)
fft = fft[:int(len(fft)/2)] # keep only first half
freq = np.fft.fftfreq(CHUNK,1.0/RATE)
freq = freq[:int(len(freq)/2)] # keep only first half
freqPeak = freq[np.where(fft==np.max(fft))[0][0]]+1
print("peak frequency: %d Hz"%freqPeak)
# uncomment this if you want to see what the freq vs FFT looks like
#plt.plot(freq,fft)
#plt.axis([0,4000,None,None])
#plt.show()
#plt.close()
# close the stream gracefully
stream.stop_stream()
stream.close()
p.terminate()
```
### Display Left and Right Levels
```python
import pyaudio
import numpy as np
maxValue = 2**16
p=pyaudio.PyAudio()
stream=p.open(format=pyaudio.paInt16,channels=2,rate=44100,
input=True, frames_per_buffer=1024)
while True:
data = np.fromstring(stream.read(1024),dtype=np.int16)
dataL = data[0::2]
dataR = data[1::2]
peakL = np.abs(np.max(dataL)-np.min(dataL))/maxValue
peakR = np.abs(np.max(dataR)-np.min(dataR))/maxValue
print("L:%00.02f R:%00.02f"%(peakL*100, peakR*100))
```
__Output__
```
L:47.26 R:45.17
L:47.55 R:45.63
L:49.44 R:45.98
L:45.27 R:49.80
L:44.39 R:45.75
L:47.50 R:46.96
L:41.49 R:42.64
L:42.95 R:41.39
L:49.56 R:49.62
L:48.29 R:48.80
L:45.03 R:47.62
L:47.99 R:49.35
L:41.58 R:49.21
```
Or with a tweak...
```python
import pyaudio
import numpy as np
maxValue = 2**16
bars = 35
p=pyaudio.PyAudio()
stream=p.open(format=pyaudio.paInt16,channels=2,rate=44100,
input=True, frames_per_buffer=1024)
while True:
data = np.fromstring(stream.read(1024),dtype=np.int16)
dataL = data[0::2]
dataR = data[1::2]
peakL = np.abs(np.max(dataL)-np.min(dataL))/maxValue
peakR = np.abs(np.max(dataR)-np.min(dataR))/maxValue
lString = "#"*int(peakL*bars)+"-"*int(bars-peakL*bars)
rString = "#"*int(peakR*bars)+"-"*int(bars-peakR*bars)
print("L=[%s]tR=[%s]"%(lString, rString))
```
### Graphical Output
<div class="text-center img-border">
[](audio-graphical.png)
</div>
Небольшое руководство по анализу и жанровой классификации аудио/музыкальных сигналов на Python.
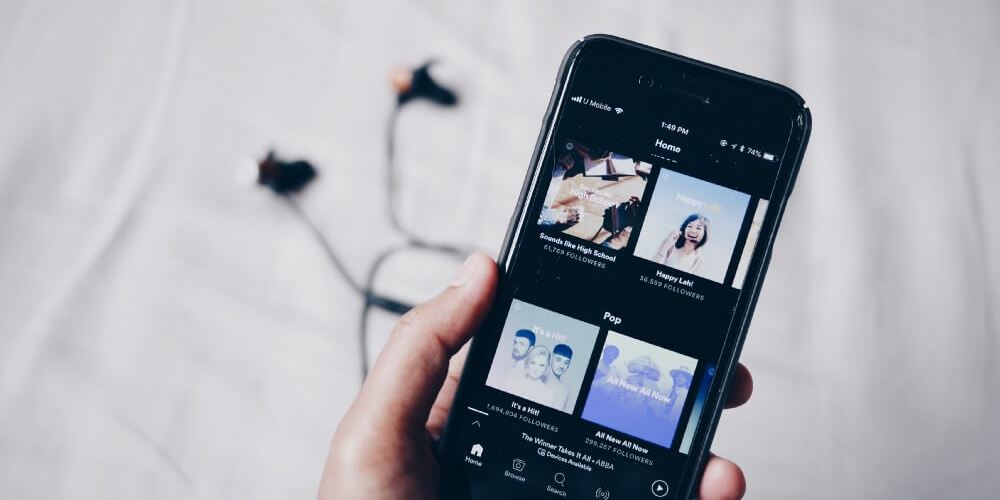
Разнообразные сервисы и платформы потоковой музыки, такие как Spotify и SoundCloud, стремятся постоянно улучшать способы подбора и рекомендации композиций для своих пользователей. Системы жанровой классификации музыки совершенствуются, а в их основе лежит машинное обучение.
В ход идут все известные методы: от NLP и коллаборативной фильтрации до deep learning. Песни распределяются по жанрам на основе их темпа, акустики, энергичности, танцевальности и десятков других характеристик.
В этой статье мы разбираемся, как анализировать и классифицировать музыкальные сигналы с помощью средств, которые предоставляет язык Python.
Если вы начинающий программист, обратите внимание на эти лучшие для изучения Python бесплатные книги, которые мы собрали специально для вас.
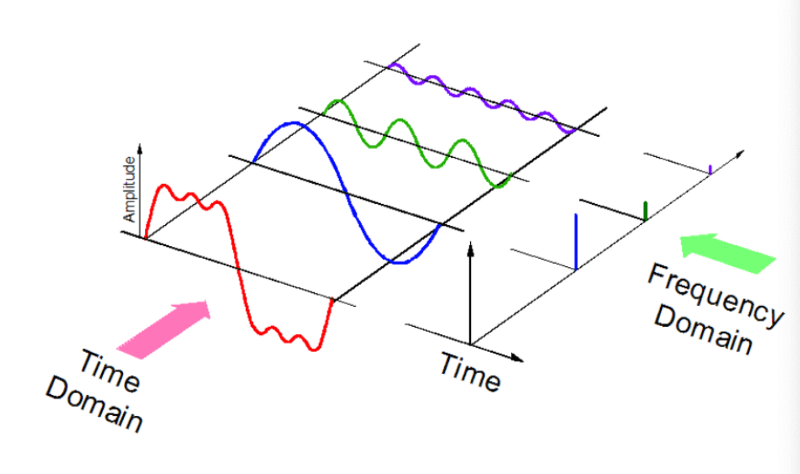
Звук – это сигнал с набором определенных параметров: частота, полоса пропускания пропускная способность, децибелы и прочее. Типичный звуковой сигнал может быть выражен как функция от амплитуды и времени:
Компьютеры могут работать с различными аудиоформатами:
- mp3;
- wma (Windows Media Audio);
- wav (Waveform Audio File).
Python библиотеки для работы со звуком
Для работы со звуком на Python существует ряд мощных библиотек, например, Librosa или PyAudio, а также встроенные модули, поддерживающие базовую функциональность.
Мы будем использовать две библиотеки:
Librosa
Librosa может работать с любыми звуковыми сигналами, но ориентирована в основном именно на музыку. Она позволяет создать полноценную систему извлечения музыкальной информации (MIR). Модуль прекрасно документирован, кроме того, существует множество руководств по использованию. Принципы разработки подробно разобраны в этой статье с конференции SciPy2015.
Установка Python библиотеки librosa выглядит так:
pip install librosa
Или так:
conda install -c conda-forge librosa
Вы также можете установить модуль ffmpeg со множеством готовых решений для конвертации аудиосигналов.
IPython.display.Audio
IPython.display.Audio позволяет воспроизводить аудио непосредственно в Jupyter Notebook.
Загрузка аудиофайла
import librosa
audio_path = '../T08-violin.wav'
x , sr = librosa.load(audio_path)
print(type(x), type(sr))
<class 'numpy.ndarray'> <class 'int'>
print(x.shape, sr)
(396688,) 22050
Скачать аудиофайл T08-violin.wav можно здесь.
Этот код превращает временной ряд аудио в NumPy массив с частотой дискретизации (sr) 22 кГц. Дефолтное значение можно изменить, например, на 44.1 кГц:
librosa.load(audio_path, sr=44100)
или совсем отключить семплирование:
librosa.load(audio_path, sr=None)
Частота дискретизации – это количество семплов (колебаний) звука, передаваемого в секунду, измеренное в Гц или кГц.
Воспроизведение
Для воспроизведения аудио используем IPython.display.Audio:
import IPython.display as ipd
ipd.Audio(audio_path)
Этот код в Jupyter Notebook возвращает вот такой виджет:
Та же самая композиция в SoundCloud:
Визуализация звука
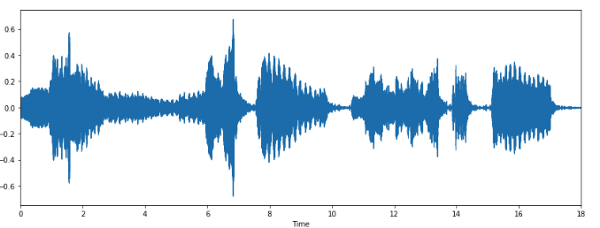
Форма волны
Используя librosa.display.waveplot, можно визуализировать массив аудиоданных:
%matplotlib inline
import matplotlib.pyplot as plt
import librosa.display

plt.figure(figsize=(14, 5))
librosa.display.waveplot(x, sr=sr)

Мы получили график амплитудной огибающей сигнала.
Спектрограмма
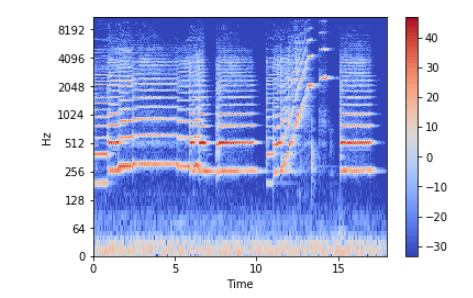
Спектрограмма – это визуальное представление спектра частот звуковых или других сигналов, изменяющихся со временем. Иногда их также называют сонограммами. На двумерных графиках по первой оси задается частота, по второй – время.
Для создания спектрограммы на Python используем librosa.display.specshow.
X = librosa.stft(x)
Xdb = librosa.amplitude_to_db(abs(X))
plt.figure(figsize=(14, 5))
librosa.display.specshow(Xdb, sr=sr, x_axis='time', y_axis='hz')
plt.colorbar()
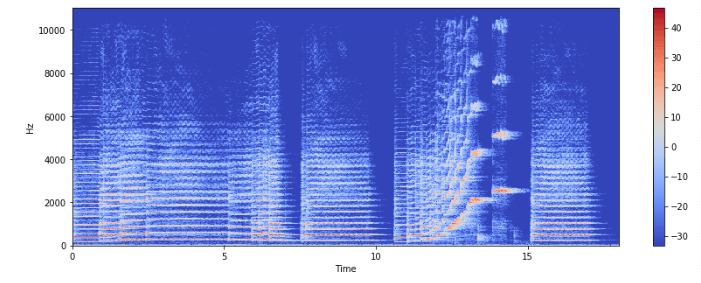
Вертикальная ось – это частоты (от 0 до 10 кГц), а горизонтальная – время клипа. Поскольку все значимые изменения происходят в нижней части спектра, частотную ось можно преобразовать в логарифмическую.
librosa.display.specshow(Xdb, sr=sr, x_axis='time', y_axis='log')
plt.colorbar()
Запись аудио
librosa.output.write_wav сохраняет NumPy массив в WAV-файл:
librosa.output.write_wav('example.wav', x, sr)
Создание звукового сигнала
Давайте теперь создадим на Python звуковой сигнал с частотой 220 Гц. Это NumPy массив, который будет передан в функцию Audio:
import numpy as np
sr = 22050 # sample rate
T = 5.0    # seconds
t = np.linspace(0, T, int(T*sr), endpoint=False) # time variable
x = 0.5*np.sin(2*np.pi*220*t)# pure sine wave at 220 Hz

# Воспроизведение
ipd.Audio(x, rate=sr) # load a NumPy array

# Сохранение
librosa.output.write_wav('tone_220.wav', x, sr)
Ура, вы создали первую композицию!
Извлечение сущностей
Каждый звуковой сигнал имеет множество характеристик, из которых следует отобрать нужные. Процесс извлечения информации для анализа называется извлечением объектов или извлечением сущностей (feature extraction).
Освоиться в мире машинного обучения помогут наши полезные руководства и книги по Python:
- Настраиваем Python для машинного обучения на Windows
- FeatureSelector: отбор признаков для машинного обучения на Python
- NLP – это весело! Обработка естественного языка на Python
- 11 книг по ИИ и Data Science для изучения в 2019
Частота перехода через нуль
Частота пересечения нуля (zero crossing rate) – это частота изменения знака сигнала, т. е. частота, с которой сигнал меняется с положительного на отрицательный и обратно. Эта функция широко используется как для распознавания речи, так и для извлечения музыкальной информации. Для металла и рока этот параметр обычно выше, чем для других жанров, из-за большого количества ударных.
Рассчитаем частоту перехода через нуль для нашего примера на Python:
x, sr = librosa.load('../T08-violin.wav')

plt.figure(figsize=(14, 5))
librosa.display.waveplot(x, sr=sr)
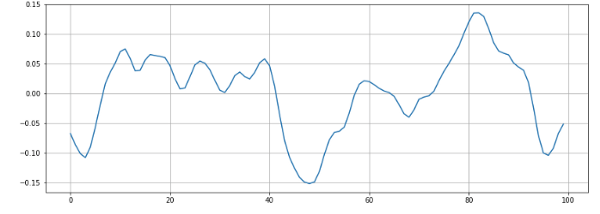
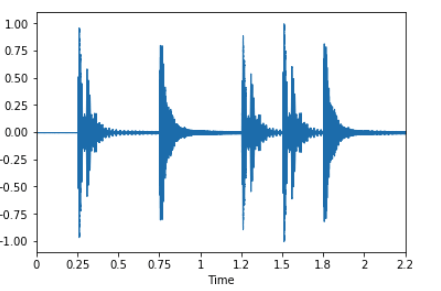
n0 = 9000
n1 = 9100
plt.figure(figsize=(14, 5))
plt.plot(x[n0:n1])
plt.grid()
На графике мы видим 6 пересечений нуля. Давайте проверим:
zero_crossings = librosa.zero_crossings(x[n0:n1], pad=False)
print(sum(zero_crossings))

# 6
Все правильно.
Спектральный центроид
Спектральный центроид указывает, где расположен «центр масс» звука, и рассчитывается как средневзвешенное значение всех частот.
В блюзовых композициях частоты равномерно распределены, и центроид лежит где-то в середине спектра. В металле наблюдается выраженное смещение частот к концу композиции, поэтому и спектроид лежит ближе к концу спектра.
Вычислим спектральный центроид для каждого фрейма с помощью librosa.feature.spectral_centroid:
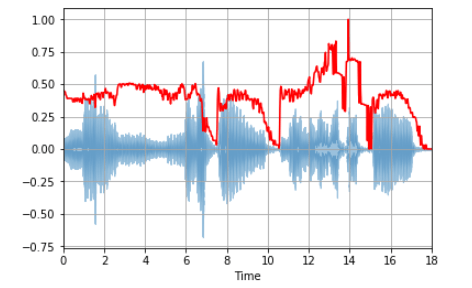
spectral_centroids = librosa.feature.spectral_centroid(x, sr=sr)[0]
spectral_centroids.shape
(775,)

# Вычисление времени для визуализации
frames = range(len(spectral_centroids))
t = librosa.frames_to_time(frames)

# Нормализация спектрального центроида
def normalize(x, axis=0):
  return sklearn.preprocessing.minmax_scale(x, axis=axis)

# Построение графика
librosa.display.waveplot(x, sr=sr, alpha=0.4)
plt.plot(t, normalize(spectral_centroids), color='r')
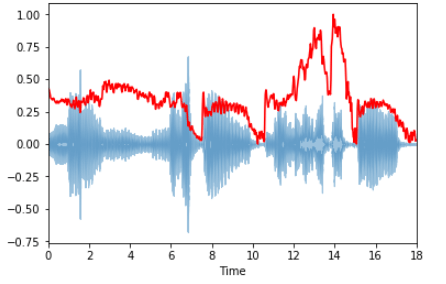
На графике ярко выражен рост частот к концу спектра.
Спектральный спад частоты
Это мера формы сигнала, представляющая собой частоту, ниже которой лежит определенный процент от общей спектральной энергии, к примеру, 85%.
librosa.feature.spectral_rolloff вычисляет спад частоты для каждого фрейма:
spectral_rolloff = librosa.feature.spectral_rolloff(x+0.01, sr=sr)[0]
librosa.display.waveplot(x, sr=sr, alpha=0.4)
plt.plot(t, normalize(spectral_rolloff), color='r')
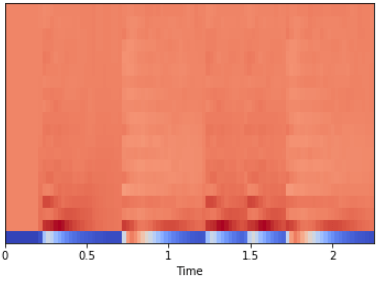
Мел-частотные кепстральные коэффициенты
Мел-частотные кепстральные коэффициенты (MFCC) сигнала – небольшой набор характеристик (обычно около 10-20) которые сжато описывают общую форму спектральной огибающей. Этот параметр моделирует характеристики человеческого голоса.
Для примера возьмем простую циклическую волну:
x, fs = librosa.load('../simple_loop.wav')
librosa.display.waveplot(x, sr=sr)
И вычислим с помощью librosa.feature.mfcc эти коэффициенты:
mfccs = librosa.feature.mfcc(x, sr=fs)
print mfccs.shape
(20, 97)

# Отображение
librosa.display.specshow(mfccs, sr=sr, x_axis='time')
Мы также можем выполнить масштабирование таким образом, чтобы каждое измерение коэффициента имело нулевое среднее и единичную дисперсию:
import sklearn
mfccs = sklearn.preprocessing.scale(mfccs, axis=1)
print(mfccs.mean(axis=1))
print(mfccs.var(axis=1))

librosa.display.specshow(mfccs, sr=sr, x_axis='time')
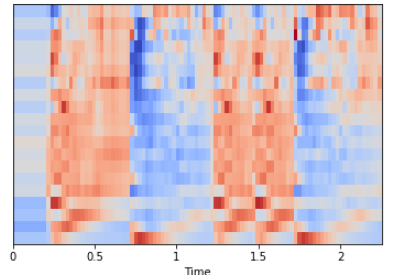
Частота цветности
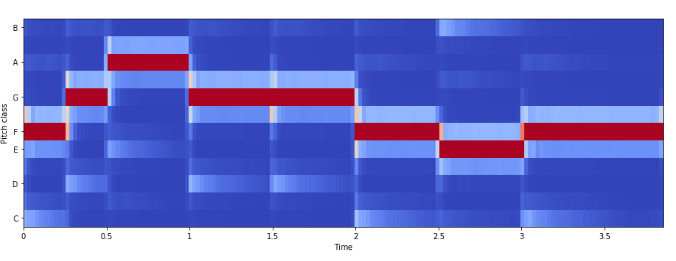
Цветность (chroma features) – это интересное и мощное представление для музыкального звука, при котором весь спектр проецируется на 12 контейнеров, представляющих 12 различных полутонов музыкальной октавы.
Для вычислений используем librosa.feature.chroma_stft:
# Загрузка файла
x, sr = librosa.load('../simple_piano.wav')

hop_length = 512
chromagram = librosa.feature.chroma_stft(x, sr=sr, hop_length=hop_length)
plt.figure(figsize=(15, 5))
librosa.display.specshow(chromagram, x_axis='time', y_axis='chroma', hop_length=hop_length, cmap='coolwarm')
Пример: классификация песен по жанрам
Теперь вы знакомы со структурой акустического сигнала и особенностями процесса извлечения музыкальной информации. Пришла пора использовать полученные знания на практике, используя Python библиотеки для работы со звуком.
Цель
Попробуем смоделировать жанровый классификатор музыки. Он вам очень пригодится, если понадобится разобрать кучу неизвестных mp3-файлов.
Набор данных
Возьмем знаменитый набор данных GITZAN. Он использовался для известного исследования Musical genre classification of audio signals (G. Tzanetakis, P. Cook).
Набор состоит из 1000 звуковых дорожек длиной 30 секунд и содержит 10 жанров: блюз, классика, кантри, диско, хип-хоп, джаз, регги, рок, метал и поп. В каждом жанре 100 звуковых клипов.
Предварительная обработка
Перед обучением модели классификации нужно преобразовать необработанные данные из звуковых выборок в более осмысленное представление. Преобразуем клипы в формат wav, чтобы Python мог с ними мог работать, с помощью модуля SoX.
sox input.au output.wav
Вы можете воспользоваться удобной шпаргалкой по SoX.
Классификация
Извлечение сущностей
Теперь извлечем из аудиофайлов всю необходимую информацию:
- мел-частотные кепстральные коэффициенты,
- спектральный центроид,
- частоту перехода через нуль,
- частоты цветности,
- спектральный спад частоты.
Все эти функции сохраним в .csv-файле.
Классификация
Теперь можно использовать существующие алгоритмы классификации для распределения песен по жанрам.
Вы можете либо использовать непосредственно спектрограммы, либо извлечь сущности и применять модели классификации на них. Здесь перед вами открывается огромный простор для экспериментов.
Здесь вы можете изучить пример использования сверточной нейронной сети (CNN) на спектрограммах.
Что дальше
Жанровая классификация – лишь одна из многих прикладных отраслей извлечения музыкальной информации.
Мы разобрались, как организовывается на Python работа с музыкальными сигналами. Эти знания можно применить для решения множества задач: отслеживания ритма, создания музыки, рекомендательных систем, распознавания инструментов и т. д.
Анализ музыкальной информации – это очень широкая и интересная сфера деятельности.
Оригинал: Music Genre Classification with Python
Если вы еще не знакомы с Python, обязательно почитайте наши статьи по обучению Python с нуля:
- Изучение Python: ТОП-10 вопросов разной направленности
- Самые эффективные ресурсы и материалы для изучения Python
- Крупнейшая подборка Python-каналов на Youtube
- 15 вопросов по Python: как джуниору пройти собеседование
Realtime_PyAudio_FFT

A simple package to do realtime audio analysis in native Python, using PyAudio and Numpy to extract and visualize FFT features from a live audio stream.
Demo Video
The basic pipeline:
- Starts a stream_reader that pulls live audio data from any source using PyAudio (soundcard, microphone, …)
- Reads data from this stream many times per second (eg 1000 updates per second) and stores that data in a fifo buffer
- When triggered by
.get_audio_features(), the stream_analyzer, applies a Fast-Fourier-Transform to the most recent audio window in the buffer - When
visualizeis enabled, the visualizer displays these FFT features in realtime using a PyGame GUI (I made two display modes: 2D and 3D)
Requirements:
pip install -r requirements.txt
You also might have to
sudo apt install libasound-dev portaudio19-dev libportaudio2 libportaudiocpp0 (tested on Ubuntu)
I developped this code on my local machine —> it has not been properly tested on other setups..
If something doesn’t work, please first try to fix it yourself and post an issue/solution when appropriate!
- Tested on Ubuntu 18.04
- Other platforms like Mac/Windows should work if PyGame can find your display and Python finds your audio card (these can be tricky with WSL)
- For Mac OSX (tested on Catalina 10.15.4), please make sure you run with Python downloaded from Python.org (
pygamedoesn’t work well with the default/Homebrew Python)
Tested with:
- Python 3.6.3
- pygame —> Version: 1.9.6 &
- pyaudio —> Version: 0.2.11
- scipy —> Version: 1.4.1
Alternatively to pyaudio, you can use sounddevice which might be more compatible with Windows/Mac
- just run
python3 -m pip install sounddevice - Tested on Ubuntu 18.04 with sounddevice version 0.3.15
- The code to switch between the two sound interfaces is in the
__init__function of the Stream_Analyzer class
Usage:
just run python run_FFT_analyzer.py and play a sound on your machine!
- I have personally learned A LOT about sound by watching this realtime visualization while listening to music
- You can run the stream_analyzer in headless mode and use the FFT features in any Python Application that requires live musical features

ToDo:
- Implement realtime beat detection / melody extraction on top of FFT features (eg using Harmonic/Percussive decomposition)
- The pygame.transform operations sometimes cause weird visual artifacts (boxes) for some resolution settings —> fix??
- Remove the matplotlib dependency since it’s only needed for the colormap of the vis..
- Slow bars decay speed currently depends on how often
.get_audio_features()is called —> fix
Currently I’m using NumPy to generate the WAV file from a NumPy array. I wonder if it’s possible to play the NumPy array in realtime before it’s actually written to the hard drive. All examples I found using PyAudio rely on writing the NumPy array to a WAV file first, but I’d like to have a preview function that just spits out the NumPy array to the audio output.
Should be cross-platform, too. I’m using Python 3 (Anaconda distribution).
![]()
asked Jul 28, 2015 at 11:03
![]()
0
This has worked! Thanks for help!
def generate_sample(self, ob, preview):
    print("* Generating sample...")
    tone_out = array(ob, dtype=int16)

    if preview:
        print("* Previewing audio file...")

        bytestream = tone_out.tobytes()
        pya = pyaudio.PyAudio()
        stream = pya.open(format=pya.get_format_from_width(width=2), channels=1, rate=OUTPUT_SAMPLE_RATE, output=True)
        stream.write(bytestream)
        stream.stop_stream()
        stream.close()

        pya.terminate()
        print("* Preview completed!")
    else:
        write('sound.wav', SAMPLE_RATE, tone_out)
        print("* Wrote audio file!")
Seems so simple now, but when you don’t know Python very well, it seems like hell.
answered Aug 22, 2015 at 23:50
![]()
Mario KrušeljMario Krušelj
6431 gold badge6 silver badges20 bronze badges
This is really simple with python-sounddevice:
import sounddevice as sd
sd.play(myarray, 44100)
answered Sep 16, 2015 at 10:01
![]()
MatthiasMatthias
4,4362 gold badges31 silver badges48 bronze badges
As you can see in the examples, pyaudio just reads data from the WAV file and writes that to the stream.
It is not necessary to write a WAV file first, you just need a stream of data in the right format.
I’m adding the example below in case the link ever goes dead (note that I didn’t write this code):
"""PyAudio Example: Play a WAVE file."""

import pyaudio
import wave
import sys

CHUNK = 1024

if len(sys.argv) < 2:
    print("Plays a wave file.nnUsage: %s filename.wav" % sys.argv[0])
    sys.exit(-1)

wf = wave.open(sys.argv[1], 'rb')

p = pyaudio.PyAudio()

stream = p.open(format=p.get_format_from_width(wf.getsampwidth()),
                channels=wf.getnchannels(),
                rate=wf.getframerate(),
                output=True)

data = wf.readframes(CHUNK)

while data != '':
    stream.write(data)
    data = wf.readframes(CHUNK)

stream.stop_stream()
stream.close()

p.terminate()
answered Aug 22, 2015 at 22:21
![]()
Roland SmithRoland Smith
41.9k3 gold badges62 silver badges90 bronze badges
2
Watch Now This tutorial has a related video course created by the Real Python team. Watch it together with the written tutorial to deepen your understanding: Playing and Recording Sound in Python
If you want to use Python to play or record sound, then you’ve come to the right place! In this tutorial, you’ll learn how to play and record sound in Python using some of the most popular audio libraries. You will learn about the most straight-forward methods for playing and recording sound first, and then you’ll learn about some libraries that offer some more functionality in exchange for a few extra lines of code.
By the end of this tutorial, you’ll know how to:
- Play MP3 and WAV files, as well as a range of other audio formats
- Play NumPy and Python arrays containing sound
- Record sound using Python
- Save your recordings or audio files in a range of different file formats
For a comprehensive list of audio-related Python libraries, have a look at the wiki page on audio in Python.
Playing Audio Files
Below, you’ll see how to play audio files with a selection of Python libraries. A few of these libraries let you play a range of audio formats, including MP3 and NumPy arrays. All of the libraries below let you play WAV files, some with a few more lines of code than others:
-
playsoundis the most straightforward package to use if you simply want to play a WAV or MP3 file. It offers no functionality other than simple playback. -
simpleaudiolets you play WAV files and NumPy arrays, and gives you options to check whether a file is still playing. -
winsoundallows you to play WAV files or beep your speakers, but it works only on Windows. -
python-sounddeviceandpyaudioprovide bindings for the PortAudio library for cross-platform playback of WAV files. -
pydubrequirespyaudiofor audio playback, but withffmpeginstalled, it lets you play a large range of audio formats with only a few lines of code.
Let’s have a look at these libraries for audio playback one by one.
playsound
playsound is a “pure Python, cross platform, single function module with no dependencies for playing sounds.”
With this module, you can play a sound file with a single line of code:
from playsound import playsound

playsound('myfile.wav')
The documentation of playsound states that it has been tested on WAV and MP3 files, but it may work for other file formats as well.
This library was last updated in June 2017. It seems to work well at the time of writing this article, but it’s not clear whether it will still support newer Python releases.
simpleaudio
simpleaudio is a cross-platform library for playback of (mono and stereo) WAV files with no dependencies. The following code can be used to play a WAV file, and wait for the file to finish playing before terminating the script:
import simpleaudio as sa

filename = 'myfile.wav'
wave_obj = sa.WaveObject.from_wave_file(filename)
play_obj = wave_obj.play()
play_obj.wait_done()  # Wait until sound has finished playing
WAV files contain a sequence of bits representing the raw audio data, as well as headers with metadata in RIFF (Resource Interchange File Format) format.
For CD recordings, the industry standard is to store each audio sample (an individual audio datapoint relating to air pressure) as a 16-bit value, at 44100 samples per second.
To reduce file size, it may be sufficient to store some recordings (for example of human speech) at a lower sampling rate, such as 8000 samples per second, although this does mean that higher sound frequencies may not be as accurately represented.
A few of the libraries discussed in this tutorial play and record bytes objects, whereas others use NumPy arrays to store raw audio data.
Both correspond to a sequence of data points that can be played back at a specified sample rate in order to play a sound. For a bytes object, each sample is stored as a set of two 8-bit values, whereas in a NumPy array, each element can contain a 16-bit value corresponding to a single sample.
An important difference between these two data types is that bytes objects are immutable, whereas NumPy arrays are mutable, making the latter more suitable for generating sounds and for more complex signal processing. For more information on how to work with NumPy, have a look at our NumPy tutorials.
simpleaudio allows you to play NumPy and Python arrays and bytes objects using simpleaudio.play_buffer(). Make sure you have NumPy installed for the following example to work, as well as simpleaudio. (With pip installed, you can do this by running pip install numpy from your console.)
For more information on how to use pip for installing packages, have a look at Pipenv: A Guide to the New Python Packaging Tool.
Below you’ll see how to generate a NumPy array corresponding to a 440 Hz tone and play it back using simpleaudio.play_buffer():
import numpy as np
import simpleaudio as sa

frequency = 440  # Our played note will be 440 Hz
fs = 44100  # 44100 samples per second
seconds = 3  # Note duration of 3 seconds

# Generate array with seconds*sample_rate steps, ranging between 0 and seconds
t = np.linspace(0, seconds, seconds * fs, False)

# Generate a 440 Hz sine wave
note = np.sin(frequency * t * 2 * np.pi)

# Ensure that highest value is in 16-bit range
audio = note * (2**15 - 1) / np.max(np.abs(note))
# Convert to 16-bit data
audio = audio.astype(np.int16)

# Start playback
play_obj = sa.play_buffer(audio, 1, 2, fs)

# Wait for playback to finish before exiting
play_obj.wait_done()
Next, let’s see how you can use winsound to play WAV files on a Windows machine.
winsound
If you use Windows, you can use the built-in winsound module to access its basic sound-playing machinery. Playing a WAV file can be done in a few lines of code:
import winsound

filename = 'myfile.wav'
winsound.PlaySound(filename, winsound.SND_FILENAME)
winsound does not support playback of any files other than WAV files. It does allow you to beep your speakers using winsound.Beep(frequency, duration). For example, you can beep a 1000 Hz tone for 100 milliseconds with the following code:
import winsound

winsound.Beep(1000, 100)  # Beep at 1000 Hz for 100 ms
Next, you’ll learn how to use the python-sounddevice module for cross-platform audio playback.
python-sounddevice
As stated in its documentation, python-sounddevice “provides bindings for the PortAudio library and a few convenience functions to play and record NumPy arrays containing audio signals”. In order to play WAV files, numpy and soundfile need to be installed, to open WAV files as NumPy arrays.
With python-sounddevice, numpy, and soundfile installed, you can now read a WAV file as a NumPy array and play it back:
import sounddevice as sd
import soundfile as sf

filename = 'myfile.wav'
# Extract data and sampling rate from file
data, fs = sf.read(filename, dtype='float32')
sd.play(data, fs)
status = sd.wait()  # Wait until file is done playing
The line containing sf.read() extracts the raw audio data, as well as the sampling rate of the file as stored in its RIFF header, and sounddevice.wait() ensures that the script is only terminated after the sound finishes playing.
Next, we’ll learn how to use pydub to play sound. With the right dependencies installed, it allows you to play a wide range of audio files, and it offers you more options for working with audio than python-soundevice does.
pydub
Although pydub can open and save WAV files without any dependencies, you need to have an audio playback package installed to play audio. simpleaudio is strongly recommended, but pyaudio, ffplay, and avplay are alternative options.
The following code can be used to play a WAV file with pydub:
from pydub import AudioSegment
from pydub.playback import play

sound = AudioSegment.from_wav('myfile.wav')
play(sound)
In order to play back other audio types, such as MP3 files, ffmpeg or libav should be installed. Have a look at the documentation of pydub for instructions. As an alternative to the steps described in the documentation, ffmpeg-python provides bindings for ffmpeg, and can be installed using pip:
$ pip install ffmpeg-python
With ffmpeg installed, playing back an MP3 file requires only a small change in our earlier code:
from pydub import AudioSegment
from pydub.playback import play

sound = AudioSegment.from_mp3('myfile.mp3')
play(sound)
Using the AudioSegment.from_file(filename, filetype) construction, you can play any type of audio file that ffmpeg supports. For example, you may play a WMA file using the ollowing:
sound = AudioSegment.from_file('myfile.wma', 'wma')
In addition to playing back sound files, pydub lets you save audio in different file formats (more on this later), slice audio, calculate the length of audio files, fade in or out, and apply cross-fades.
AudioSegment.reverse() creates a copy of the AudioSegment that plays backwards, which the documentation describes as “useful for Pink Floyd, screwing around, and some audio processing algorithms.”
pyaudio
pyaudio provides bindings for PortAudio, the cross-platform audio I/O library. This means that you can use pyaudio to play and record audio on a variety of platforms, including Windows, Linux, and Mac. With pyaudio, playing audio is done by writing to a .Stream:
import pyaudio
import wave

filename = 'myfile.wav'

# Set chunk size of 1024 samples per data frame
chunk = 1024

# Open the sound file
wf = wave.open(filename, 'rb')

# Create an interface to PortAudio
p = pyaudio.PyAudio()

# Open a .Stream object to write the WAV file to
# 'output = True' indicates that the sound will be played rather than recorded
stream = p.open(format = p.get_format_from_width(wf.getsampwidth()),
                channels = wf.getnchannels(),
                rate = wf.getframerate(),
                output = True)

# Read data in chunks
data = wf.readframes(chunk)

# Play the sound by writing the audio data to the stream
while data != '':
    stream.write(data)
    data = wf.readframes(chunk)

# Close and terminate the stream
stream.close()
p.terminate()
As you may have noticed, playing sounds with pyaudio is a bit more complex than playing sounds with the libraries you’ve seen earlier. This means that it may not be your first choice if you just want to play a sound effect in your Python application.
However, because pyaudio gives you more low-level control, it is possible to get and set parameters for your input and output devices, and to check your CPU load and input or output latency.
It also allows you to play and record audio in callback mode, where a specified callback function is called when new data is required for playback, or available for recording. These options make pyaudio a suitable library to use if your audio needs go beyond simple playback.
Now that you’ve seen how you can use a number of different libraries to play audio, it’s time to see how you can use Python to record audio yourself.
Recording Audio
The python-sounddevice and pyaudio libraries provide ways to record audio with Python. python-sounddevice records to NumPy arrays and pyaudio records to bytes objects. Both of these can be stored as WAV files using the scipy and wave libraries, respectively.
python-sounddevice
python-sounddevice allows you to record audio from your microphone and store it as a NumPy array. This is a handy datatype for sound processing that can be converted to WAV format for storage using the scipy.io.wavfile module. Make sure to install the scipy module for the following example (pip install scipy). This automatically installs NumPy as one of its dependencies:
import sounddevice as sd
from scipy.io.wavfile import write

fs = 44100  # Sample rate
seconds = 3  # Duration of recording

myrecording = sd.rec(int(seconds * fs), samplerate=fs, channels=2)
sd.wait()  # Wait until recording is finished
write('output.wav', fs, myrecording)  # Save as WAV file
pyaudio
Earlier in this article, you learned how to play sounds by reading a pyaudio.Stream(). Recording audio can be done by writing to this stream instead:
import pyaudio
import wave

chunk = 1024  # Record in chunks of 1024 samples
sample_format = pyaudio.paInt16  # 16 bits per sample
channels = 2
fs = 44100  # Record at 44100 samples per second
seconds = 3
filename = "output.wav"

p = pyaudio.PyAudio()  # Create an interface to PortAudio

print('Recording')

stream = p.open(format=sample_format,
                channels=channels,
                rate=fs,
                frames_per_buffer=chunk,
                input=True)

frames = []  # Initialize array to store frames

# Store data in chunks for 3 seconds
for i in range(0, int(fs / chunk * seconds)):
    data = stream.read(chunk)
    frames.append(data)

# Stop and close the stream
stream.stop_stream()
stream.close()
# Terminate the PortAudio interface
p.terminate()

print('Finished recording')

# Save the recorded data as a WAV file
wf = wave.open(filename, 'wb')
wf.setnchannels(channels)
wf.setsampwidth(p.get_sample_size(sample_format))
wf.setframerate(fs)
wf.writeframes(b''.join(frames))
wf.close()
Now that you’ve seen how to record audio with python-sounddevice and pyaudio, you’ll learn how to convert your recording (or any other audio files) to a range of different audio formats.
Saving and Converting Audio
You saw earlier that you can use the scipy.io.wavfile module to store NumPy arrays as WAV files. The wavio module similarly lets you convert between WAV files and NumPy arrays. If you want to store your audio in a different file format, pydub and soundfile come in handy, as they allow you to read and write a range of popular file formats (such as MP3, FLAC, WMA and FLV).
wavio
This module depends on numpy and lets you read WAV files as NumPy arrays, and save NumPy arrays as WAV files.
To save a NumPy array as a WAV file, you can use wavio.write():
import wavio

wavio.write("myfile.wav", my_np_array, fs, sampwidth=2)
In this example, my_np_array is a NumPy array containing audio, fs is the sample rate of the recording (usually 44100 or 44800 Hz), and sampwidth is the sampling width of the audio (the number of bytes per sample, typically 1 or 2 bytes).
soundfile
The soundfile library can read and write all file formats supported by libsndfile. Although it can’t play back audio, it allows you to convert audio from and to FLAC, AIFF, and a few audio formats that are less common . To convert a WAV file to FLAC, you can use the following code:
import soundfile as sf

# Extract audio data and sampling rate from file
data, fs = sf.read('myfile.wav')
# Save as FLAC file at correct sampling rate
sf.write('myfile.flac', data, fs)
Similar code will work for converting between other file formats supported by libsndfile.
pydub
pydub lets you save audio in any format that ffmpeg supports, which includes nearly all audio types you might encounter in your daily life. For example, you can convert your WAV file to MP3 with the following code:
from pydub import AudioSegment
sound = AudioSegment.from_wav('myfile.wav')

sound.export('myfile.mp3', format='mp3')
Using AudioSegment.from_file() is a more general way of loading audio files. For example, if you want to convert your file back from MP3 to WAV, you can do the following:
from pydub import AudioSegment
sound = AudioSegment.from_file('myfile.mp3', format='mp3')

sound.export('myfile.wav', format='wav')
This code should work for any audio file format that ffmpeg supports.
Comparison of Audio Libraries
Below is handy table that compares the functionality of the libraries discussed in this tutorial:
The libraries that are included in this tutorial are chosen for their ease of use and popularity. For a more comprehensive list of audio libraries for Python, have a look at the wiki page on audio in Python.
Conclusion: Playing and Recording Sound in Python
In this tutorial, you learned how to use some of the most popular audio libraries to play and record audio in Python. You also saw how to save your audio in a range of different formats.
You are now able to:
- Play a large range of audio formats, including WAV, MP3 and NumPy arrays
- Record audio from your microphone to a NumPy or Python array
- Store your recorded audio a range of different formats, including WAV and MP3
- Convert your sound files to a range of different audio formats
You now have the information you need to help you decide which libraries to use to start working with audio in Python. Go forth, and develop some awesome audio applications!
Watch Now This tutorial has a related video course created by the Real Python team. Watch it together with the written tutorial to deepen your understanding: Playing and Recording Sound in Python
Время на прочтение
6 мин
Количество просмотров 6.4K
Настройка программного обеспечения
Без промедления начнём. Нам нужно установить следующее ПО:
-
Windows 10
-
Anaconda 3 (Python 3.8)
-
Visual Studio 2019 (Community) — объясню позже, зачем она понадобится.
Открываем Anaconda Prompt (Anaconda3) и устанавливаем следующие пакеты:
pip install opencv-python
pip install dlib
pip install face_recognition
И уже на этом моменте начнутся проблемы с dlib.
Решаем проблему с dlib
Я перепробовал все решения, что нашёл в интернете и они оказались неактуальными — раз, два, три, официальное руководство и видео есть. Поэтому будем собирать пакет вручную.
Итак, первая же ошибка говорит о том, что у нас не установлен cmake.
ERROR: CMake must be installed to build dlib

Не закрывая консоль, вводим следующую команду:
pip install cmakeПроблем при установке быть не должно

Пробуем установить пакет той же командой (pip install dlib), но на этот раз получаем новую ошибку:
Отсутствуют элементы Visual Studio

Ошибка явно указывает, что у меня, скорее всего, стоит студия с элементами только для C# — и она оказывается права. Открываем Visual Studio Installer, выбираем «Изменить», в вкладке «Рабочие нагрузки» в разделе «Классические и мобильные приложения» выбираем пункт «Разработка классических приложений на С++»:
Пошагово
Почему важно оставить все галочки, которые предлагает Visual Studio. У меня с интернетом плоховато, поэтому я решил не скачивать пакет SDK для Windows, на что получил следующую ошибку:
Не нашли компилятор
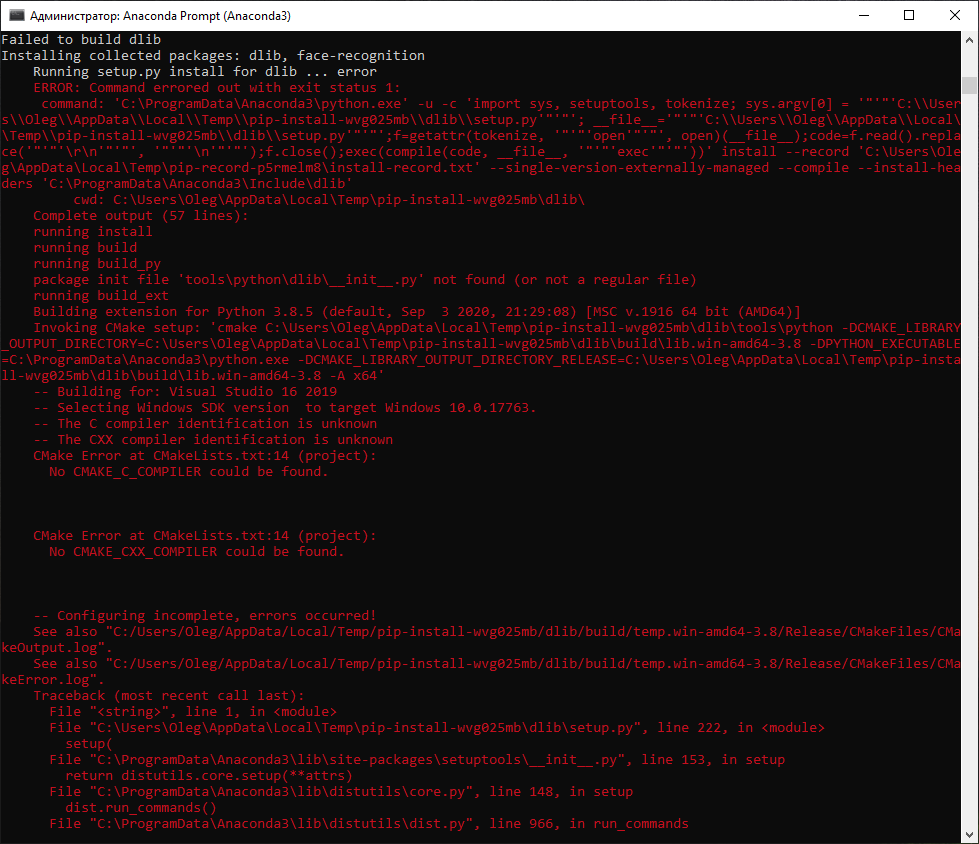
Я начал искать решение этой ошибки, пробовать менять тип компилятора (cmake -G » Visual Studio 16 2019″), но только стоило установить SDK, как все проблемы ушли.
Я пробовал данный метод на двух ПК и отмечу ещё пару подводных камней. Самое главное — Visual Studio должна быть 2019 года. У меня под рукой был офлайн установщик только 2017 — я мигом его поставил, делаю команду на установку пакета и получаю ошибку, что нужна свежая Microsoft Visual C++ версии 14.0. Вторая проблема была связана с тем, что даже установленная студия не могла скомпилировать проект. Помогла дополнительная установка Visual C++ 2015 Build Tools и Microsoft Build Tools 2015.
Открываем вновь Anaconda Prompt, используем ту же самую команду и ждём, когда соберется проект (около 5 минут):
Сборка
Для удобства залили скомпилированные файлы в репозиторий — https://github.com/OlegBezverhii/python-notebooks/blob/master/For%20dlibs
Управляем громкостью
Вариантов оказалось несколько (ссылка), но чем проще — тем лучше. На русском язычном StackOverflow предложили использовать простую библиотеку от Paradoxis — ей и воспользуемся. Чтобы установить её, нам нужно скачать архив, пройти по пути C:ProgramDataAnaconda3Lib и перенести файлы keyboard.py, sound.py из архива. Проблем с использованием не возникало, поэтому идём дальше
Собираем события мыши
Самым популярным модулем для автоматизации управления мышью/клавиатурой оказался pynput. Устанавливаем так же через (pip install pynput). У модуля в целом неплохое описание — https://pynput.readthedocs.io/en/latest/mouse.html . Но у меня возникли сложности при получении событий. Я написал простую функцию:
from pynput import mouse

def func_mouse():
        with mouse.Events() as events:
            for event in events:
                if event:
                    print('Переместил мышку/нажал кнопку/скролл колесиком: {}n'.format(event))
                    print('Делаю половину громкости: ', time.ctime())
                    Sound.volume_set(volum_half)
                    break
В комментариях к статье придём к истине, как лучше сделать.
А что в итоге?
Adam Geitgey, автор библиотеки face recognition, в своём репозитории имеет очень хороший набор примеров, которые многие используют при написании статей: https://github.com/ageitgey/face_recognition/tree/master/examples
Воспользуемся одним из них и получим следующий код, который можно скачать по ссылке: Activity.ipynb, Activity.py
Код
# Подключаем нужные библиотеки
import cv2
import face_recognition

# Получаем данные с устройства (веб камера у меня всего одна, поэтому в аргументах 0)
video_capture = cv2.VideoCapture(0)

# Инициализируем переменные
face_locations = []

from sound import Sound
Sound.volume_up() # увеличим громкость на 2 единицы
current = Sound.current_volume() # текущая громкость, если кому-то нужно

volum_half=50  # 50% громкость
volum_full=100 # 100% громкость

Sound.volume_max() # выставляем сразу по максимуму


# Работа со временем

# Подключаем модуль для работы со временем
import time
# Подключаем потоки
from threading import Thread
import threading


# Функция для работы с активностью мыши
from pynput import mouse

def func_mouse():
        with mouse.Events() as events:
            for event in events:
                if event == mouse.Events.Scroll or mouse.Events.Click:
                    #print('Переместил мышку/нажал кнопку/скролл колесиком: {}n'.format(event))
                    print('Делаю половину громкости: ', time.ctime())
                    Sound.volume_set(volum_half)
                    break

# Делаем отдельную функцию с напоминанием
def not_find():
    #print("Cкрипт на 15 секунд начинается ", time.ctime())
    print('Делаю 100% громкости: ', time.ctime())
    #Sound.volume_set(volum_full)
    Sound.volume_max()

    # Секунды на выполнение
    #local_time = 15
    # Ждём нужное количество секунд, цикл в это время ничего не делает
    #time.sleep(local_time)

    # Вызываю функцию поиска действий по мышке
    func_mouse()
    #print("Cкрипт на 15 сек прошел")


# А тут уже основная часть кода

while True:
    ret, frame = video_capture.read()

    '''
    # Resize frame of video to 1/2 size for faster face recognition processing
    small_frame = cv2.resize(frame, (0, 0), fx=0.50, fy=0.50)
    rgb_frame = small_frame[:, :, ::-1]
    '''

    rgb_frame = frame[:, :, ::-1]

    face_locations = face_recognition.face_locations(rgb_frame)

    number_of_face = len(face_locations)

    '''
    #print("Я нашел {} лицо(лица) в данном окне".format(number_of_face))
    #print("Я нашел {} лицо(лица) в данном окне".format(len(face_locations)))
    '''

    if number_of_face < 1:
        print("Я не нашел лицо/лица в данном окне, начинаю работу:", time.ctime())
        '''
        th = Thread(target=not_find, args=()) # Создаём новый поток
        th.start() # И запускаем его
        # Пока работает поток, выведем на экран через 10 секунд, что основной цикл в работе
        '''
        #time.sleep(5)
        print("Поток мыши заработал в основном цикле: ", time.ctime())

        #thread = threading.Timer(60, not_find)
        #thread.start()

        not_find()
        '''
        thread = threading.Timer(60, func_mouse)
        thread.start()
        print("Поток мыши заработал.n")
        # Пока работает поток, выведем на экран через 10 секунд, что основной цикл в работе
        '''
        #time.sleep(10)
        print("Пока поток работает, основной цикл поиска лица в работе.n")
    else:
        #все хорошо, за ПК кто-то есть
        print("Я нашел лицо/лица в данном окне в", time.ctime())
        Sound.volume_set(volum_half)

    for top, right, bottom, left in face_locations:
        cv2.rectangle(frame, (left, top), (right, bottom), (0, 0, 255), 2)

    cv2.imshow('Video', frame)

    if cv2.waitKey(1) & 0xFF == ord('q'):
        break


video_capture.release()
cv2.destroyAllWindows()
Суть кода предельно проста: бегаем в цикле, как только появилось хотя бы одно лицо (а точнее координаты), то звук делаем 50%. Если не нашёл никого поблизости, то запускаем цикл с мышкой.
Тестирование в бою
Ожидание и реальность
Если вы посмотрели видео, то поняли, что результат ещё далёк от реальной эксплуатации.
Признаю честно — до этого момента никогда не сталкивался с многопоточностью на Python, поэтому «с наскоку» тему взять не удалось и результат по видео понятен. Есть неплохая статья на Хабре, описывающая различные методы многопоточности, применяемые в языке. Пока у меня решения нету по этой теме нету — будет повод разобраться лучше и дописать код/статью с учетом этого.
Так же возникает закономерный вопрос — а если вместо живого человека поставить перед монитором картинку? Да, она распознает, что, скорее всего, не совсем верно. Мне попался очень хороший материал по поводу определения живого лица в реальном времени — https://www.machinelearningmastery.ru/real-time-face-liveness-detection-with-python-keras-and-opencv-c35dc70dafd3/ , но это уже немного другой уровень и думаю новичкам это будет посложнее. Но эксперименты с нейронными сетями я чуть позже повторю, чтобы тоже проверить верность и повторяемость данного руководства.
Немаловажным фактором на качество распознавания оказывает получаемое изображение с веб-камеры. Предложение использовать 1/4 изображения (сжатие его) приводит только к ухудшению — моё лицо алгоритм распознать так и не смог. Для повышения качества предлагают использовать MTCNN face detector (пример использования), либо что-нибудь посложнее из абзаца выше.
Другая интересная особенность — таймеры в Питоне. Я, опять же, признаю, что ни разу до этого не было нужды в них, но все статьях сводится к тому, чтобы ставить поток в sleep(кол-во секунд). А если мне нужно сделать так, чтобы основной поток был в работе, а по истечению n-ое количества секунд не было активности, то выполнялась моя функция? Использовать демонов (daemon)? Так это не совсем то, что нужно. Писать отдельную программу, которая взаимодействует с другой? Возможно, но единство программы пропадает.
Заключение
На своём примере могу точно сказать — не все руководства одинаково полезны и простая задача может перерасти в сложную. Я понимаю, что большинство материалов является переводом/простым копированием документации. Но если ты пишешь руководство, то проверь хотя бы на тестовой системе, что написанные тобой действия точно повторимы. Пробуйте, экспериментируйте — это хороший повод изучить и узнать новое.
P.S. Предлагаю вам, читатели, обсудить в комментариях статью — ваши идеи, замечания, уточнения.