Overview
EN:I’ve seen this issue listed many times in comment and discussion sections. I’ve encountered it myself. Today I am giving you all the workaround for the issue of a subscribed and downloaded submarine not appearing.RU:Важная информация: Русский мой третий язык Я до сих пор учусь. Часть этого переведена Google. Не стесняйтесь вносить исправления. Я видел эту проблему много раз в комментариях и обсуждениях. Я столкнулся с этим сам. Сегодня я даю вам все обходные пути для проблемы, когда подписанная и загруженная субмарина не появляется.
English
I will provide photos for all file navigation steps. Every click I make will be listed as a step to ensure people don’t get lost.
Step 1: In Steam right click on Barotrauma
Step 2: Navigate to the manage tab.
Step 3: Click on browse local files. You should be brought to a window like this:

This is the folder for the game. We will be doing all our work in here.
Step 4: Click on mods

This is the folder we need to look in to find the “missing sub” be sure you are subscribed to the sub still.

This is inside the folder. Anything you subscribe to will appear in here, even subs.
Step 5: Open the folder of the missing sub.

Missing submarine located!

This is a more complicated example. But still workable.
Step 5.5: Open any sub-folders(Which may or may not also be a sub folder). In this case we are clicking on the folder labeled “Submarines”. This folder tends to appear should multiple files be needed for copy.

Sometimes there will be additional folders. Try and find the one that contains “SUB” files if there is not a clearly labeled folder.
Step 6: Locate the “SUB” files. These are the files for the submarine. Copy every file be needed for the sub to your clipboard. This means should count for shuttles and other important components(like a ballast).

Since the missing submarine has some additional features listed on its workshop page we will be copying those files as well. In this case a shuttle was listed. The transducer file seems to be an important component for the ship as well so we will copy both files along with the main submarine.
Step 7: Navigate back to Barotrauma’s main folder.

Press that button for a quick navigation back to Barotraumas Main Folder.
Completing this step should bring you to a screen like this.
Step 8: Click on the Submarines folder in Barotrauma’s main folder

This is the folder we will be opening.
Step 9: Paste the files you copied straight into this fold(Ignore the downloaded folder)

Do not put them into downloads. This can cause issues, and may not add it to the list.
русский
Я предоставлю скриншоты для всех шагов навигации по файлам. Каждый клик, который я делаю, будет указан как шаг, чтобы люди не потерялись.
1: В Библиотеке Steam кликните правой кнопкой мыши на Barotrauma
2: Перейдите на вкладку “Управление”
3: Нажмите на “Просмотреть локальные файлы”. Вы должны быть приведены к окну, как это:
Это папка игры. Мы будем делать всю нашу работу здесь.
4: Нажмите на Mods
Это папка, в которой мы должны искать «пропавшую подводную лодку», чтобы убедиться, что вы все еще подписаны на подводную лодку.
Это внутри папки. Все, на что вы подписаны, появится здесь, даже подводные лодки.
5: Откройте папку с пропавшей подводной лодкой.
Пропавшая лодка найдена!
Это более сложный пример. Но все еще выполнимо.
Step 5.5: Откройте любые дочерние папки. В этом случае мы нажимаем на папку с надписью «Submarines». Эта папка имеет тенденцию появляться, если для копирования потребуется несколько файлов.
Иногда будут дополнительные папки. Попробуйте найти ту, которая содержит файлы «SUB», если нет четко обозначенной папки.
Step 6: Найдите файлы «SUB». Это файлы для подводной лодки. Скопируйте каждый файл, необходимый для подводной лодки, в буфер обмена. Это должно учитываться для шаттлов и других важных компонентов (таких как балласт).
Поскольку у пропавшей подводной лодки есть некоторые дополнительные функции, перечисленные на странице в мастерской, мы также будем копировать эти файлы. В данном случае был указан челнок. Файл преобразователя также является важным компонентом для подводной лодки, поэтому мы скопируем оба файла вместе с основным файлом подводной лодки.
Step 7:Вернитесь в главную папку Barotrauma.
Нажмите эту кнопку для быстрой навигации к корневой папке Barotrauma.
Выполнение этого шага должно привести вас к такому экрану.
Step 8: Нажмите на папку Submarines в корневой папке Barotrauma
Это папка, которую мы будем открывать.
Step 9: Вставьте файлы, которые вы скопировали прямо в эту папку(Игнорируйте папку Downloaded)
Не перемещайте их в Загрузки. Это может вызвать проблемы, и может не добавить файлы в список.
Спасибо rav2n за помощь с переводом!!
![]()


Транспортная подлодка премиум класса. Предназначена для транспортировки, исследований, добычи ресурсов и их переработки, имеет солидный арсенал который могут дополнить два больших орудия оснащена восемью каютами для членов экипажа у каждого имеется личный шкафчик с собственным кодом доступа для владельца, только капитан может получить доступ к любому шкафчику. Имеет разведывательный челнок «Прилипала» рассчитанный на троих, предназначенный для исследования пещер оснащён двумя магнитными пушками.
Экипаж: 4 — 16 человек
Цена: 40000
Установка:
1. Распаковать файл
2. Закинуть файл в BarotraumaLocalMods
3. В игре Настройки -> Моды -> Переместить «Медуза 4» в разрешённые обычные наборы


P.S. Анчоус другая подлодка её может не быть
В статье присутствуют только оригинальные подводные лодки которые доступны игрокам по умолчанию, т.е. это подлодки, которые присутствуют при чистой установке barotrauma.
Но вы всегда можете посетить WorkShop в Steam и скачать подлодки разработанные и улучшенные другими участниками. Поверьте, там есть крайне достойные экземпляры которые, зачастую значительно превосходят по оснащению дефолтные подлодки.
В таблице ниже перечислены стандартные подводные лодки и их основные основные характеристики; то есть до установки каких-либо обновлений.
Максимальная скорость подъема для всех подводных лодок — 19 км/ч.
Азимут (Azimuth)
| Класс | Разведчик |
| Стоимость (мк) | 10000 |
| Размеры (Ширина х Высота) | 34×8 м |
| Рекомендуемый опыт работы в команде | Новичок |
| Рекомендуемый экипаж (человек) | 3–5 |
| Фабрикатор и деконструктор | Нет |
| Медицинский фабрикатор | Нет |
| Максимальная горизонтальная скорость (км/ч) | 30 |
| Максимальная скорость спуска (км/ч) | 16 |
| Электромагнитные катушки | 2 |
| Рейлганы | 0 |
| Катушка электрического разряда | 0 |
| Глубинная бомба | 2 |
Дюгонь (Dugong)
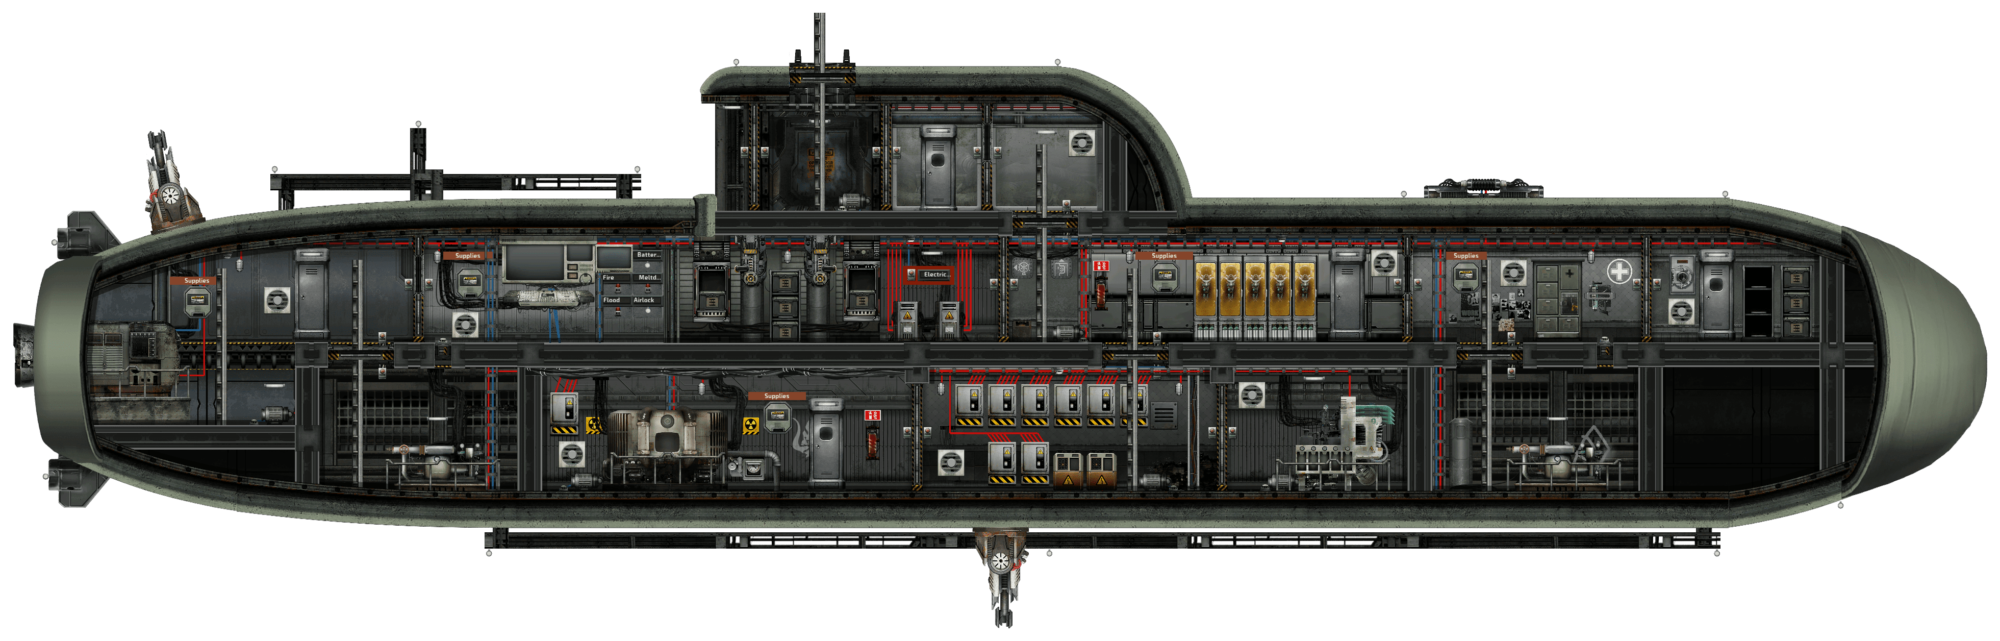
| Класс | Разведчик |
| Стоимость (мк) | 6000 |
| Размеры (Ширина х Высота) | 34×8 м |
| Рекомендуемый опыт работы в команде | Новичок |
| Рекомендуемый экипаж (человек) | 3–5 |
| Фабрикатор и деконструктор | Нет |
| Медицинский фабрикатор | Нет |
| Максимальная горизонтальная скорость (км/ч) | 22 |
| Максимальная скорость спуска (км/ч) | 12 |
| Электромагнитные катушки | 2 |
| Рейлганы | 0 |
| Катушка электрического разряда | 1 |
| Глубинная бомба | 0 |
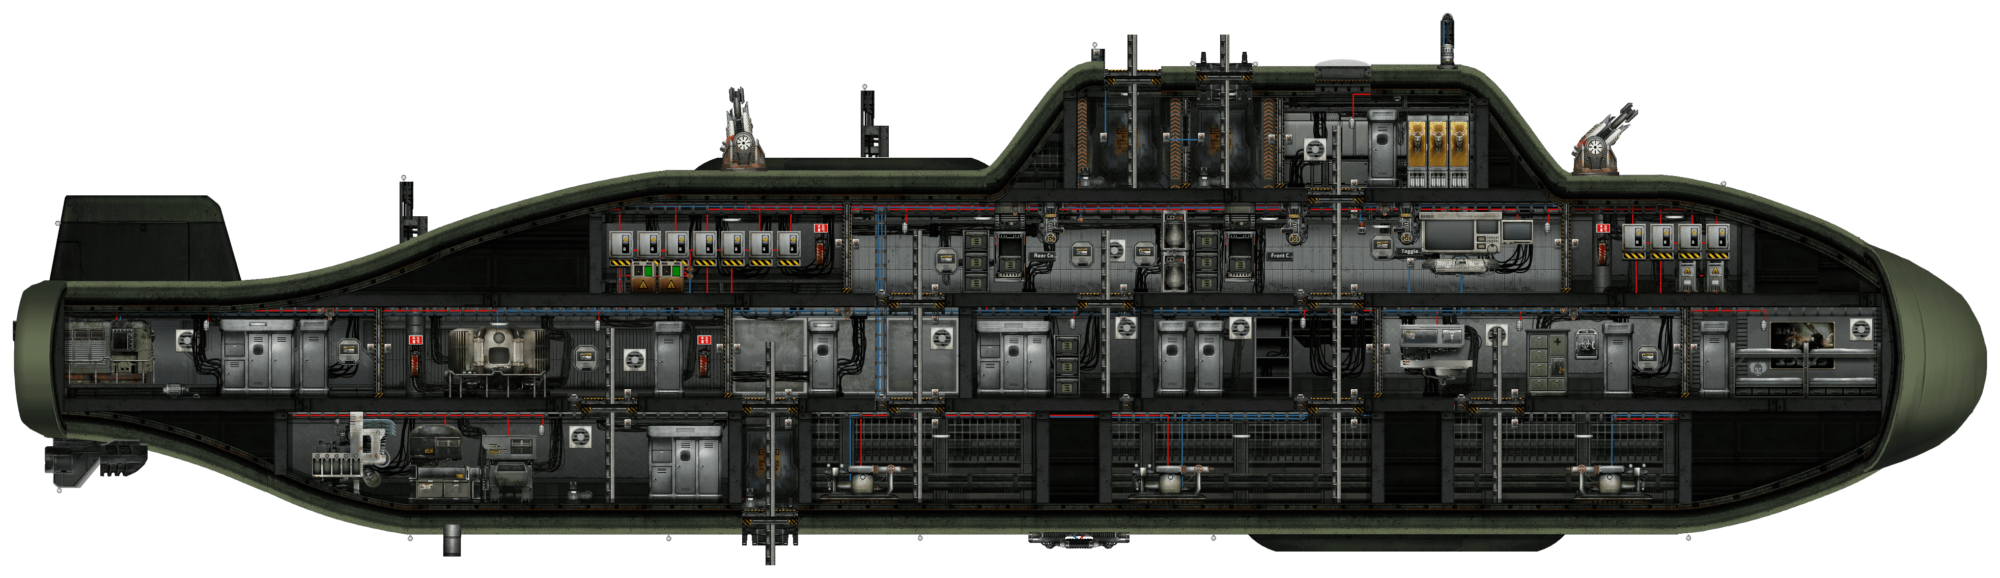
Горбун (Humpback)
| Класс | Атака |
| Стоимость (мк) | 78000 |
| Размеры (Ширина х Высота) | 44×9 м |
| Рекомендуемый опыт работы в команде | Средний |
| Рекомендуемый экипаж (человек) | 4–6 |
| Фабрикатор и деконструктор | да |
| Медицинский фабрикатор | да |
| Максимальная горизонтальная скорость (км/ч) | 26 |
| Максимальная скорость спуска (км/ч) | 13 |
| Электромагнитные катушки | 2 |
| Рейлганы | 1 |
| Катушка электрического разряда | 0 |
| Глубинная бомба | 0 |
Орка (Orca)
| Класс | Разведчик |
| Стоимость (мк) | 9000 |
| Размеры (Ширина х Высота) | 41×10 м |
| Рекомендуемый опыт работы в команде | Новичок |
| Рекомендуемый экипаж (человек) | 3–5 |
| Фабрикатор и деконструктор | да |
| Медицинский фабрикатор | да |
| Максимальная горизонтальная скорость (км/ч) | 25 |
| Максимальная скорость спуска (км/ч) | 15 |
| Электромагнитные катушки | 2 |
| Рейлганы | 0 |
| Катушка электрического разряда | 1 |
| Глубинная бомба | 1 |
Тифон (Typhon)
| Класс | Атака |
| Стоимость (мк) | 11500 |
| Размеры (Ширина х Высота) | 40×14 м |
| Рекомендуемый опыт работы в команде | Средний |
| Рекомендуемый экипаж (человек) | 4–9 |
| Фабрикатор и деконструктор | да |
| Медицинский фабрикатор | да |
| Максимальная горизонтальная скорость (км/ч) | 23 |
| Максимальная скорость спуска (км/ч) | 8 |
| Электромагнитные катушки | 2 |
| Рейлганы | 1 |
| Катушка электрического разряда | 1 |
| Глубинная бомба | 1 |
Тифон 2 (Typhon 2)
| Класс | Атака |
| Стоимость (мк) | 20000 |
| Размеры (Ширина х Высота) | 40×14 м |
| Рекомендуемый опыт работы в команде | Средний |
| Рекомендуемый экипаж (человек) | 4–9 |
| Фабрикатор и деконструктор | да |
| Медицинский фабрикатор | да |
| Максимальная горизонтальная скорость (км/ч) | 18 |
| Максимальная скорость спуска (км/ч) | 12 |
| Электромагнитные катушки | 2 |
| Рейлганы | 1 |
| Катушка электрического разряда | 1 |
| Глубинная бомба | 1 |
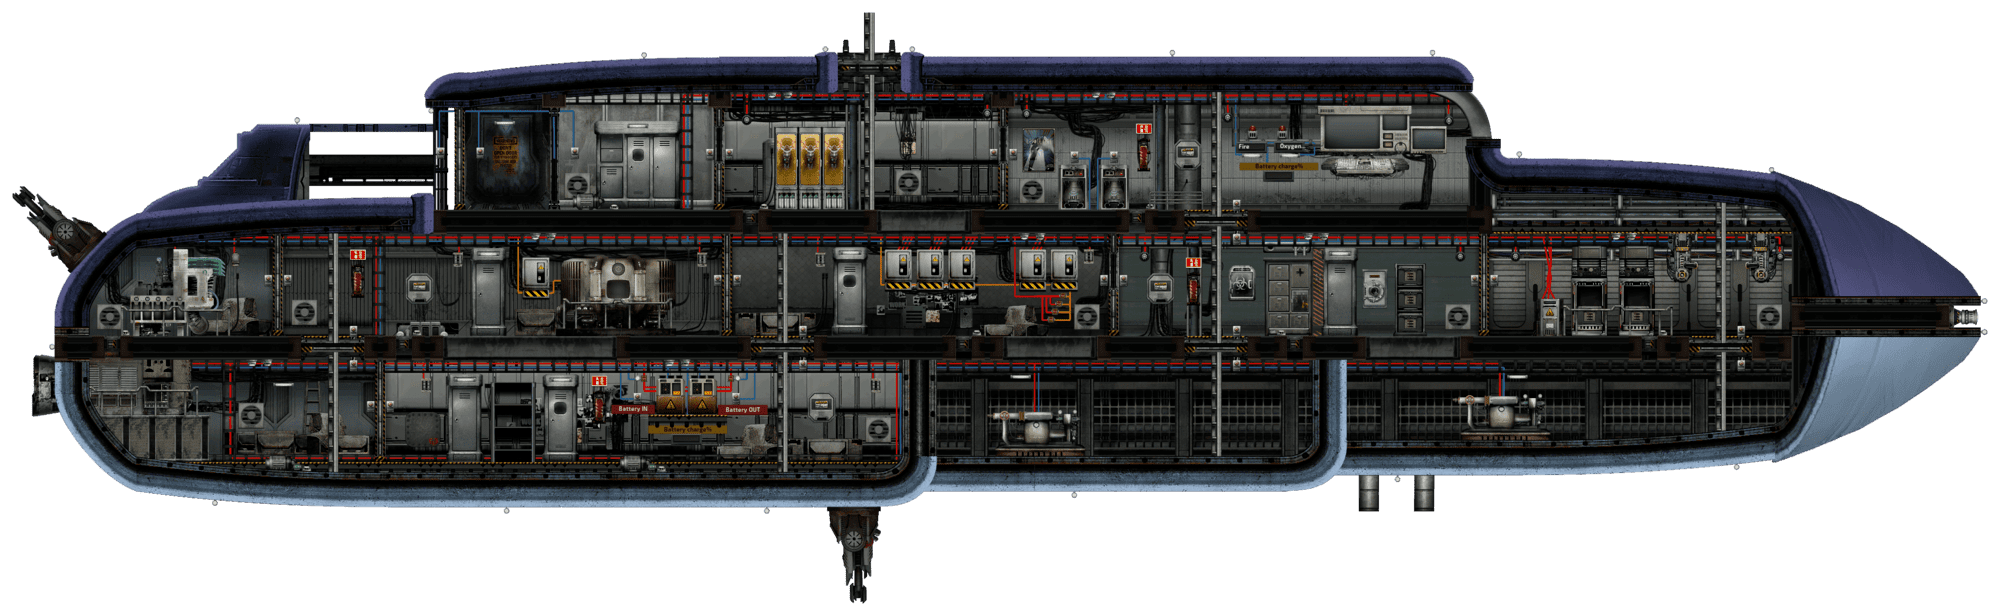
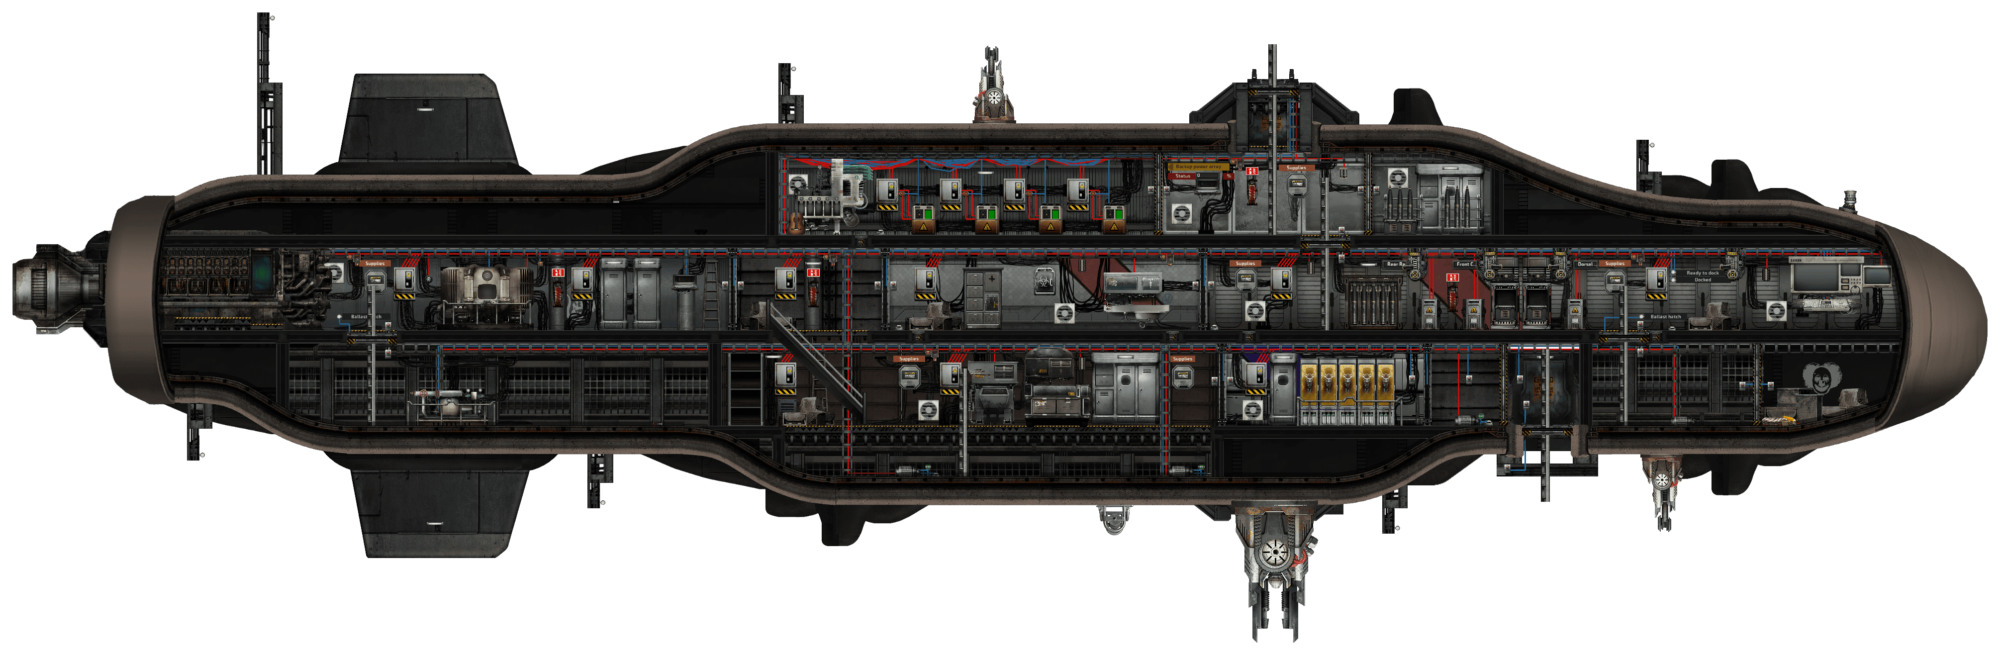
R-29
| Класс | Транспорт |
| Стоимость (мк) | 14500 |
| Размеры (Ширина х Высота) | 50×12 м |
| Рекомендуемый опыт работы в команде | Опытный |
| Рекомендуемый экипаж (человек) | 5–9 |
| Фабрикатор и деконструктор | да |
| Медицинский фабрикатор | Нет |
| Максимальная горизонтальная скорость (км/ч) | 16 |
| Максимальная скорость спуска (км/ч) | 9 |
| Электромагнитные катушки | 1 |
| Рейлганы | 0 |
| Катушка электрического разряда | 2 |
| Глубинная бомба | 0 |
Берилия (Berilia)

| Класс | Транспорт |
| Стоимость (мк) | 15326 |
| Размеры (Ширина х Высота) | 61×17 м |
| Рекомендуемый опыт работы в команде | Опытный |
| Рекомендуемый экипаж (человек) | 12–16 |
| Фабрикатор и деконструктор | да |
| Медицинский фабрикатор | Нет |
| Максимальная горизонтальная скорость (км/ч) | 16 |
| Максимальная скорость спуска (км/ч) | 10 |
| Электромагнитные катушки | 3 |
| Рейлганы | 0 |
| Катушка электрического разряда | 2 |
| Глубинная бомба | 1 |
Ремора (Remora)
| Класс | Глубоководный дайвер |
| Стоимость (мк) | 16000 |
| Размеры (Ширина х Высота) | 43×15 м |
| Рекомендуемый опыт работы в команде | Опытный |
| Рекомендуемый экипаж (человек) | 7–12 |
| Фабрикатор и деконструктор | да |
| Медицинский фабрикатор | да |
| Максимальная горизонтальная скорость (км/ч) | 21 год |
| Максимальная скорость спуска (км/ч) | 11 |
| Электромагнитные катушки | 1 + 1 * |
| Рейлганы | 1 |
| Катушка электрического разряда | 1 |
| Глубинная бомба | 1 |
Кастрюля (Kastrull)
| Класс | Атака |
| Стоимость (мк) | 21000 |
| Размеры (Ширина х Высота) | 45×11 м |
| Рекомендуемый опыт работы в команде | Опытный |
| Рекомендуемый экипаж (человек) | 8–12 |
| Фабрикатор и деконструктор | да |
| Медицинский фабрикатор | да |
| Максимальная горизонтальная скорость (км/ч) | 20 |
| Максимальная скорость спуска (км/ч) | 8 |
| Электромагнитные катушки | 2 + 1 * |
| Рейлганы | 1 |
| Катушка электрического разряда | 2 |
| Глубинная бомба | 1 |
The Submarine Editor is a modding tool that can be used to expand the core game by creating your own submarines, wrecks and outposts (NEW!). The custom creations can be shared in the Steam Workshop. The submarine editor is included within the main game and is accessible from the main menu under «Customize». At the moment the editor is only available in English. The process of building a fully playable submarine or functional monster can be quite involved and, unfortunately, in-game tutorials or documentation are not available yet. Aside from this Wiki, you may be able to find help through the following links:
FakeFish guide to the Submarine Editor
Barotrauma Discord Server
Barotrauma Forums
Basics
In Barotrauma a submarine is constructed from rectangular Hulls, designating areas that are inside the submarine. Water will not «spawn» inside of Hulls. The next step is to surround the Hull with structural objects to give collision surfaces to walk on and stop water from entering the Hull. Usually a submarine is made up of multiple Hulls separated by internal walls and floors, with doors and hatches to travel between them, and the ensemble of Hulls enclosed by Shell structures.
From this bare minimum watertight structure, there are several vital systems required for a fully functional submarine.
Power
- See also: Nuclear Reactor
Almost all submarine systems require power. Currently the only power source available to submarines is the Nuclear Reactor, fed by Fuel Rods which must be manually loaded into the reactor. The resulting output power can be wired to other systems, usually via Junction Boxes
Oxygen
- See also: Oxygen Generator
While the Hulls are empty of water, they are not automatically full of air. To prevent suffocation within the submarine, an oxygen generator must be powered and connected to an immediately accessible vent. Vents must be connected directly to the oxygen generator by links. Vents linked to other vents will not transfer air or water as of v0.10.6.2 therefore they must be connected to an oxygen generator to work properly.
Navigation
- See also: Navigation Terminal
Submarine movement is controlled by the Navigation Terminal, and achieved by two separate components: the Engine and Ballast Pumps. The engine is required for movement in the x direction (horizontally), while ballast is required for movement in the y direction (vertically).
Docking Port
- See also: Docking Port
A Docking Port is required for submarines to dock at outposts.
Spawnpoints
- See also: Spawnpoint
At least one character Spawnpoint is required for a submarine to be useable.
Interface
Submarine editor interface in «Edit Mode».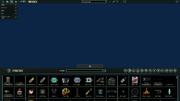
The buttons on the top part of the editor interface, from left to right, are Back, Open…, Save, Test, Toggle visibility, Previously used, (The name of your edit), Add submarine, Edit mode, Wiring mode, Generate waypoints, and Info.
At the top left, there is a panel listing the number of Items, Structures, Walls, Lights, and Shadow-casting lights in your edit. These numbers provide a general metric for the complexity of your file. The numbers will turn from green to red as they reach a level with significant (anticipated) performance impact.
Along the bottom is the Entity Menu, which can be toggled open and closed with the arrow button at the top of the menu. This is where you will find the components to create your edit. You can filter components using the textbox in the center of the Entity Menu and by selecting a category on the right. From left to right the categories are All, Structure, Decorative, Machine, Equipment, Electrical, Material, Misc, Alien, Wrecked, Thalamus, ItemAssembly, and Legacy.
After selecting an object, clicking in the editor window will place the object. Right clicking will cancel object placement. Clicking the name of an object will select it for placement.
Adjustment of an object’s position can be done by clicking and dragging the object. A finer degree of movement can be accomplished by selecting the object and using the arrow keys. Additionally, holding shift will ignore the grid when placing an object using the mouse.
Top Toolbar
Back
This button opens a dialogue box asking «Are you sure you want to return to the main menu? All your unsaved progress will be lost,» with the options of «Yes» and «Cancel». Selecting yes will bring you back to the main menu, cancel will keep you in the submarine editor.
Open…
This button opens the load menu, with the options to «Delete», «Load Autosave», «Cancel», and «Load» a selected file, with a textbox to search the list of available files. The available files are broken into «Submarine», «Outpost» (although this may be empty), «Outpost Module», and «Wreck». The files are all «.sub» files and are located at «…BarotraumaSubmarines», «…BarotraumaContentMapOutposts», and «…BarotraumaContentMapWrecks» respectively. Once a file is selected, it can be deleted to be removed from the game, or loaded into the editor to be edited. This is different from «Add Submarine».
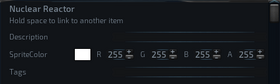
Save
This button opens the save menu, with text fields «Name» and «Description», a dropdown menu for «Submarine type», the settings «Shuttle» and «Hide in menus», and the «Required content packages». The save menu also has a «Preview Image» which can be automatically generated using the «Create» button or can be picked from your files using the «Browse…» button. Finally, the save menu has «Cancel» and «Save» buttons, which cancel or confirm your save respectively.
Submarine Type
With the submarine type «Submarine» selected, the «Price», «Class», «Recommended crew size» and «Recommended crew experience» characteristics appear. Everything is determined by you except the price, which is automatically calculated by the editor itself (but you can still set the price manually if you are so inclined).
With the submarine type «Outpost module» selected, the «Module type», «Allow attaching to», «Location types», «Gap positions», «Maximum count», and «Commonness» characteristics appear. These options allow you to define what type of module you have created, the types of other modules it may be connected to, which types of campaign map locations this module can be generated in, where the gaps in the hull of the module are (defining where other modules connect to this one), how many instances of this module can be generated at one outpost, and how likely this module is to be found in an outpost.
With the submarine type «Outpost» or «Wreck» selected, you have no additional characteristics to edit.
Regardless of submarine type selected, your file will be saved to «…BarotraumaSubmarines» as a «.sub» file.
Test
This button allows you to test your edit by spawning you and 2 crewmates into the .sub file in an otherwise empty ocean. If there are no spawnpoints present in your edit, you will receive an error message. Simply type «spawnpoint» into the filter textbox in the Entity Menu, click on the Spawnpoint, and place it within your edit. You will spawn as a Captain with standard spawn gear, so make sure to put the spawnpoint in a safe location.
Toggle Visibility
This button opens a menu to allow you to choose which types of entities are visible in the editor. The options from top to bottom are «Lighting», «Walls», «Structures», «Items», «Waypoints», «Spawnpoints», «Links», «Hulls», «Gaps», and «Thalamus». This button can be useful when trying to fine tune different aspects of your edit, without disturbing other layers.
Previously Used
This button opens a small window which shows the history of previously placed objects.
History
This button opens a drop-down menu which shows the edits you have made and allows you to jump back to specific edits. The history is cleared when exiting the editor.
Add Submarine
This button adds another submarine into the current submarine file. This button is NOT equivalent to «Open…Load» as the added submarine is non-editable and will simply appear as a green outline with a cross at the added file’s origin. This tool can be used for adding things such as smaller vessels, escape pods, or detachable sections into your current edit. For example, if you open the Kastrull submarine file, you will see the Kastrull’s Drone at the bottom right of the editor as a green outline. The drone is attached to the Kastrull by clicking on the Kastrull’s bottom docking hatch and then holding space while clicking on the green cross of the drone. You can test the success of this addition using the «Test» button. The Kastrull spawns with its drone attached. Note that this combination requires docking hatches oriented in a matching way, ie. a ship with only a top docking hatch cannot be connected to a ship with only a top docking hatch,a ship with a horizontal hatch cannot be connected to a ship with a vertical one, etc.
Edit Mode
This button puts the editor into «Edit Mode» (default mode). In this mode you can spawn and delete items. You can open/interact with items by pressing «E» or right-clicking the item and selecting «Open». More on this mode in the Editor Tools section.
Wiring Mode
This button puts the editor into «Wiring Mode». In this mode you gain a new menu on the left which contains every color of wire available in the game as well as an inventory where you have a screwdriver equipped. This mode allows you to wire power and signals between devices in your edit. More on this mode in the Editor Tools section.
Generate Waypoints
This button will generate waypoints for AI navigation around the submarine based upon the layout of hulls, gaps, doors, hatches, and ladders. If you want your ship to be compatible for playing with bots you should double-check your waypoints after they have been generated. Every point on the ship you want the AI to access should be within character’s reach of a waypoint. Connect waypoints by left-clicking on a waypoint, holding space, and then left-clicking the waypoint you want to connect it to. Pay special attention to the waypoints outside of the ship, as the auto-generated waypoints tend to intersect with the collision boxes of the railguns and coilguns, as well as being dangerously close to the propeller.
Info
This button displays the information about the submarine and character editors. Hopefully someday in the future this will contain official documentation and tutorials.
Editor Tools
Edit Mode
In edit mode, the user can spawn and delete entities using the Entity Menu. Items can be selected and placed in containers by holding the item over the container, holding shift, then releasing the item once the desired container is highlighted. Additionally, containers and appropriate items can be opened by mousing over them and pressing «E» or right-clicking them and selecting «Open». Once the inventory of the container is open, items can be selected from the Entity Menu and placed in inventory slots. Individual items can be placed by clicking once, multiple items can be placed by clicking and dragging over the inventory slots. This is especially useful when filling items with the same item multiple times, such as with shotguns, harpoon guns, and revolvers.
The entity menu contains almost every item that can be found in the game. They are organized into different categories that can be selected via buttons in the top right corner of the menu. Users may filter items in the selected category by using the ‘Filter’ textbox on top of the menu.
All
The ‘All’ category displays items from all categories.
Structure
The ‘Structure’ category contains walls, fins and some decorative elements specific to a submarine’s hull.
Decorative
‘Decorative’ items include background walls, signs and decorations.
Machine
The ‘Machine’ category contains functional devices.
Equipment
‘Equipment’ are items that can be carried, handled and/or equipped by characters.
Electrical
Items that relate to storing and distributing power and signals are found in the ‘Electrical’ category. This includes batteries, wires, lamps and logic components.
Material
The ‘Material’ category contains items used primarily in crafting.
Misc
The ‘Misc’ category contains items that don’t fit into any other category.
Alien
The ‘Alien’ category is for items specific to the alien ruins.
Wrecked
The wrecked versions of items are in the ‘Wrecked’ category.
Thalamus
The ‘Thalamus’ is a special category comprised of items related to the Thalamus creature.
ItemAssembly
Multi-item assemblies saved in the editor are found under ‘ItemAssembly’.
Legacy
The ‘Legacy’ category contains legacy items that aren’t officially supported, but remain in the editor to preserve compatibility with older creations.
Linking
Links are used to associate two objects together within your edit. To link one object to another, select either object, hold space, then select the other. To unlink two objects, select one of them and repeat the process.
If an object can be linked with another object, the details will be presented in yellow text in the Object Properties underneath the object name. The object properties will prompt you to «Hold space and click with the mouse to link to another item» and will then specify «Allowed links». Sometimes you will attempt a space-click to link 2 objects together which are not allowed to be linked and no link will appear, while other times the link will appear in red. If you believe 2 devices should be able to be linked but you are not seeing the link appear, you may not have Links visible under the «Toggle Visibility» menu. When 2 objects are successfully linked, the link appears green.
Examples of items that can be linked are vents to oxygen generators (a necessity), coilgun, railgun, and depth charge loaders to their respective weapons (also necessary), and containers to nearby fabricators or deconstructors or other containers. Linked objects have a special object property called «Display Side By Side When Linked». This can be useful when trying to see if you have the material to craft a certain item in a fabricator. When done successfully, the link should turn purple. However, this property can also result in inventory menus overlapping and can be frustrating in practice, so best not to go overboard and link 3 large cabinets together. A special case of linking is when a room in your edit is not defined by a single rectangle. This can be overcome by placing many hull objects, linking them, and then placing gap objects between the hull objects to create one large hull.
Wiring Mode
- See also: Wiring
In wiring mode, you gain a new menu on the left which contains every color of wire available in the game as well as an inventory where you have a screwdriver equipped. Clicking a wire from the menu will add it to the other hand of the player, allowing you to wire power and signals between devices in your edit. Wire nodes can be created by selecting an existing, placed wire with left-click, then «CTRL»+left-clicking on a straight portion of the wire. These nodes can then be dragged around the ship to make your wiring look neater (or worse, it’s not a science). Right-clicking a wire node will delete it. Objects cannot be spawned or moved while in wiring mode. Unfortunately this includes very useful and commonly wire-dependent electrical components and sensors. Use «CTRL+1» to quickly switch to Edit Mode and «CTRL+2» to switch back. (More shortcuts in the Shortcuts section)
To (Re)wire a Device
Pressing «E» on a device in Wiring Mode allows you to rewire the device, opening up a new panel with various electrical input and output pins, depending on the device. When this panel is opened with a wire in your hand, the wire will appear on the panel. If not, you can click on the desired color of wire while the device wiring panel is open and the wire will appear on the panel. Click and drag the end of the wire to the desired pin to secure one end of the wire to the device. Right-click or press «ESC» to leave the device wiring panel. Now you can move to the device you want to connect the other end of the wire to, dragging the wire behind your cursor. Mouse over the desired device and again press «E». Again the wire in your hand will appear on the panel, drag the wire to the desired pin to secure the wire. When the wire pops into place, you will see a label generated beside the wire telling you the name of the device (and pin) the other end of the wire is connected to. To remove a wire from a pin, press «E» to bring up the wiring panel, then click and drag the end of the wire off of the undesired pin, but still on the panel. To remove the wire completely, drag the end of the wire off of the wiring panel.
Object Properties
After an object has been placed, the user can select it and edit its properties. See items, and installations for more specific information.
Submarine Design Considerations
Flood Management
- See also: Maintenance#Flooding
Hull breaches are an almost inevitable occurrence in gameplay. Submarines can be designed to help manage flooding and mitigate its damaging effects. By designing a submarine to have several compartments, flooding can be localized, limiting damage to the power grid and disturbances to submarine buoyancy. Doors can be specifically wired to close automatically, or to have their state linked to a signal from a water detector. Indicators warning of high water levels on the opposite side of a door can prevent accidental flooding as well.
Bilge Systems
There are a variety of ways to set up a bilge system, but they always require a pump connected to a power source. Except for large submarines, only one pump is usually required. Effective bilge systems usually have the following characteristics:
- The bilge pump will be located near the bottom of the submarine, where water naturally tends to accumulate.
- The power source for the bilge pump will be elevated above the pump. This keeps the pump working even as water accumulates.
- The bilge room is separated from neighboring rooms by doors, or can only be entered from above.
More advanced bilge systems may feature automated bilging, remote activation, connection to the ballast system and/or flood doors.
Navigation
- See also: Connection Panels#Steering
Navigation is usually done via a Navigation Terminal. The navigation terminal must be wired to send signals to the engine and ballast pumps to be effective.
Engines
Engines are used to adjust the horizontal acceleration of the submarine. Engine power requirements and effectiveness can be specifically modified by changing the engine properties.
Ballast Systems
Ballast systems are used to adjust the rate of descent/ascent of the submarine. Ballast systems generally involve two or more pumps, connected to a power source. A larger ballast room means the submarine can ascend or descend more quickly. If the ballast room is too small or if there is not enough pumping power, the submarine will respond slowly to vertical navigation instructions.
Submarine weapons
- See also: Railgun
There are four components to a properly functioning submarine weapon system: the turret, the controller, a loader, and at least one supercapacitor. The turret should be on the outside of the submarine, with its range of rotation appropriately set to limit the potential for accidental hull damage (this can be done through changing the object properties). The gun controller is attached to the ceiling and is wired to the railgun. Submarine weaponry is powered exclusively by supercapacitors (rail- and coilguns have very high power requirements, which only supercapacitors can deliver). Generally, only one supercapacitor is needed per turret. Supercapacitors usually receive their energy directly from the power grid and must be charged like batteries. Weapon loaders must be linked to the corresponding turret in the same way that vents are linked to the oxygen generator in order for the weapon to use ammunition and work.
Hulls and Gaps
Hulls must be defined for every discrete space which can hold air or water in the submarine. If a space is not contained by the hull, the game will assume it is the outside ocean. The hull object is found under the «Structure» menu. The hull should be dragged to at least include the interior of a room and half of the space of the surrounding walls, floor, ceiling, and entryways (including doors and hatches).
Gaps connect hulls together and allow the game to determine how water and air should flow between rooms. Gaps should only be manually placed for cases where two hulls are adjacent to each other and will not be connected by a door or a hatch. Door and hatch gaps are automatically generated when a submarine is loaded into the editor, or at the start of gameplay.
Power Grid
- See also: Nuclear Reactor
Submarines are powered by at least one nuclear reactor, which must be connected indirectly to all of the powered objects within a submarine via junction boxes. If too much power flows through a junction box (or if the power delivered to a junction box far exceeds its load) for a sustained period of time, the box can blow a fuse or even explode and cause a fire. The power delivered by the reactor to all of the junction boxes it is immediately connected to is the amount required by the most energy demanding junction box. In general, power requirements for different paths in the grid should be about even, and the impact of power fluctuations when a machine becomes active or shuts down should be minimized.
Backup Power
- See also: Battery
Batteries are a source of backup power. Backup power can be used to keep critical systems (such as the oxygen generator) going for a short time when the reactor shuts down or fails. Batteries also can be used to prevent power outages by absorbing excess energy from a junction box.
Обновлено: 23.03.2023
Эта публикация удалена, так как она нарушает рекомендации по поведению и контенту в Steam. Её можете видеть только вы. Если вы уверены, что публикацию удалили по ошибке, свяжитесь со службой поддержки Steam.
Этот предмет несовместим с Barotrauma. Пожалуйста, прочитайте справочную статью, почему этот предмет может не работать в Barotrauma.
Этот предмет виден только вам, администраторам и тем, кто будет отмечен как создатель.
В результатах поиска этот предмет сможете видеть только вы, ваши друзья и администраторы.

Я постараюсь рассказать и показать как ВАМ создать СВОЮ АПЛ (субмарину). В дальнейшем я буду всегда так называть субмарину. Это проще.
К тому же, я буду показывать на своей «Акуле», которую делал 4 дня из-за незнания всех механик игры. Надеюсь, после этого руководства вы не потратите столько же времени в пустую.

1

4

2

| 3,163 | уникальных посетителей |
| 218 | добавили в избранное |

Тут вы будите проводить всё своё время. Если опыта у вас много, то стройка не займёт у вас много времени. Однако если в этом деле вы зелень(новенький), то готовьте чай и усаживайтесь поудобнее. Итак, знакомимся: Bаше рабочее поле.
—————————————————————————————————————————————-
Сверху у нас есть панель: Выход в меню (стрелка влево), открыть субмарину (приоткрытая папка), сохранить текущий проект (дискета), название проекта(его можно изменить при сохранении), добавить субмарину( Add submarine), режим редактирования (карандаш), режим персонажа (человечек), режим проводки (кабель), путевые точки (waypoints), отображение (сверху вниз: свет, стены, структура, предметы, путевые точки, точки спауна, соединения, Hull и Gap).
—————————————————————————————————————————————-
Панель снизу: фильтр с поисковой строкой (для поиска по названию), все материалы (абсолютно все доступные в игре), сооружения (ваш основной материал), украшения (задние стены и прочее), механизмы (органы субмарины), снаряжение (Из названия понятно думаю), электрика (коробки, провода, лампы и т.д.), материалы (Всякие руды, лекарства, камешки и т.д), разное (тут стоит искать двери и лестницу), с другой планеты (некоторые детали от другой расы), сохранённые детали (из названия понятно), устаревшее (просто старые детали).
—————————————————————————————————————————————-
- Вам нужен чертёж или хотя бы набросок того, что вы хотите построить. Поверьте, будет гораздо легче делать АПЛ (Атомную Подводную Лодку = субмарину) когда вы имеете представление как она должно выглядеть. Замечу: не внутренние отсеки, а именно сам корпус/очертания.
- Выбирая АПЛ, сразу продумывайте сколько человек она будет вмещать, будет она грузовой или боевой. От этого зависит размер АПЛ и как долго вам придётся работать с внутренней составляющей.
- Если у вас очень мало опыта в редакторе, то не брезгуйте открывать другие лодки для изучения. Как лежит проводка, корпус, пол, балки и т.д. Как только вы будите понимать как чего работает, вам станет легче и проще осваиваться в редакторе.
Если же с этим проблем нет, то приступаем:
Если вы всё-таки изучали другие лодки, то заметили, что корпус у всех один — синий. В самых разных наклонах и проекциях. В фильтре выбираем сооружения и ищем внизу корпус с названием «Shell «. Это основной материал для создания АПЛ. Благодаря ему и нужно создать основной корпус. Именно из него вам нужно попытаться воссоздать то, что вы нарисовали или смотрите с интернета. !ВНИМАНИЕ! Старайтесь ставить отдельные части корпуса максимально близко друг к другу. Выравнивайте его стрелками(одно нажатие-одно движение), если мышкой не выходит.
—————————————————————————————————————————————-
Помимо всего прочего, у вас в любом случае будет как минимум один шлюз, для соединения с базой. Надеюсь вы подумали над вторым? Он лишним не будет. Возможно вы поставите дверь, в этом случае стоит зайти в сохранённые детали и найти дверь с пометкой «AirLock», но об этом позже.
—————————————————————————————————————————————-
В конечном результате вы должны соединить все части корпуса между собой, чтобы получились очертания АПЛ. В моём случае это «Акула».
—————————————————————————————————————————————-
Всё в тех же сооружениях находим «basic platforms» (её ставим на место люков) и «large horizontal inside wall» (это наш пол)
—————————————- Они самые удобные для люков и дверей—————————————
—————————————————————————————————————————————-
Делим нашу АПЛ на отсеки. Необязательно должно быть всё одинаково, впрочем, это дело каждого. Ставьте двери, чтобы ориентироваться на высоту полов/потолка.
—————————————————————————————————————————————-


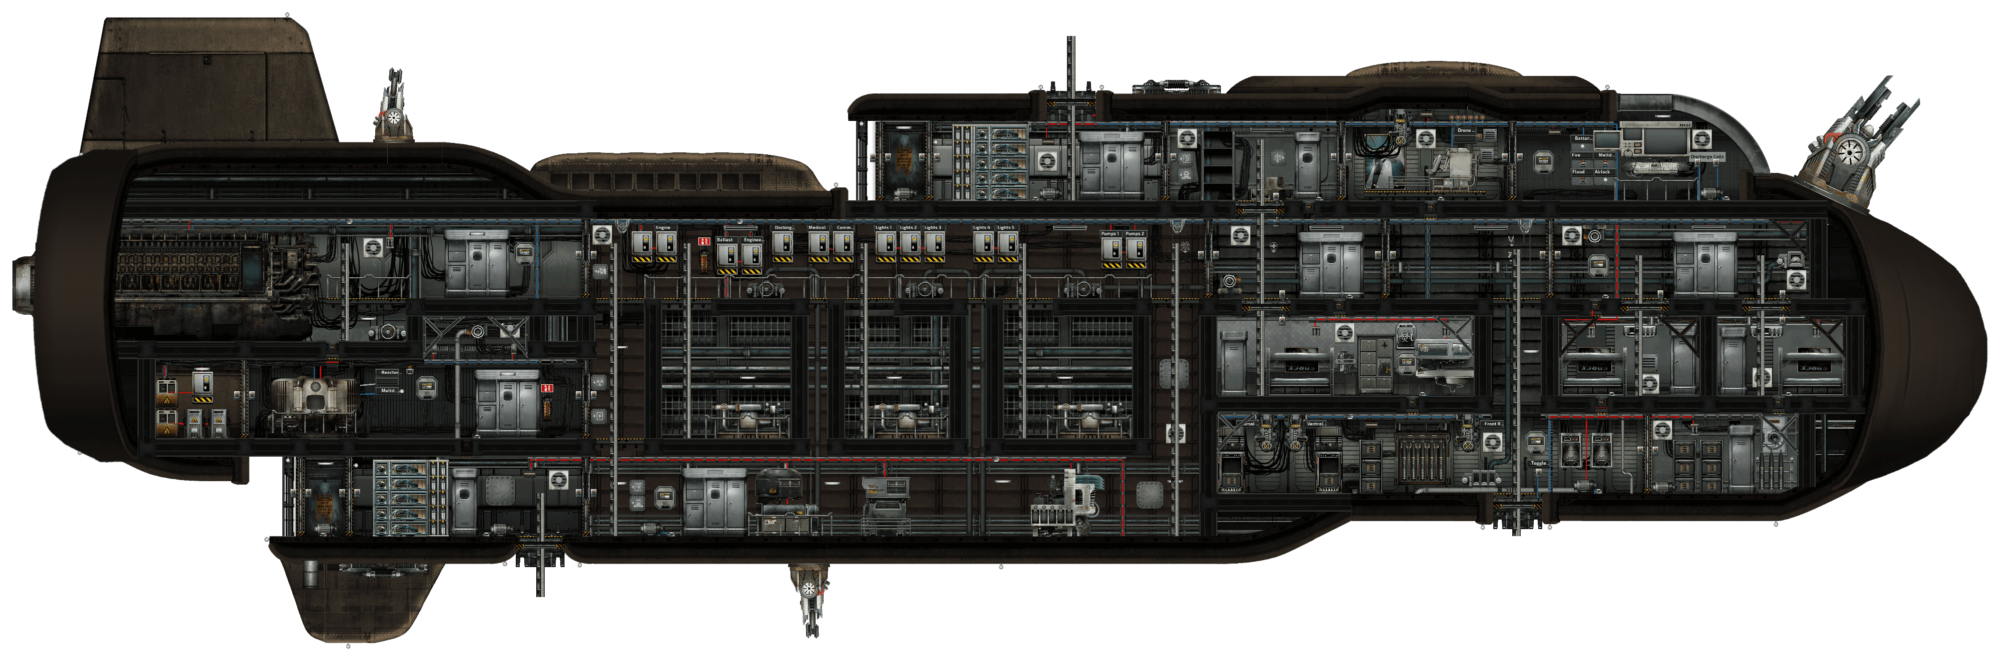
Верхний этаж
На верхнем этаже находится Оружейная с двумя стойками для снарядов рельсотрона, двумя ящиками для боеприпасов и одним стальным шкафом с различным оружием и боеприпасами. Он также содержит отсек с четырьмя распределительными коробками, четырьмя батареями, гитарой и кислородным генератором.

Ниже предоставлены две части редактора подлодок, описано всё предельно содержательно, и более менее понятно. Приятного чтения.
P.S. По прочтению, ответьте на опрос, выше этой записи.
Редактор подлодок. Часть 1.
«Open. » — открывает вайл субмарины, которую вы выберите из списка.
«Save» — сохраняет подлодку.
Когда вы нажали на «Save», там будет возможность дать имя вашей субмарине (Name), придать ей описание (Description), пометить его как шаттл (Shuttle), и настроить показ в меню (Hide in menus).
«Add submarine» — позволяет добавить ещё одну субмарину к уже существующей (полезно для размещения шаттлов спасения).
«STRUCTUR» — в нём находятся различные структуры, такие как: стены, полы, лестницы, окна, задний фон и так далее.
«EQUIPMENT» позволяет выбрать всю возможную в игре экипировку, к примеру: одежду, оружие, батарейки, инструменты и подобное.
«ELECTRICAL» содержит всё то, что хоть как-то касательно относится к электричеству. Это могут быть различные механизмы, сигналеры, вай-фай компоненты, аккумуляторы, кнопки и всё в этом роде.
«MATERIAL» собирает в себе материалы для фабрикаторов, там могут находится: медикаменты, различные слитки (FPGA circuit находится во вкладке «ELECTRICAL»).
«MISC» содержит различные вещи КОТОРЫЕ можно в пихнуть куда-либо, вещи В которые можно что-либо впихнуть, шлюзы, док порты и так далее (Так же, там находится лестница, та, за которую руками держаться нужно).
«ALIEN». Ну, здесь особо рассуждать не нужно — содержит всё, что связанно с руинами и монстрами (Туда же артефакты и руда, которые можно найти внутри руин).
«CHARASTER MODE» переводит вас в режим персонажа, позволяя заполнять шкафчики содержимым (не только шкафчики).
«WIRING MOD» переводит вас в режим прокладки проводов. В этом режиме вы можете подсоединять провода к различным устройствам, и прокладывать их куда угодно (даже в стены). Создавать новую точку провода или удалять её можно с помощью левой/правой кнопки мыши.
«GENERATE WAYPOINTS» генерирует вэйпоинты, для навигации ИИ по кораблю.
Меню «SHOW:», включает в себя опции показа структур, вещей, вейпоинтов и так далее.
«PREVIOUSLY USED» показывает список последних использованных объектов/структур (Последние использованные наверху).
Навигация, балласт, двигатели и кислород:
Пилотирование обычно осуществляется с помощью навигационного терминала. Навигационный терминал должен быть подключен, что бы подавать сигналы к двигателям и балластным насосам.
Балласт:
Используется для регулировки скорости спуска/подъема подводной лодки. Балласт обычно включает в себя два или более насосов, подключенных к источнику питания. Размер балластного отсека непосредственно влияет на управляемость — если помещение, выделенное под балласт слишком мало, или не хватает мощности накачки (мало насосов), подводная лодка будет менее управляемой, в плане перемещения по вертикали.
Двигатель:
Двигатели используются для регулировки горизонтального ускорения лодки. Мощность двигателя может быть изменена путем изменения свойств двигателя.
Кислород:
Для обеспечения экипажа кислородом, используется генератор кислорода. Он должен быть подключен к вентиляционному отверстию. Подключаются они ТОЛЬКО через редактор: устанавливаете генератор кислорода, прикручиваете к стенам вентиляционные отверстия (Vent), выбираете активным предметом уже установленный генератор кислорода, зажимаете пробел и тыкаете по вентиляции (На данный момент, отменить привязку через пробел — невозможно, так что будьте аккуратны).
Редактор подлодок. Часть 2.
Рельсотрон (RailGun):
Для функционирования орудия, нужны четыре компонента: само орудие, перископ, минимум один магазин (Railgun Loader), и один суперконденсатор (supercapasitor). Орудие должно быть снаружи субмарины. Перископ крепится к потолку, и подключается к рельсотрону проводами. Рельсотрон питается ИСКЛЮЧИТЕЛЬНО с помощью суперконденсаторов (электромагнитные пушки имеют высокое энергопотребление, которое могут удовлетворить только они). Как правило, для одного рельсотрона нужен всего один суперконденсатор. Суперконденсаторы обычно получают энергию от энергосистемы, и должны быть заряжены в точности, как батареи. Магазин должен быть связан с соответствующими рельсотронами (Через пробел, в пример можно взять связку Генератор кислорода — вентеляция).
Корпуса и Проемы (Hull and Gap):
Корпус (Hull) должен быть определён для каждого помещения, которое считается субмариной. Если корпус не обозначен, то игра будет считать, что комната за пределами субмарины. Объект Hull находится в меню «Structure».
Проём (Gap) является соединителем корпусов, который размещается на всю территорию двери или люка. Если проёмов нету, то игра не сможет пустить воду через дверь/люк.
Резервное питание:
Аккумуляторы (Battery) являются основной (и единственной) системой резервного питания. Резервное питание может использоваться для питания важных систем (Генератор кислорода), во время не активности/выхода из строя реактора.
Реактор
Комната реактора, находится в нижней левой части Дюгоня. Он соединен с коммутационными отсеками, содержит одну распределительную коробку, которая является главной распределительной коробкой, в случае ее поломки вся электроника не получит энергии. так же рядом с реактором находится один шкаф питания, вентиляционный выход и один стальной шкаф.
Нижний этаж
Нижний этаж Дюгоня состоит из пяти комнат (шесть, если рассматривать часть машинного отделения), в дальнем левом углу расположен один из двух балластов, с левой стороны находится реакторное отделение, посередине вы можете найти Распределительный отсек, справа находится Комната генератора кислорода, на дальней правой стороне находится второй балласт.
Barotrauma
26 июл в 7:41
Редактор подлодки и перенос скаченных подлодок в редактор
Возможно ли перенести скачанную подлодку из мастерской в саму мастерскую для дальнейшего улучшения подлодки?
26 июл в 9:12
However, you should definitely ask for permission from the original authors if you ever want to upload your «improved version» to the workshop.
—————————————————————
Это возможно, и это довольно просто
Тем не менее, вы обязательно должны спросить разрешения у первоначальных авторов, если вы когда-нибудь захотите загрузить свою «улучшенную версию» на семинар.
26 июл в 11:03
However, you should definitely ask for permission from the original authors if you ever want to upload your «improved version» to the workshop.
—————————————————————
Это возможно, и это довольно просто
Тем не менее, вы обязательно должны спросить разрешения у первоначальных авторов, если вы когда-нибудь захотите загрузить свою «улучшенную версию» на семинар.
Я хочу для себя переделать подлодку, но редактор подлодки на открывает подлодку из мастерской
27 июл в 2:40
However, you should definitely ask for permission from the original authors if you ever want to upload your «improved version» to the workshop.
—————————————————————
Это возможно, и это довольно просто
Тем не менее, вы обязательно должны спросить разрешения у первоначальных авторов, если вы когда-нибудь захотите загрузить свою «улучшенную версию» на семинар.
Я хочу для себя переделать подлодку, но редактор подлодки на открывает подлодку из мастерской
You have to put the files you want to edit into your submarine folder in order to open them in the editor.
From «BarotraumaMods» to «BarotraumaSubmarines».
———————————————————
Вы должны поместить файлы, которые хотите отредактировать, в папку вашей подводной лодки, чтобы открыть их в редакторе.
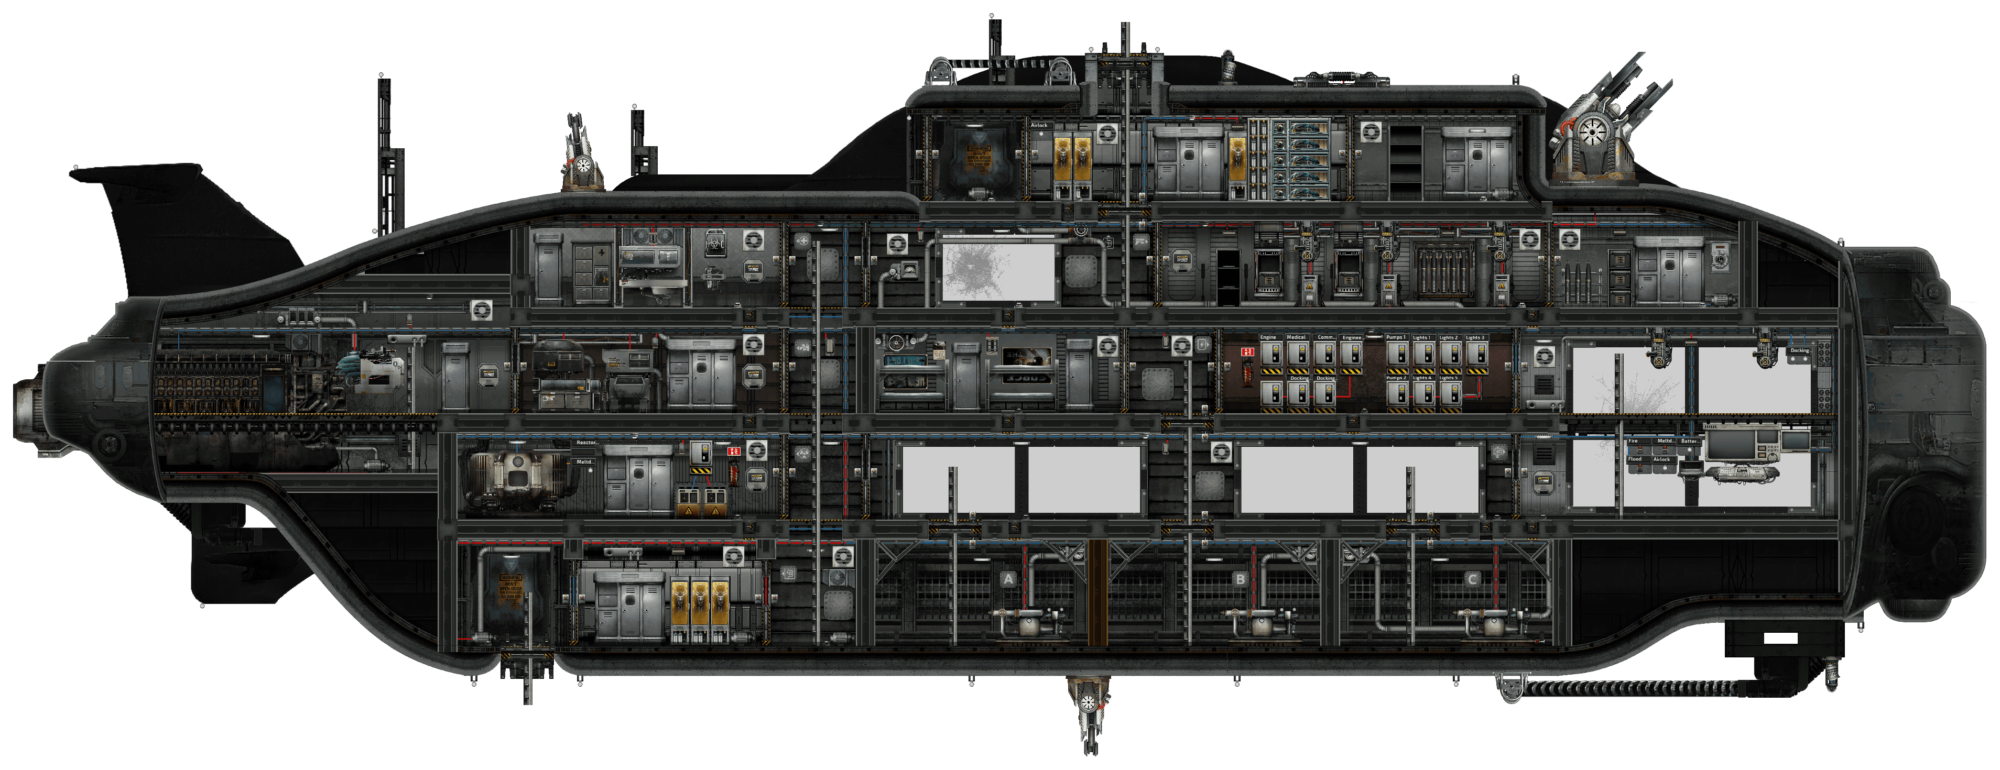
По сравнению с более крупными судами, серия Dugong уступает по всем параметрам, кроме одного: их надежность по цене мирового класса. Им не хватает огневой мощи и скорости, поэтому правильное маневрирование является ключевым моментом.

Нижний этаж
На нижнем этаже Горбуна вы можете найти Фабрикатор и Деконструктор, при этом Фабрикатор связан со Стальным шкафом, содержащим некоторые основные предметы для крафта.
Комната управления
Командная комната находится в левой части подлодки. С двумя перископами: один управляет верхней левой пушкой, а другой — нижней. Он содержит навигационный терминал с кнопками для выключения ядерного реактора, переключения подачи питания на батареи и активации катушки электрического разряда (расположен в верхней правой части подлодки), один монитор состояния, связанный с навигационным терминалом . В комнате так же есть есть шкаф снабжения.
Средний этаж
Средний этаж содержит три комнаты: реакторную, командную и медпункт (вы можете увидеть реакторную и командную комнату вверху). В медотсеке есть один производитель медицинских препаратов, один шкаф с ядами и противоядиями и один медицинский кабинет.
Средний этаж
На среднем этаже также пять комнат. В дальнем левом углу находится машинное отделение, с левой стороны — командная комната, в центре — комната для водолазных костюмов, справа — медицинский отсек, а в дальнем правом углу — оружейная. расположен.
Командная комната
Командная комната находится в правой части подлодки. Содержит четыре перископа, которые можно использовать для управления двумя пушками, одним рельсотроном и одной камерой, которую капитан может использовать, чтобы смотреть наружу, поскольку у Горбуна нет других перископов в командном пункте. Так же внутри навигационный терминал с кнопками для выключения ядерного реактора, один монитор состояния, связанный с навигационным терминалом. В комнате есть два шкафа снабжения, одна дверь, которая соединяет командную комнату с медотсеком, и два люка, один из которых соединяет с верхним этажом, второй с малым балластом.
Реактор
Комната реактора, находится в дальнем левом углу Горбуна. Он соединен с медотсеком, содержит одну главную распределительную коробку, один шкаф снабжения, один выход для вентиляции и два стальных шкафа.
Верхний этаж
На верхнем этаже находится воздушный шлюз, который отличается от большинства подводных лодок, поскольку в нем нет водолазных костюмов , а только один стальной шкаф с водолазным снаряжением.
Бывшее военное судно WH4-L3 «Горбун» было оборудовано, чтобы противостоять большинству опасностей в глубоводной Европе. Ее относительно высокая скорость компенсируется низкой маневренностью. Поскольку она все еще может похвастаться реактором старой модели, мощность необходимо дополнять резервной батареей, иначе экипаж окажется не в состоянии запустить все новое оборудование.

Читайте также:
- При обновлении arma 2 dayz mod произошла ошибка не найден исполняемый файл
- Замена bravura гта са андроид
- Как поменять уровень сложности в battlefield 3
- Как поменять ник в phasmophobia на пиратке
- Как запустить недетские сказки на windows 10
The Shipyard introduces Submarine customization and progression, which is available in every Outpost.
Submarine
The one in charge of selling Submarines wears the Boiler Suit and an unpowered Headset with the Sub icon above them. They have a Wrench, a Screwdriver, a Diving Mask and a Toolbox containing a loaded Welding Tool, a Welding Fuel Tank, and 1 Aluminum. Their station is the Maintenance bay, easily recognized from all the Submarine Blueprints hanging on the wall.
When interacting with them, an interface similar to the Outpost Terminal appears, showing all available subs for sale, with the fixed price and its class specified, along with the options to either Purchase or Purchase and Switch (This function is identical to the Switch option in the Outpost Terminal). There are 10 vanilla subs available for sale, plus any up to date modded subs the player/host may have installed.
| Sub | Class | Description | Price |
|---|---|---|---|
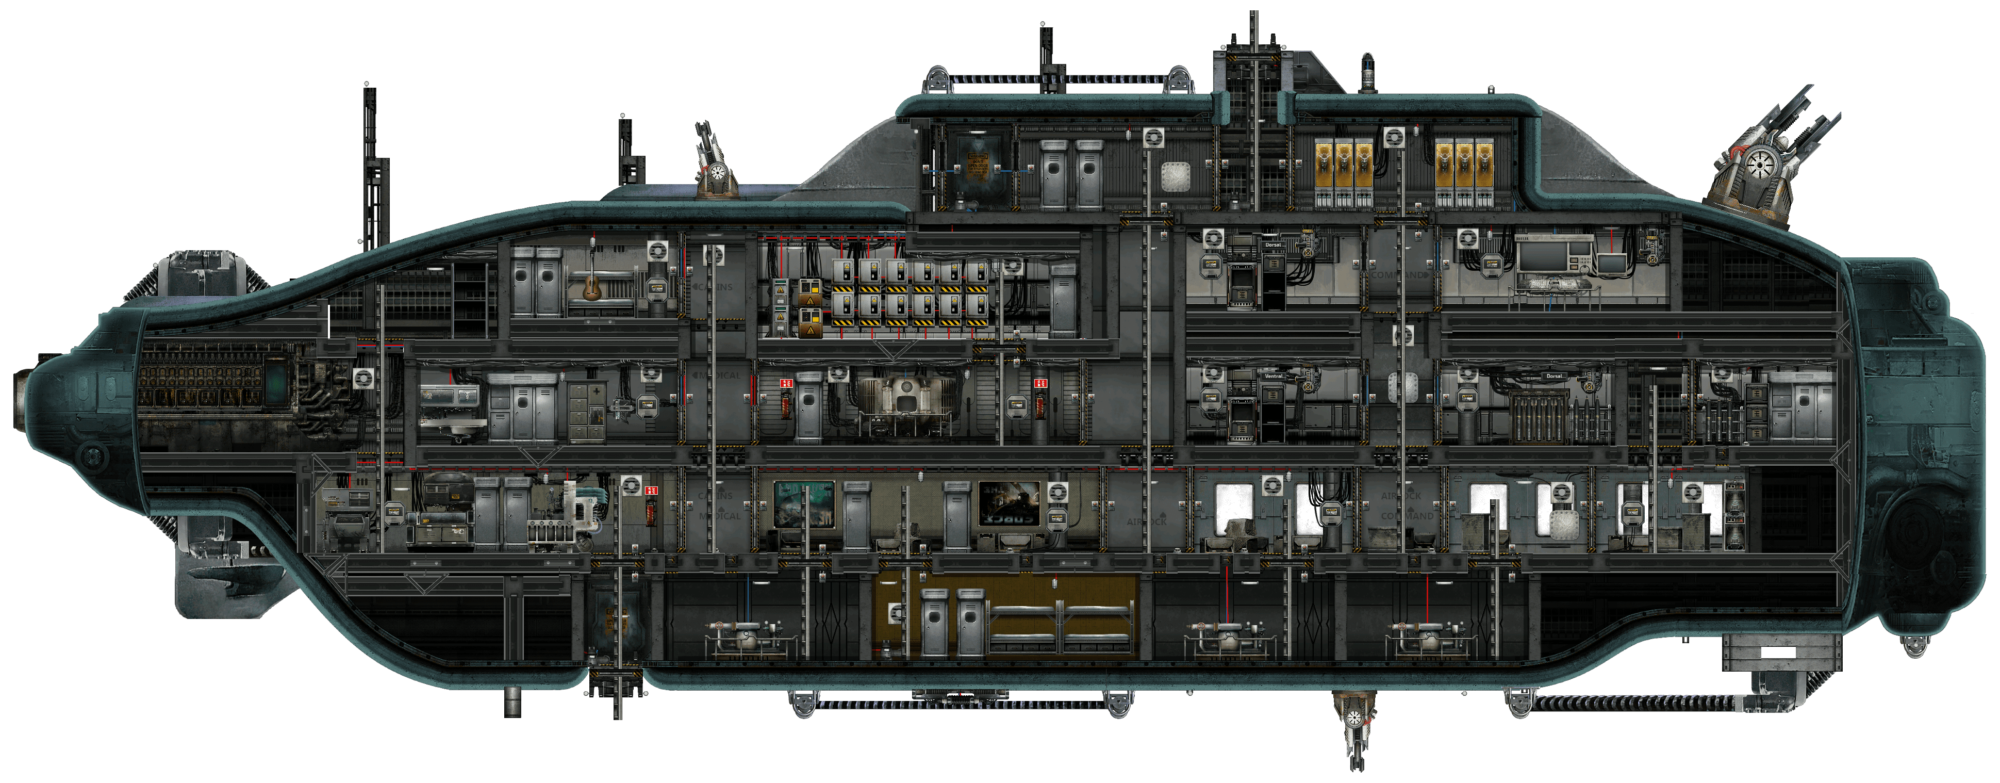
| Azimuth | Scout | Superior speed, sleek design, and quality-of-life systems make this submarine a favorite among wealthy Coalition captains who manage to make it to retirement. | 10,000 mk |
| Dugong | Scout | Compared to larger vessels, the Dugong series is overshadowed in all aspects except one: their reliability for their price is world class. They’re lacking firepower and speed, so smart maneuvering is key. | 6,000 mk |
| Orca | Scout | With a relatively high top speed and fantastic ascent and descent characteristics due to her 3 large ballast tanks, Orca class subs are agile vessels, let down only by their small compliment of weapons, unreliable engine and reactors with a greater than average hunger for fuel. | 9,000 mk |
| Humpback | Attack | A former military vessel, WH4-L3 ‘Humpback’ has been outfitted to withstand most of the dangers in deep Europa. Her relatively high velocity is offset by low maneuverability. As she’s still boasting an older model reactor, power needs to be supplemented by a backup battery array or the crew will find themselves unable to run all of the new equipment. | 7,800 mk |
| Kastrull | Attack | The Kastrull is a dependable attack sub class bringing plenty of firepower to any fight, and although it’s not very nimble, it does sport a drone gunship as standard. Keep in mind that with its experimental open ballast tanks, low tolerance to flooding and numerous crew stations, a large, experienced crew will get the most out of this sub. | 21,000 mk |
| Typhon | Attack | Typhon class subs are known for their brutish appearance, reasonable array of light and heavy firepower, and their general dependability. Any captain should be aware of their poor rate of descent and unimpressive top speed. | 11,500 mk |
| Typhon 2 | Attack | Typhon 2 is an overhauled version of the venerable Typhon class of sub. Serving as a heavy gunship, the Typhon 2 class subs remain slow and ugly, but with the benefits of better survivability for their crews. | 20,000 mk |
| Berilia | Transport | Berilia is one of the biggest cargo ships on Europa. Its two engines and three ballasts require a copious amount of power to operate, and keeping the machinery in good working condition is a handful for even a moderately large crew. | 15,000 mk |
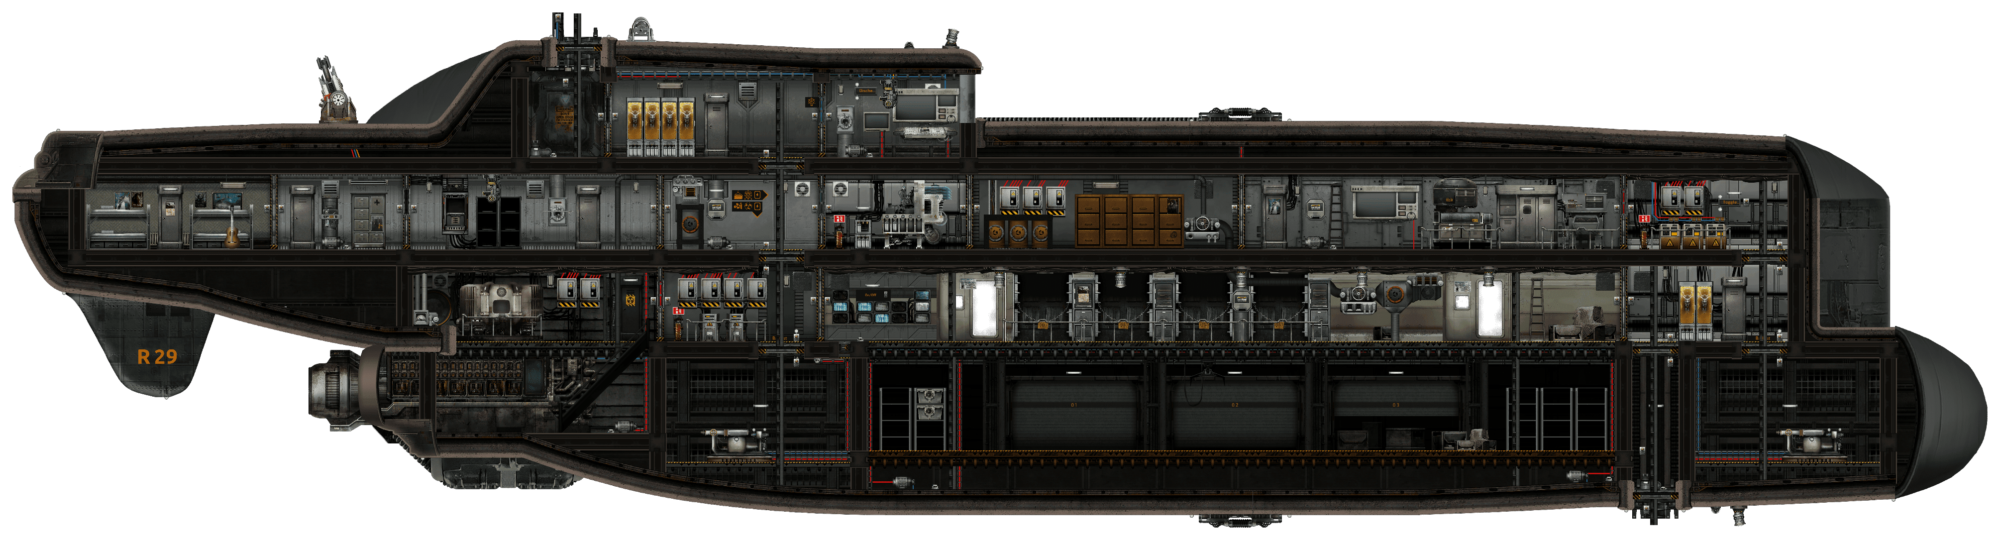
| R-29 «Big Rig» | Transport | R-29 is a heavyweight transport ship. While not terribly well armed against Europa’s underwater denizens, it has been retrofitted with two powerful electric discharge coils. Original design by rav2n. | 14,500 mk |
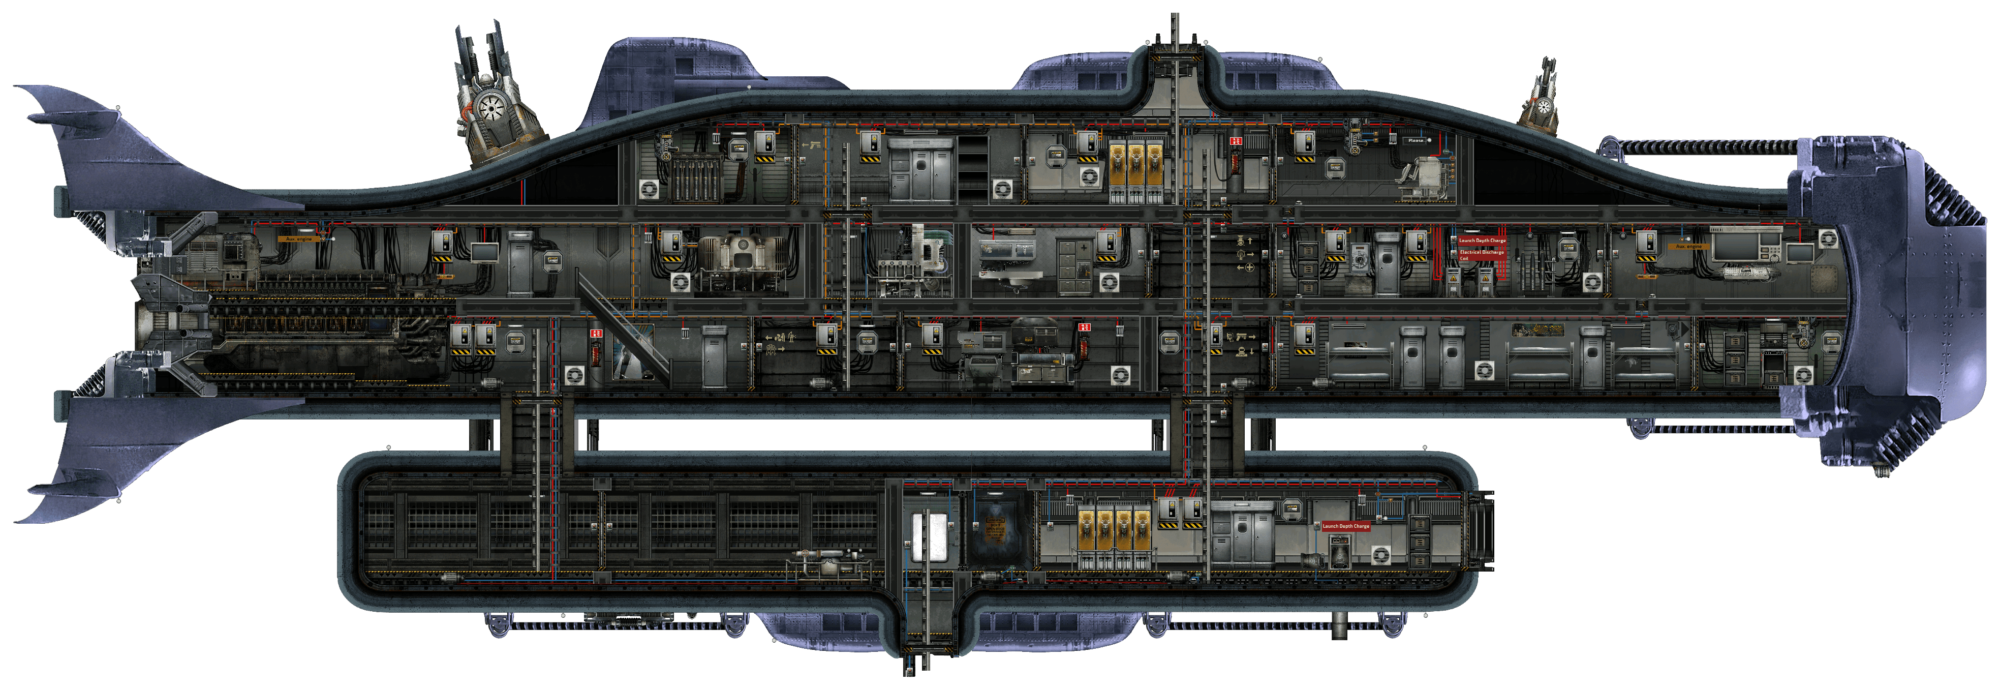
| Remora | Deep diver | A range of customization options are available for Remora. In this model, some of the main hull space has been replaced by a detachable ballast and a remote-controlled drone. A large crew is needed to operate this submarine. | 16,000 mk |
Improvement
Subs may have their hulls and systems upgraded in a variety of ways to improve durability and effectiveness. These are purchased from the engineering crew chief at any station, who is usually in the station engineering section with the reactor and the oxygen generator, plus a fabricator can also spawn randomly in this area. They can be seen wearing the Crew Chief’s Outfit and an unpowered Headset with the Upgrade symbol above them. They also possess a Wrench, a Screwdriver, a Diving Mask, a loaded Revolver, and a Toolbox containing the same items as their sub selling partner.
The crew chief offers multiple Upgrades per Upgrade category to further improve them, but each additional Upgrade in the same category also costs more than the one before. Thus, more money buys more and nicer things. Each sub may be upgraded independently of all the other subs, so how many different subs the player chooses to invest their hard-earned marks in is up to them. The crew chief also offers sub Maintenance services to ensure the safety of the crew on their next trip, provided they can afford such services.
When purchasing and switching to a new submarine, it will only be delivered and available for use once the crew leaves the Outpost. During this period, the Upgrade interface will become inaccessible as the crew chief isn’t able to work on any of the crew’s newly purchased subs until they have been delivered.
The pricing of their Upgrades and Maintenance services is dependent on the RP of the current Outpost, specifically 1 RP is equivalent to 0.5% of the price. Therefore, the maximum discount is 50% off at 100 RP, and at -80 RP they will charge 40% extra. Much like Store, the price gets higher beyond -80 RP as the entire Outpost hound for the crew’s blood.
Upgrades
There are 13 parts of a submarine, each with different types of Upgrades and each Upgrade has multiple levels. There is a total of 22 different Upgrades across all parts. Once the first level of an Upgrade is purchased, the second level will cost more than the last by a percentage. Each Upgrade has a different initial and maximum percentage spike in price and depending on the number of levels, the percentage price spike of 2 consecutive levels is different between all Upgrades.
Upgrade Price Calculation
An Upgrade has Y levels in total and its first level costs X1 marks, then X2, X3,… then pre-final level costs XPre-Max and final level costs XMax. Its initial cost increase is A%, maximum cost increase for the last level is B% and Z% = (B% — A%) / Y is the cost increase between each level. Therefore:
After paying X1 money for the first level, the second one will cost X2 = X1 + (A% + Z%).
The third level will then cost X3 = X2 + [A% + (Z% * 2)].
Then the fourth level is X4 = X3 + [A% + (Z% * 3)], and so on…
Until the final level is XMax = XPre-Max + (B% — Z%).
NOTE: Some prices after adding the level’s cost increase become decimal numbers. However, the game doesn’t take the decimal part into account, but only the whole number part as the actual price, which is then used to add the next level’s cost increase. So for instance, even after doing the calculation and the price of a level is X.99 mk (decimal part being 0.99), the actual price that is also displayed in game is just X mk.
The following tables show all values regarding each Upgrade in different Upgrade categories at 0 RP.
Hulls
◎
| Upgrade | Description | Effect per Level | Level Maxed | Initial price increase | Max price increase | Base price | |||||||||||||||||||||||||||
|---|---|---|---|---|---|---|---|---|---|---|---|---|---|---|---|---|---|---|---|---|---|---|---|---|---|---|---|---|---|---|---|---|---|
| Increase submarine hull durability. Makes the walls less vulnerable to damage and allows the submarine to dive deeper without getting crushed by pressure. | 10% Additional Wall Health
5% Deeper Crush Depth |
10 | 15% | 25% | 2,000 mk | ||||||||||||||||||||||||||||
|
Junction Boxes
◎◎◎◎◎◎
| Upgrade | Description | Effect per Level | Level Maxed | Initial price increase | Max price increase | Base price | |||||||||||||||||||||||||||
|---|---|---|---|---|---|---|---|---|---|---|---|---|---|---|---|---|---|---|---|---|---|---|---|---|---|---|---|---|---|---|---|---|---|
| Decrease the probability of fires occurring. | -3% | 5 | 15% | 20% | 1,000 mk | ||||||||||||||||||||||||||||
|
|||||||||||||||||||||||||||||||||
| Resist damage from excessive voltage. | 2% | 10 | 10% | 15% | 1,500 mk | ||||||||||||||||||||||||||||
|
Pumps
◎◎◎◎◎◎
| Upgrade | Description | Effect per Level | Level Maxed | Initial price increase | Max price increase | Base price | |||||||||||||||||||||||||||
|---|---|---|---|---|---|---|---|---|---|---|---|---|---|---|---|---|---|---|---|---|---|---|---|---|---|---|---|---|---|---|---|---|---|
| Increase the speed at which water is pumped in or out of the sub. | 5% | 10 | 15% | 25% | 2,000 mk | ||||||||||||||||||||||||||||
|
|||||||||||||||||||||||||||||||||
| Decrease power consumption. | -1% | 10 | 15% | 20% | 1,000 mk | ||||||||||||||||||||||||||||
|
Supercapacitors
◎◎◎◎◎◎
| Upgrade | Description | Effect per Level | Level Maxed | Initial price increase | Max price increase | Base price | ||||||||||||
|---|---|---|---|---|---|---|---|---|---|---|---|---|---|---|---|---|---|---|
| Increase maximum energy storage capacity. | 5% | 5 | 20% | 25% | 2,000 mk | |||||||||||||
|
||||||||||||||||||
| Increase maximum recharge rate. | 5% | 5 | 20% | 25% | 2,000 mk | |||||||||||||
|
Batteries
◎◎◎◎◎◎
| Upgrade | Description | Effect per Level | Level Maxed | Initial price increase | Max price increase | Base price | ||||||||||||
|---|---|---|---|---|---|---|---|---|---|---|---|---|---|---|---|---|---|---|
| Increase maximum energy storage capacity. | 10% | 5 | 20% | 25% | 2,000 mk | |||||||||||||
|
||||||||||||||||||
| Increase maximum recharge rate. | 5% | 5 | 20% | 25% | 2,000 mk | |||||||||||||
|
Fabricators
◎◎◎◎◎◎◎
| Upgrade | Description | Effect per Level | Level Maxed | Initial price increase | Max price increase | Base price | |||||||||||||||||||||||||||
|---|---|---|---|---|---|---|---|---|---|---|---|---|---|---|---|---|---|---|---|---|---|---|---|---|---|---|---|---|---|---|---|---|---|
| Decrease the time needed to fabricate items. | 5% | 10 | 15% | 25% | 2000 mk | ||||||||||||||||||||||||||||
|
|||||||||||||||||||||||||||||||||
| Lower the skill levels required for item fabrication. | -3% | 5 | 20% | 25% | 2,000 mk | ||||||||||||||||||||||||||||
|
|||||||||||||||||||||||||||||||||
| Decrease power consumption. | -1% | 10 | 15% | 20% | 1,000 mk | ||||||||||||||||||||||||||||
|
Deconstructors
◎◎◎◎◎◎
| Upgrade | Description | Effect per Level | Level Maxed | Initial price increase | Max price increase | Base price | |||||||||||||||||||||||||||
|---|---|---|---|---|---|---|---|---|---|---|---|---|---|---|---|---|---|---|---|---|---|---|---|---|---|---|---|---|---|---|---|---|---|
| Items will be deconstructed faster. | 5% | 10 | 10% | 15% | 1,500 mk | ||||||||||||||||||||||||||||
|
|||||||||||||||||||||||||||||||||
| Decrease power consumption. | -1% | 10 | 15% | 20% | 1,000 mk | ||||||||||||||||||||||||||||
|
Weapons
◎◎◎
| Upgrade | Description | Effect per Level | Level Maxed | Initial price increase | Max price increase | Base price | |||||||||||||||||||||||||||
|---|---|---|---|---|---|---|---|---|---|---|---|---|---|---|---|---|---|---|---|---|---|---|---|---|---|---|---|---|---|---|---|---|---|
| Decrease power consumption. | -5% | 5 | 15% | 20% | 1,500 mk | ||||||||||||||||||||||||||||
|
|||||||||||||||||||||||||||||||||
| Increase the rotation rate of all guns when operated by insufficiently skilled crew. | 10% | 10 | 20% | 25% | 1,000 mk | ||||||||||||||||||||||||||||
|
|||||||||||||||||||||||||||||||||
| Increase the view range of all weapons. | 8% | 5 | 15% | 20% | 4,000 mk | ||||||||||||||||||||||||||||
|
Loaders
◎◎◎◎
Loaders do not have any unique Upgrades, only general Machine Repairs Upgrades.
Engines
◎◎◎◎◎◎
| Upgrade | Description | Effect per Level | Level Maxed | Initial price increase | Max price increase | Base price | |||||||||||||||||||||||||||
|---|---|---|---|---|---|---|---|---|---|---|---|---|---|---|---|---|---|---|---|---|---|---|---|---|---|---|---|---|---|---|---|---|---|
| Increase maximum speed. | 5% | 5 | 15% | 20% | 3,500 mk | ||||||||||||||||||||||||||||
|
|||||||||||||||||||||||||||||||||
| Decrease power consumption. | -1% | 10 | 15% | 20% | 1,000 mk | ||||||||||||||||||||||||||||
|
Reactors
◎◎◎◎◎◎◎
| Upgrade | Description | Effect per Level | Level Maxed | Initial price increase | Max price increase | Base price | |||||||||||||||||||||||||||
|---|---|---|---|---|---|---|---|---|---|---|---|---|---|---|---|---|---|---|---|---|---|---|---|---|---|---|---|---|---|---|---|---|---|
| Increase reactor power output. | 2% | 5 | 15% | 20% | 2,500 mk | ||||||||||||||||||||||||||||
|
|||||||||||||||||||||||||||||||||
| Decrease fuel consumption rate. | -7% | 5 | 20% | 25% | 1,500 mk | ||||||||||||||||||||||||||||
|
|||||||||||||||||||||||||||||||||
| Increase the time reactors can stay at critical temperature before meltdown. | 10% | 10 | 10% | 15% | 1,000 mk | ||||||||||||||||||||||||||||
|
Monitors
◎◎◎◎
Monitors do not have any unique Upgrades, only general Machine Repairs Upgrades.
Oxygen Generators
◎◎◎◎◎◎
| Upgrade | Description | Effect per Level | Level Maxed | Initial price increase | Max price increase | Base price | |||||||||||||||||||||||||||
|---|---|---|---|---|---|---|---|---|---|---|---|---|---|---|---|---|---|---|---|---|---|---|---|---|---|---|---|---|---|---|---|---|---|
| Increase the amount of oxygen generated. | 5% | 5 | 10% | 15% | 2,000 mk | ||||||||||||||||||||||||||||
|
|||||||||||||||||||||||||||||||||
| Decrease power consumption. | -1% | 10 | 15% | 20% | 1,000 mk | ||||||||||||||||||||||||||||
|
Machine Repairs Upgrades
These are available for all Upgrade categories except for Hulls and Weapons.
| Upgrade | Description | Effect per Level | Level Maxed | Initial price increase | Max price increase | Base price | |||||||||||||||||||||||||||
|---|---|---|---|---|---|---|---|---|---|---|---|---|---|---|---|---|---|---|---|---|---|---|---|---|---|---|---|---|---|---|---|---|---|
| Equipment will take longer to start deteriorating. | 5% | 10 | 10% | 20% | 2,000 mk | ||||||||||||||||||||||||||||
|
|||||||||||||||||||||||||||||||||
| Equipment will deteriorate more slowly. | -5% | 10 | 10% | 20% | 2,000 mk | ||||||||||||||||||||||||||||
|
|||||||||||||||||||||||||||||||||
| Decrease the amount of time needed to repair equipment when unskilled. | -5% | 5 | 10% | 15% | 1,000 mk | ||||||||||||||||||||||||||||
|
|||||||||||||||||||||||||||||||||
| Decrease the skill level required to repair items. | -5% | 5 | 10% | 15% | 1,500 mk | ||||||||||||||||||||||||||||
|
Maintenance
Keeping the sub and its installations in good condition is crucial for the crew’s survival when traversing the Europa’s ocean. Sub Maintenance can be done manually by anyone, preferably individuals skilled in those aspects, mainly Mechanics.
Manually repairing things can be a tedious and difficult task depending on the structure of a sub and the current state of a sub. The quickest way to maintain a sub is to just stop by an Outpost, spend money in Maintenance services, and get everything repaired automatically instead.
However, things like shuttles (drones) that come with certain subs can’t be recovered manually if they get destroyed or the crew happens to lose them along the way. The only way to retrieve the lost shuttle is to replace it for a new one in Maintenance.
There are 2 types of services in Maintenance: Repair and Replace. The repair service is available for purchase once per visit to an Outpost. The replace service is only available for subs with built-in shuttles that have lost said shuttles and also only purchasable once per visit to an Outpost.
The price of the services is shown below at 0 RP.
| Service | Price |
|---|---|
 Repair All Walls Repair All Walls
|
500 mk |
 Repair All Items Repair All Items
|
500 mk |
 Replace Lost Shuttles Replace Lost Shuttles
|
1,000 mk |